Demo: Create Customized Installations Using Monitoring
In some cases, you may need not only to repackage a non-silent installation but also to customize it after installation to apply a license code or change the installed application settings and to get a deployment package that includes the installation and its customization.
As you may have learned in the Overview of the MSI Creation Methods chapter, you can repackage such installations using the Capture System Changes option of repackaging. It allows you not only to monitor an installation but also to monitor any changes performed in Windows and create a deployment package reproducing those changes. This very powerful feature of EMCO MSI Package Builder allows you to create any type of installation quickly and easily. Let's have a look at some examples of how you can use it.
Create a Customized Firefox Installation
Let’s suppose we need to distribute Firefox across a local network. The standard Firefox installation doesn't work silently, so we need to repackage it into an MSI. An additional requirement here is that the Firefox installation should show our company home page at start and should have certain changed proxy settings. Those changes can be applied in Firefox options after installation, so we need to monitor the installation and application customization steps to create the required MSI.
Step 1. Open the Repackage Installation wizard
As the first step, you need to open the Repackage Installation wizard. If it isn't opened automatically, press the Repackage Installation button in the Home Ribbon page, read the welcome information and press the Next button.
Step 2. Select the Monitoring option
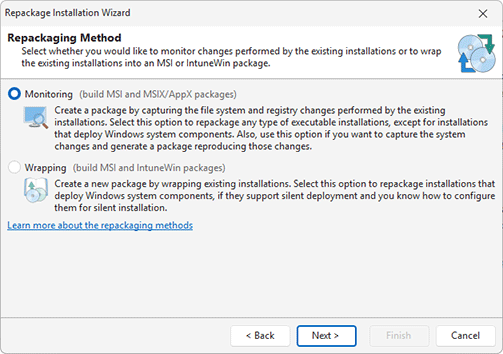
We are going to use installation monitoring, so select the corresponding option and press the Next button to proceed Pic 1.
Step 3. Select the Monitor on This Computer option
The program allows performing repackaging on the local computer, in Windows Sandbox or on an existing virtual machine. In this tutorial, we will repackage an installation on the local computer, so select the Monitor on This Computer option and proceed to the next step. To learn how to repackage an installation in Windows Sandbox or an existing virtual machine, refer to the Selecting monitoring environment chapter.
Step 4. Select the Capture System Changes option
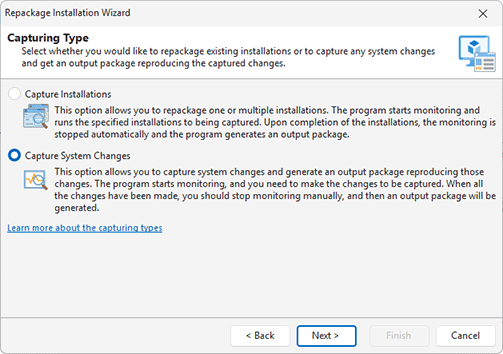
We need to monitor not only the Firefox installation but also the post-install customization, so we cannot rely on automatic monitoring stopping, that is provided by EMCO MSI Package Builder for installations repackaging. As you learned in the Overview of MSI Creation Methods chapter, we need to use Capture System Changes to stop monitoring manually, so select the corresponding option and press the Next button Pic 3.
Step 5. Check the repackaging best practices
When you use monitoring, you need to follow the repackaging best practices to get accurate repackaging results. Review the recommendations displayed by the wizard, make sure that you perform repackaging in a clean environment and follow other best practices, and then press the Next button. You can learn more about this topic in the Overview of Repackaging Best Practices chapter.
Step 6. Prepare the computer for monitoring
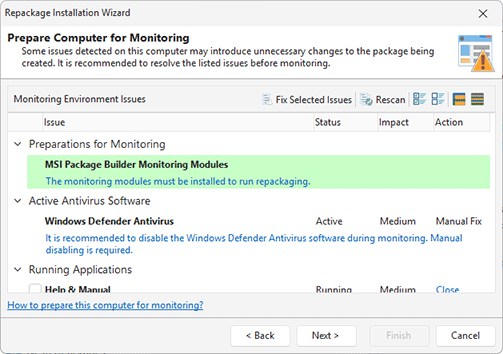
The program automatically checks the computer for potential monitoring problems and displays the discovered issues Pic 4. The program checks the status of the Windows services, such as Windows Update and Windows Search, detects if the antivirus is disabled and determines the list of running applications. All those services and applications may introduce unnecessary changes to the package being created. If any issues are detected, you need to follow the displayed instructions. To resolve the environment issues automatically, select the displayed items and click the Fix Issues button. Once all the issues have been resolved, you can proceed to the next step.
Step 7. Specify the project name
EMCO MSI Package Builder will automatically create an installation project when the monitoring is completed, so you need to enter the project name and press the Next button.
Step 8. Select an output package format
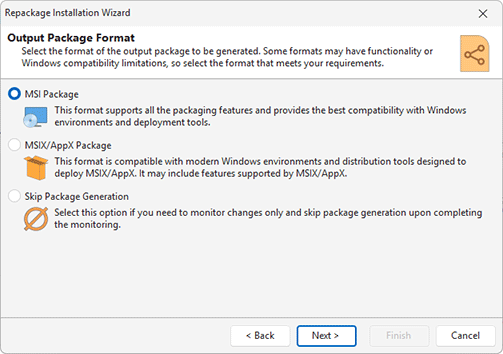
The program enables generating an output package in different formats. For our purposes, we will generate an MSI package, so select the MSI Package option Pic 5.
Step 9. Specify the MSI properties
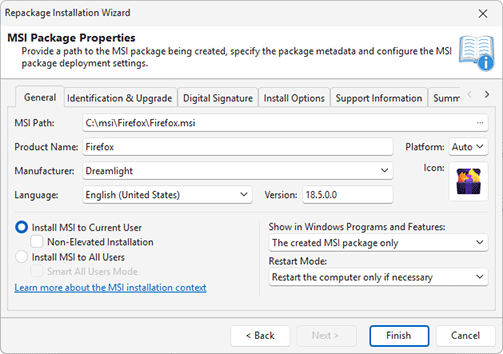
At this step, you need to select the output package type, so select MSI. Also, you need to specify the properties of the MSI package to be generated. You need to specify the path to the MSI file that will be generated automatically after the monitoring ends. You also need to specify Product Name and Version that should be the same as in the repackaged Firefox installation. You can enter your company name as Manufacturer and click on Icon to pick it from the Firefox installation file Pic 6. To learn more about the options in this dialog, refer to the Creating an MSI Package chapter. Press the Finish button when you finish editing the MSI properties.
Step 10. Follow the installation and customization steps
At this step, the monitoring is started, and any file system and registry changes are being captured. Note that you haven't specified the Firefox installation in the wizard, so it won't be started automatically, and you need to find the installation file in Windows Explorer and run it manually. You need to follow the Firefox installation process until Firefox is installed. The difference from installation repackaging lies in the fact that monitoring isn't stopped automatically when the installation is completed, so you can apply the required customization. After Firefox is deployed, you can run the Firefox application and specify your company website as the home page, then set the required proxy settings in the program options.
Step 11. Stop the installation and get an MSI package
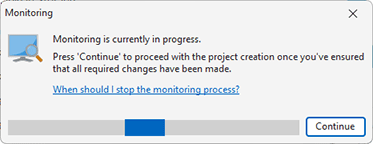
Now that all the Firefox installation and customization steps are finished, you can go back to EMCO MSI Package Builder and press the Continue button to stop the monitoring Pic 7. As you can see, once the monitoring is stopped, EMCO MSI Package Builder generates an MSI package automatically, and you can see it in the Windows Explorer.
After getting an MSI package, you need to test it before you can deploy it across a network. The testing approach is explained in the Packages Testing and Troubleshooting chapter. If you generate an MSI using the trial version of EMCO MSI Package Builder, you get a trial MSI package that can be deployed during 30 days only and that displays a trial message in Windows Programs and Features after the deployment. These limitations do not influence the functionality of the repackaged application, so you can fully test it to make sure it works as expected.
As you can see, installation repackaging using the Capture System Changes option works automatically and is identical to the Capture Installations option except for the requirement to run the repackaged installation and stop the monitoring manually, but that allows you to repackage installations that require customization.
Create a Custom Font Installer
Using repackaging with the Capture System Changes option, you can easily get custom installations for any software deployment or Windows administration task. For example, let's assume that you need to distribute a font across your network, but you only have a font file. Of course, you can create an installation from scratch manually using the visual editors of EMCO MSI Package Builder, but in this case, you need to know a lot of technical details like the folder where the font should be installed, how to register the font, etc. Using Capture System Changes, you can create the required MSI automatically and let EMCO MSI Package Builder capture all the required changes while you install the font manually. Let's see how it works.
Steps 1 - 9. Select the Capture System Changes option and configure the MSI properties
Every time you use system changes capturing, the initial steps are the same: you need to open the Repackage Installation wizard, select the Capture System Changes option and make sure you follow the repackaging best practices. You also need to specify the MSI properties and to use the installation-specific properties such as the MSI path, Product Name and Version. You can see the details steps 1 to 8 in the example above. In the dialog where you need to provide the MSI properties, you should use the Always restart computer after the installation option for Restart Mode. It is required to make the installed font visible in the system after the deployment.
Step 10. Install the font
Now that EMCO MSI Package Builder monitors all the changes, you can select the font file to be installed in Windows Explorer and choose the option to install it from the context menu. Check the Windows Control Panel > Fonts to make sure the font has been installed correctly.
Step 11. Stop the installation and get an MSI package
Once the font installation is finished, you can go back to EMCO MSI Package Builder and press the Continue button to stop the installation and generate an MSI. As a result, the MSI generation is started automatically, and you get an MSI package that installs the font.
Using this approach, you can create an MSI automatically for any system administration task. For example, if you need to create an installation that deploys a set of files and registry keys. At Step 9, you can copy these files to the required target folders in Windows Explorer and create the required registry keys in Registry Editor manually, and EMCO MSI Package Builder will create an MSI that reproduces the captured changes.
