Manual Update
Sometimes the automatic update of inventory data is not a convenient way. In such a case you can always perform the update of inventory information manually. There are four possible scenarios of manual update – you can update the data for the selected Machines, the Machines that were offline during the last update though marked with a red cross, the Machines which data was not updated during last 30 days and custom update. All these scenarios are described below.
Update Selected
To update only some particular Machines select these Machines in the Machine Tree and choose Update Selected option from the drop-down of the Update button located on the tool bar above the Machine Tree. The update process starts and soon you'll have inventory data updated for the selected Machines.
Update Offline only
The Machines that were offline during the last scan or just added manually are marked with a red cross and may not have inventory information at all. To collect inventory data only for these Machines you should choose Update Offline only option from the drop-down of the Update button located on the tool bar above the Machine Tree. The update process starts and soon you'll have inventory data updated for these Machines.
Update Scan Age > 30 days
Lets consider that you do not have to update the inventory data constantly but would like to have at least some accuracy of the information collected about the remote Machines. In such a case you can always update only those Machines which were not scanned during the last 30 days. To perform such kind of an update choose Update Scan Age > 30 days option from the drop-down of the Update button located on the tool bar above the Machine Tree. The update process starts and soon you'll have inventory data updated for those Machines.
Update Custom
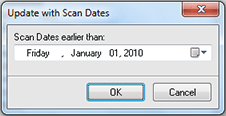
It may be so that 30 days is not a convenient period for update inventory data and you would like to update it more or less frequently. In such a case Network Inventory provides you with the feature of custom update. To perform such kind of an update choose Update Custom option from the drop-down of the Update button located on the tool bar above the Machine Tree. In the dialog opened Pic 1 specify a date you are supposed to believe as the inventory time stamp and press OK button to proceed.
The update process starts and soon you'll have inventory data updated for the Machines matching the specified criteria.
