File System Modifications
The file system modifications are the changes to be performed by a generated package during its deployment to the file system on a target PC. Those changes can include files and folders creation or deletion, file content modification and shortcuts creation. The file system modifications are displayed in the File System view when the File System node of a project is selected in the Projects view. The changes performed during the monitoring process are added to the file system modifications automatically and can be edited only after the project is prepared. Let us take a closer look at configuring file system modifications.
System Folders and Drives
Each file system modification is defined with a full path of the resource, so to add a file you should also define the whole file path. Each path is routed either with a logical drive or with a system folder object. The logical drive simply represents the drive letter, and the system folder object is used to define one of the available system folders. You can review a list of system folders in the System Folder Definition Placeholders section of this document.
|
System Folder The System Folder button from the New group on the Project Ribbon page and on the contextual File System Ribbon page should be used to add a new system folder object to the currently configured project. |
|
Drive The Drive button from the New group on the Project Ribbon page and on the contextual File System Ribbon page should be used to add a new logical drive to the currently configured project. |
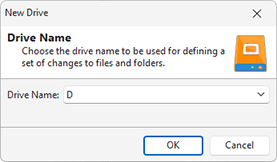
To add a new logical drive definition, you should either choose the New Drive item from the pop-up menu, or click the Drive button from the New group on the regular Project and contextual File System Ribbon pages. Within the New Drive dialog, you are suggested to choose a drive letter Pic 1.
As soon as the drive is added, you can define modifications to files and folders on this drive.
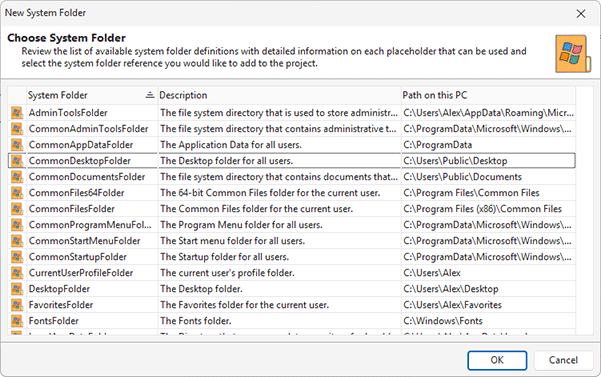
Mostly the programs are installed to specific folders, and the shortcuts are created within the specific folders, that are operating system specific. To reach the same behavior you should use the system folders. To add a new system folder definition to the file system modifications, either choose the New System Folder menu item, or click the System Folder button from the New group on the regular Project and contextual File System Ribbon pages. Within the New System Folder dialog, you are suggested to choose a system folder to add to the project Pic 2.
As soon as the system folder is added, you can define modifications to files and folders in this folder. Each system folder is expanded to a full path during a generated package deployment.
|
Folder The Folder button from the New group on the contextual File System Ribbon page should be used to create a new folder modification within the selected path. |
|
Sync Folder The Sync Folder button from the New group on the contextual File System Ribbon page can be used to create a new folder, which content is synchronized with the selected folder on the file system. |
|
File The File button from the New group on the contextual File System Ribbon page should be used to create a new file modification within the selected path. |
|
Shortcut The Shortcut button from the New group on the contextual File System Ribbon page allows you to create a new shortcut to any target from this project in the selected path. |
MSI Package Builder allows you to define which files and folders should be created, modified or deleted during a deployment package installation.
Folders
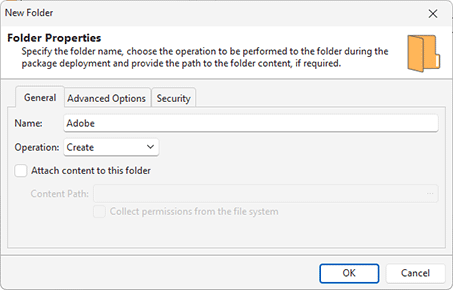
To add a new folder modification, select the drive, folder or system folder to add modification to, and either choose the New > Folder item from the pop-up menu, or press the Folder button from the New group on the contextual File System Ribbon page. The New Folder dialog will appear on the screen to configure the folder modification Pic 3.
While configuring a folder modification, you should specify a folder name and an operation to be performed over this folder during a deployment package installation. You can choose between the Create, Modify and Delete operations. For the folder creation and modification, you can attach content to this folder, using the file system import. Just check the Attach content to this folder option and provide a path to the folder to import its content. If you need to set file system attributes to be applied to the folder, you can configure these attributes on the Advanced Options tab. On the Security tab, you can specify the permissions to be explicitly assigned to this folder.
Sync Folders
When you add a folder and prepare the project, the folder contents is copied into the project storage, as described in the Project Preparation chapter. The project storage is used to generate an output package. So when you add a regular folder, its content is copied to the storage when the project is prepared, but after preparation folder changes aren’t reflected in the generated package.
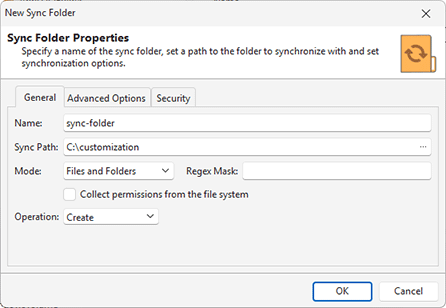
A sync folder allows you to add a folder to the project and let the program use the folder content to generate a package. Any external changes in the folder contents will be reflected in the package generated. To add a new sync folder choose the New > Sync Folder item from the pop-up menu, or press the Sync Folder button from the New group on the contextual File System Ribbon page. The New Sync Folder dialog will appear on the screen to configure the folder modification Pic 4.
A sync folder has the same parameters as a regular folder, but additionally you need to specify a Sync Path to the folder used to provide content to the generated package. The Mode option allows you to retrieve files only, or files and folders that are stored in the sync folder. The Regex Mask option allows you to specify a regular expression to retrieve folder entries. Only resources matching these options will be added to the generated package.
Once a sync folder is added to the project, you can see its content retrieved from the file system according with the configured options. If the sync folder content is changed on the file system, you can refresh it in the project by choosing the Synchronize option in the context menu for the sync folder.
Files
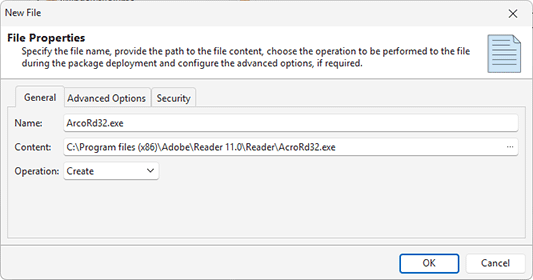
To add a new file modification, select the drive, folder or system folder to add modification to, and either choose the New > File item from the pop-up menu, or press the File button from the New group on the contextual File System Ribbon page. The New File dialog will appear on the screen to configure the file modification Pic 5.
While configuring a file modification, you should specify a file name and an operation to be performed over this file during a deployment package installation. You can choose between Create, Modify and Delete operations. For the file creation and modification, you should define file content in the Content field, providing a path to an existing file to get content from.
While specifying files and folders modifications you can provide a relative path to the Name field – the missing path elements will be automatically created in the file system modifications.
It is also possible to override file system attributes to be used for the file and specify if this file should be treated as persistent, thus not removed during a deployment package uninstall process. These options are available on the Advanced Options tab. On the Security tab, you can specify the permissions to be explicitly assigned to this file.
The advanced options are provided for the experienced users. Please do not modify these options until you are positively sure that this modification is required for the correct package deployment.
Shortcuts
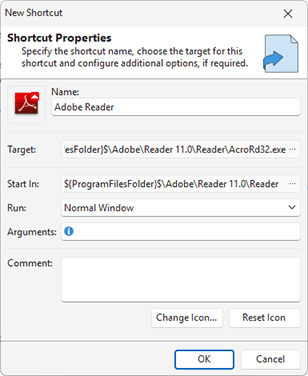
MSI Package Builder allows you to create shortcuts to any item defined in the file system modifications during a deployment package installation. To add a shortcut definition, select the path you would like to create shortcut in and choose the New > Shortcut item from the pop-up menu. Alternatively, you can use the Shortcut button from the New group on the contextual File System ribbon page. The New Shortcut dialog will appear on the screen to let you configure the shortcut Pic 6.
While adding a shortcut, you should provide a name for the shortcut to be created to the Name field and choose the shortcut target in the Target field. Optionally you can configure a set of additional shortcut settings. You can choose a working directory for a shortcut, choose a required window state, provide command-line arguments to be passed to the shortcut target and define a comment for the shortcut. The Arguments field supports the property definition placeholders, so you can use the standard MSI properties while specifying the arguments. See the Property Definition Placeholders section of this document for the list of available placeholders.
Modifying File System Resources
The file system modifications can be changed, deleted and transferred to different location.
|
Edit The Edit button from the Management group on the contextual File System Ribbon page should be used to change the selected file system modification. |
|
Delete The Delete button from the Management group on the contextual File System Ribbon page allows you to delete the selected file system modification from the project. |
|
Copy To The Copy To button from the Management group on the contextual File System Ribbon page should be used to copy the selected file system modifications to another location. |
|
Move To The Move To button from the Management group on the contextual File System Ribbon page allows you to move the selected file system modifications to another location. |
To change the modification, select it in the File System view and either choose the Edit item in the pop-up menu or click the Edit button on the contextual File System Ribbon page. While editing a file system modification, it is possible to configure the same options as during its creation. To delete specific modifications from the project, select them and choose the Delete item from the pop-up menu or click the Delete button on the contextual File System Ribbon page.
If the project contains some files or folders that you don’t want to include into the generated package, you can use the context menu option Exclude from Build. Excluded resources are displayed in the project using the faded icons. Use the context menu option Include in Build for excluded resource to add them into the generated package. The Exclude from Build option allows you to make experiments with the set of resources included into the resulted package with no deleting resources from the project.
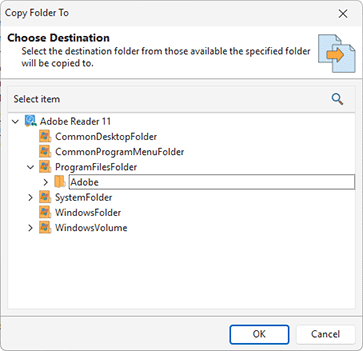
The well-known drag/drop and copy/paste techniques are fully supported for copying and moving file system modifications within a single project and between projects. You can also use the Copy To and Move To buttons from the Management group on the contextual File System Ribbon page to transfer the selected file system modifications to a different location. While using these buttons, you are suggested to select a target location in a dialog and confirm your selection Pic 7.
When a container (drive, system folder or folder) is transferred to another location, all files and folders within the container are transferred as well. Also all files and folders within a container are deleted irreparably when a container is deleted, so be careful while transferring and deleting file system modifications.
Importing Existing Files and Folders
MSI Package Builder allows you to ease the file system modifications definition by using an ability of importing the local file system objects to the project. You can import both files and folders with or without their contents. While importing file system elements, a folder structure is created and files contents are attached automatically. To perform import, you can choose the Import > Folder or Import > File items from the pop-up menu. Alternatively, you can use the File System, Folder and File buttons from the Import groups on the regular Project and contextual File System Ribbon pages.
|
File System The File System drop-down button from the Import group on the Project Ribbon page should be used to add files and folders from the file system to the selected project. |
|
Folder The Folder button from the Import group on the contextual File System Ribbon page allows you to add a folder from the file system with or without its content to the selected project. |
|
File The File button from the Import group on the contextual File System Ribbon page allows you to add a file from the file system to the selected project. |
While importing a folder, you are suggested to provide the path to the folder to be added to the selected project and choose if the folder content should also be imported. You can import files and folders from the specified folder, only files from the specified folder or ignore the folder content. As for importing a file, you should provide the path to the file to be added to the selected project. The file content will be attached automatically.
Exporting Files and Folders
File system resources in the project are stored in encrypted form within the project storage. You can export resources as regular files and folders by saving them to the file system. To do this, select the resource you want to export, choose the Export... option from the context menu, and specify the location where the resource should be saved.
Rolling and Unrolling System Folders
If a deployed file system resource should be stored in one of the Windows system folders, a path to this resource can be different on different machines. To create installations that can be deployed successfully on different machines, it’s recommended to replace absolute deployment paths by system folders in the project. When such an installation is deployed, system folders are automatically resolved to absolute paths suitable for the system, where the installation is deployed. When you use monitoring the program automatically rolls system folders by replacing system paths, but you can also roll system folder manually for a project or for a specific folder.
|
Roll The Roll button from the System Folders group on the contextual File System Ribbon page should be used to replace the selected system folders with their definitions in the selected project. |
|
Unroll The Unroll button from the System Folders group on the contextual File System Ribbon page allows you to expand the selected system folders to their absolute local paths in the selected project. |
Together with rolling and unrolling all system folders in a project, that is a recommended way, it is possible to roll and unroll only the specific folders. To roll a folder select it and choose the Roll item from the pop-up menu, and to perform unroll you should choose the Unroll item. Alternatively, you can use the Roll and Unroll buttons from the System Folders group on the contextual File System Ribbon page. Rolling and unrolling only specific folders is an advanced feature of MSI Package Builder and should be used very carefully.
Now you are introduced to the features used to manage the file system modifications with MSI Package Builder and should be able to define the modifications to be included into a deployment package without any misunderstanding.


