Defining Hosts and Groups
The hosts are displayed in the Hosts view either in the hierarchical or in the flat form, depending on the view configuration. In this chapter, we will describe how to create hosts and groups, configure them for monitoring and delete them when they are no longer needed.
|
Host The Host button from the New Ribbon group on the Home page and on the Hosts page from the Hosts Tools category should be used to add a new host or a range of hosts to be monitored. |
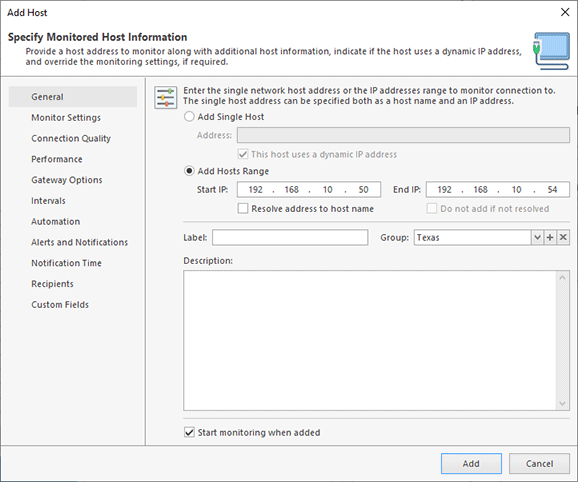
To create a new host or a group of hosts from an IP range, you should press the Host button from the New group on the Home Ribbon page or on the Hosts page from the Hosts Tools category. Alternatively, you can use the New > Host routine from the Hosts Browser view toolbar and pop-up menu. In any case, the dialog will appear on the screen to help you with the creation process Pic 1.
In the Add Host dialog, you should first choose if you would like to add a single host or a range of hosts by specifying their IP addresses. If you would like to add a single host, leave the Add Single Host radio button chosen, enter the host address into the Address field and indicate if this host uses a dynamic IP address. In case of adding a range of hosts, you should provide the start and end IP addresses for the range. To perform the name resolution from IP addresses to host names when adding a range of hosts, you should check the Resolve address to host name option. If the host names resolution is enabled, you can specify if the hosts whose names cannot be resolved should be added to the monitoring data or not by using the Do not add if not resolved option.
The Label and Description fields can be used for easier host identification, and the Group field allows you to select the group this host belongs to. Also, you can provide additional configuration settings using appropriate tabs of the Add Host dialog.
On the Custom Fields page, you can provide values for a set of custom fields defined in the program preferences. Custom fields can be displayed in the Hosts view when corresponding columns are added. Custom fields can be used also within notifications and when integrating with external tools.
If you do not want the monitoring process to start automatically for hosts being added, uncheck the Start monitoring when added box. When you are done with providing the required information, press Add for the host or the hosts to be created. The created hosts will be automatically included into the auto-start list.
|
Group The Group button from the New Ribbon group on the Home page and on the Hosts page from the Hosts Tools category allows you to create a new hosts group. |
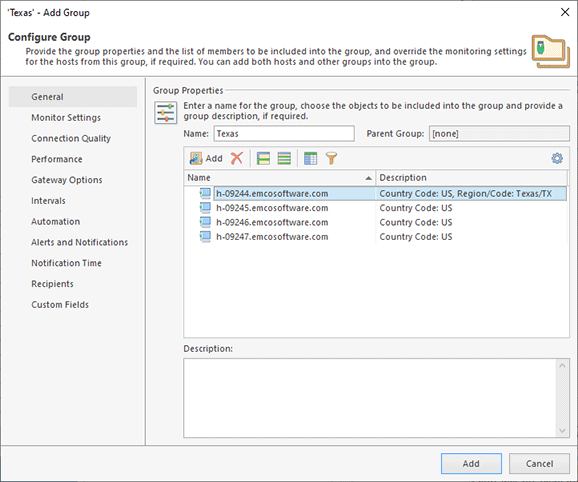
To create a new group of hosts, you should use the Group button from the New Ribbon group on the Home page or on the Hosts page from the Hosts Tools category. Alternatively you can use the Group item from the New button pop-up on the Hosts view toolbar and the appropriate item in the view pop-up menu. The Add Group dialog will appear on the screen to configure the group being created Pic 2.
When creating a group you are proposed to define the group name and description as well as the set of hosts and groups to be included into a group being created. The name and description are used to make it easier for you to identify the group being created in the future. To add a host or a group to the group being created use the Add button from the members tree toolbar or choose an appropriate item from the pop-up menu. The dialog will be displayed to let you choose the hosts and groups to be added. Those items that are already in the group being created are filtered from those available. The Delete button and menu item are used to remove the selected hosts and groups from the group being created. When configuring a group, it is also possible to provide the settings to be applied to hosts within the group, unless overridden, on the corresponding tabs. As soon as the group is configured, press Add to create it.
To edit any host or group, select it and either choose the Edit button from the Organize Ribbon group on the Program page or use the Edit items from the view toolbar and pop-up menu. The editing process is similar to the creation. When some hosts or groups are no longer needed you can delete them using either the Delete button from the Organize Ribbon group on the Program page or use the Delete items from the view toolbar and pop-up menu. When you are deleting hosts and groups they are also deleted from all groups and reports they are currently included into.
Within the Hosts view it is also possible to copy and move hosts and groups between other groups as well as create their duplicates. This can be done either via the drag and drop technique, or via the copy/paste one. The Cut, Copy, and Paste items from the Clipboard Ribbon group on the Program page can be used, as well as the appropriate items from the pop-up menu. It is also possible to copy hosts and groups between different editions of the program and use the export feature. For the details on import and export, refer to the Importing and Exporting Hosts section of this document.


