Importing and Exporting Network
With Remote Installer, you can easily import and export network objects any time you want. You can export one or all of the available Machines, Credentials and Collections to use the exported data as a backup, to share data with your colleagues or simply to import the objects to another instance of the program. The import feature can be used both to import Machines, Credentials, Collections and Collection Members from files created during export and those created manually. For example, you can create a CSV file manually to add Machines by specifying their data in Microsoft Office Excel. This chapter covers the process of importing and exporting network objects.
|
The Import button from the Organize Ribbon group on the Program page can be used to import Machines' data from an XML or CSV file and Credentials, Collections or Collection Members from an XML file with the help of the wizard. |
It is possible to import Machines, Credentials, Collections and Collection Members. Machines can be imported into Remote Installer from XML and CSV files. You can import Machines to the Network node or to any Collection, depending on the selection in the Network view. When running import from the All Machines view, Machines are imported into the Network node. Other network objects can be imported only from the XML format. To import Collections, you should select either the Collections node in the Network view or any Collection. The Credentials import can be launched when the Credentials view is active. The file formats are described in detail the Export/Import Formats section. You can use the files created by the program during previous exports or create new files manually.
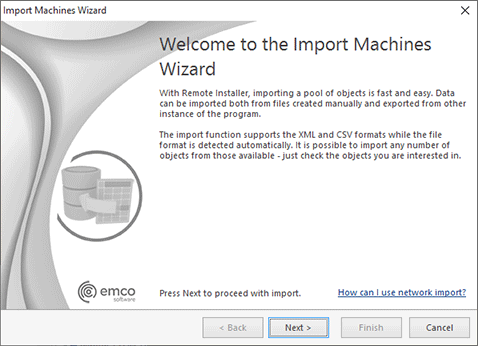
To perform import, press the Import button from the Organize Ribbon group on the Program page. The import wizard will appear on the screen. Let us take a closer look at the import process using the Machines import as an example Pic 1.
The first page of the Import Machines Wizard is the welcome page used to introduce you to the feature the wizard is supposed to help you with. After reading the welcome information, press Next to continue with import.
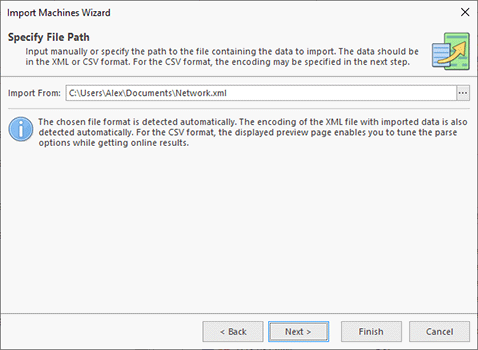
On the next page of the Import Machines Wizard, you are offered to choose the file you are going to import Machines from Pic 2. The file path should be provided to the Import From field. The format of the provided file is detected automatically. The encoding of the XML file with Machines is also detected automatically. For the CSV format, a preview page is displayed where you can tune the parse options while immediately seeing the results.
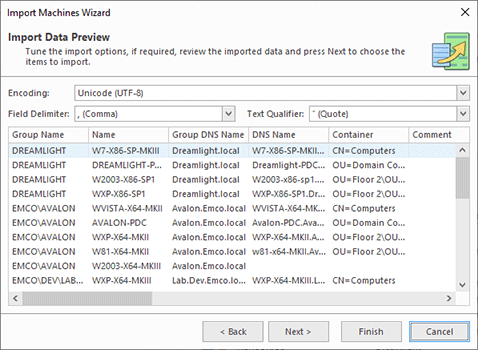
In case of a CSV file, the next page is a preview page. When you change the CSV format options, the preview is refreshed so that you can see if the format options are chosen properly Pic 3.
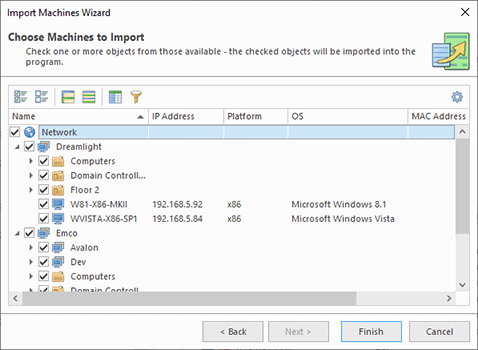
After you have tuned the parse options, press Next to choose the Machines to import. The next page is the page for choosing Machines from those available in the file Pic 4. It is also displayed if you have chosen an XML file containing Machines. By default, all available Machines are chosen for import.
When the Machines to import have been chosen, press the Finish button to proceed with import. As soon as the import is complete, the imported Machines are added to the Network and the All Machines views. The same concept is used for importing Credentials and Collections, importing into Collections, etc.
|
The Export button from the Organize Ribbon group on the Program page can be used to export the selected Machines, Queries, Collections or Credentials from the program to a file that can be used in the future for import. |
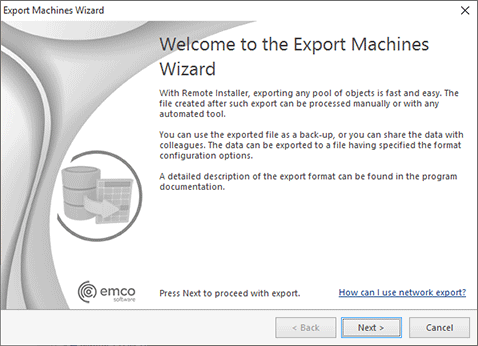
Remote Installer allows you to export Machines, Machine Queries, Collections and Credentials. Machines can be exported to the XML or CSV file format. Other network objects can be exported to the XML file format only. To perform export, select the objects to export and press the Export button from the Organize Ribbon group on the Program page. Let us take a closer look at the network objects export using the Machines export as an example. When you choose to export some objects, the export wizard appears on the screen Pic 5.
The first page of the export wizard is the welcome page used to introduce you to the feature the wizard is supposed to help you with. After reading the welcome information, press Next to continue with export.
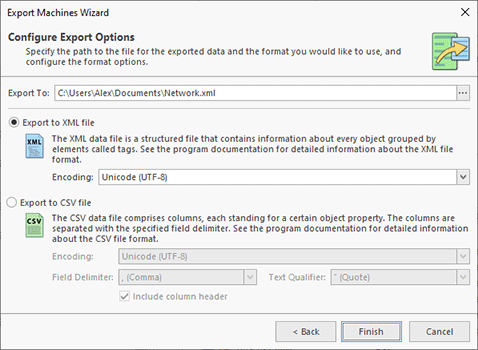
On the next page of the export wizard, you are offered to choose the file you are going to save the Machines data to, the file format and the format options Pic 6. The file path should be provided to the Export To field. For the XML format, you can choose the encoding to be used for saving the objects, and for the CSV file, the text delimiter and the field delimiter should also be specified along with the encoding.
After the file path and the export form have been chosen, press Finish to proceed with export. A file containing the exported objects will be created in the specified path. The file created during export can be used in the future to import the objects back to the program.
Now you are fully introduced to the network objects export and import options available in Remote Installer and can use them in the future to solve your tasks. If you are interested in creating files to import manually, you can read the Export/Import Formats section that follows this section to get detailed information on the file formats.
Export/Import Formats
This section describes the format of the files used by Remote Installer while importing and exporting network objects. The CSV export and import is only supported for Machines; other network objects can only be transferred via XML files. The CSV file format for exporting Machines in general consists of sixteen columns, namely:
Index |
Header |
Description |
Mandatory |
|---|---|---|---|
1 |
GroupName |
The NetBIOS name of the group the Machine is located in. |
Yes |
2 |
Name |
The NetBIOS name of the Machine. |
Yes |
3 |
GroupDNSName |
The full DNS name of the domain the Machine is located in (can be empty for network environments with workgroups). |
No |
4 |
DNSName |
The full DNS name of the Machine. This column can be empty for network environments with workgroups. |
No |
5 |
OrganizationUnit |
The path of the organization unit containing the Machine in the Active Directory database. The path elements should be separated with the '\' character. If the organization unit name contains the '\' character, it should be replaced with '\\'. If you would like to scan and rescan the imported units, you should define the container type for each path element: the organization unit should start with 'OU=' and the container, such as the default one named Computers, with 'CN='. |
No |
6 |
Comment |
The comment for the Machine. |
No |
7 |
Description |
The description for the Machine. |
No |
8 |
GUID |
The unique Machine identifier in the Active Directory database. This column can be empty for network environments with workgroups. |
No |
9 |
Username |
The username used to connect to the Machine. |
No |
10 |
Password |
The password used to connect to the Machine in a strongly encrypted state. This column value cannot be provided manually. |
No |
11 |
IPAddress |
The last retrieved IP address of the Machine. |
No |
12 |
Platform |
The platform of the Machine: x86 or x64. |
No |
13 |
OSVersion |
The major and minor version of the remote Machine's operating system, e.g. '5.2' for Microsoft Windows XP/2003. |
No |
14 |
OSType |
The remote Machine's operating system type: 'Workstation', 'Server' or 'Server R2'. |
No |
15 |
ServicePack |
The service pack version of the remote Machine's operating system, e.g. '2' for Service Pack 2. |
No |
16 |
OSLanguage |
The language code of the remote Machine's operating system, e.g. 'en-US' for English (United States). |
No |
If you are preparing a CSV file for import manually, you have two options: follow the indexes of columns or provide the column headers. If the headers are provided, the columns order is not taken into account. So, for example, if you want to provide the IP addresses for Machines you can create a file only with Name, GroupName and IPAddress columns – the program will determine the fields you are going to import using the header.
Sampe CSV file with Machines
"GroupName","Name","GroupDNSName","DNSName","OrganizationUnit","Comment","Description","GUID","Username","Password","IPAddress","Platform","OSVersion","OSType","ServicePack","OSLanguage" "DREAMLIGHT","W7-X86-SP-MKIII","Dreamlight.local","W7-X86-SP-MKIII.Dreamlight.local","CN=Computers",,,"2f780f0f-6530-43e0-b7b0-e90e3a3689fc",,,"192.168.5.85","x86","6.1","Workstation","1","en-US" "DREAMLIGHT","DREAMLIGHT-PDC","Dreamlight.local","Dreamlight-PDC.Dreamlight.local","OU=Domain Controllers",,,"3a9a9fb2-aa92-4768-b9f5-0883048ff999",,,"192.168.5.74","x64","5.2","Server","2","en-US" "DREAMLIGHT","W2003-X86-SP1","Dreamlight.local","W2003-x86-sp1.Dreamlight.local","OU=Floor 2\OU=Office 203","Windows Server 2003",,"07649a86-36d9-409d-8caa-b2bb0e46e832",,,"192.168.5.94","x86","5.2","Server","1","en-US" "DREAMLIGHT","WXP-X86-SP1","Dreamlight.local","WXP-X86-SP1.Dreamlight.local","OU=Floor 2\OU=Office 204","Windows XP Professional x86 Edition",,"038badad-baf7-41a8-a199-cac381c48b60",,,"192.168.5.93","x86","5.1","Workstation","1","en-US" |
As for the XML files, each file containing exported data has the Data root node that defines the data format and the format version. The following formats are supported:
- Machines, used to represent the exported Machines, respecting the network structure;
- Queries, used to represent the exported standalone Queries and Machines;
- Collections, used to represent the exported Collections;
- Network, used to represent the mix of exported Collections, standalone Queries and standalone Machines and can be imported into the Network view or into a Collection;
- Credentials, used to represent the exported Credentials respecting the network structure.
All XML formats for exporting network objects contain the network structure. Each element in the structure is represented with the Entry node. The root node is always a network node that has its Type attribute set to 'Network'. For all the formats, except Machines and Credentials, there is also the Explorer root node available, which contains Collections, Queries and references to the nodes representing the network item. For example, if there is the same Machine in two Collections, the Machine is only stored once within the network structure, and both the Collections contain references to that Machine. Let us take a look at the available entry types for each data format.
Type |
Formats |
Purpose |
|---|---|---|
Network |
All |
This is the root node of the network structure, which can also contain the credentials to be used as default for connecting to remote Machines. |
Group |
All |
This node represents a Group in the network structure. |
OU |
All |
This node represents an Active Directory container (either Organization Unit or Container) in the network structure. |
Machine |
All |
This node either represents a Machine in the network structure (when located within the Network node) or a reference to a Machine in the network structure. |
Query |
Queries, Collections, Network |
This node represents a query for fetching remote Machines and references a Group in the network structure. |
Collection |
Collections, Network |
This node represents a Collection and contains Queries and references to remote Machines grouped by this Collection. |
Each node representing a network object has a set of properties used to describe the object. The table below contains a joint set of attributes and describes each attribute and its purpose in details.
Attribute |
Description |
|---|---|
The following attributes are used in all formats for all entry types representing the network structure, Queries and Collections. |
|
Name |
The name of a network item. This attribute defines either the name for Active Directory Containers, Queries and Collections or the NetBIOS name for Groups and Machines. |
Comment |
The comment used for a network item. |
Description |
The description defined for a network item. |
GUID |
The unique item identifier in the database. This attribute is not applicable to Machines and Groups in workgroup environments. |
The following attributes are used for the Group, OU and Machine entry types representing the network structure, in all formats. |
|
CNType |
The type of a network item. It should be 'DC' for domains, 'OU' for organization units and 'CN' for other active directory containers, such as the default one named Computers, and Machines. |
Username |
The username used to connect to a network item. |
Password |
The password in a strongly encrypted from used to connect to a network item. This attribute cannot be provided manually. |
The following attributes are used for the Group and Machine entry types representing the network structure, in all formats. |
|
DNSName |
The DNS name of a Machine or the Fully Qualified Domain Name of a Group. |
The following attributes are used for the Machine entries representing the network structure, in all formats, except Credentials. |
|
IPAddress |
The last retrieved IP address of a Machine. |
Platform |
A Machine's platform: x86 or x64. |
OSVersion |
The major and minor version of a remote Machine's operating system, e.g. '5.2' for Microsoft Windows XP/2003. |
OSType |
A remote Machine's operating system type: 'Workstation', 'Server' or 'Server R2'. |
ServicePack |
The service pack version of a remote Machine's operating system, e.g. '2' for Service Pack 2. |
OSLanguage |
The language code of a remote Machine's operating system e.g. 'en-US' for English (United States). |
The following attributes are used for Machine entries in the Collections and Network formats. |
|
ref |
A reference to the Machines that is included into a Collection or a Network node in the network structure definition. |
The following attributes are used for Query entries in the Queries, Collections and Network formats. |
|
Condition |
The Query condition to be used for fetching remote Machines. |
ref |
A reference to the Group that should be used to fetch Machines from in the network structure definition. |
The following attributes are used for Collection entries in the Queries, Collections and Network formats. |
|
Condition |
The condition to be used for the Machines Filter. |
OverrideMode |
The sign that the Machine querying options are overridden for this Collection. The value is either 'yes' or 'no'. |
Mode |
The overridden querying source: '0' to fetch Machines from the entire Network and '1' to select Machines from the program database. |
OverrideCache |
The sign that the filtering options pertaining to the property values cache are overridden for this Collection. The value is either 'yes' or 'no'. |
UseCache |
The overridden sign showing if it is allowed to use cached property values for filtering. |
PropsMeasurement |
The overridden expiration measurement unit of the operating system properties cache: '0' for minutes, '1' for hours, '2' for days. |
PropsExpire |
The overridden number of measurement units (minutes/hours/days) for the time span defining the properties cache expiration interval. |
InventoryMeasurement |
The overridden expiration measurement unit of the software inventory cache: '0' for minutes, '1' for hours, '2' for days. |
InventoryExpire |
The overridden number of measurement units (minutes/hours/days) for the time span defining the software inventory cache expiration interval. |
Sample XML file with network objects
<?xml version="1.0" encoding="utf-16"?> <Data Version="3" Format="Machines"> <Entry Type="Network"> <Entry Type="Group" Name="DREAMLIGHT" DNSName="Dreamlight.local" CNType="DC" Comment="Main office of Dreamlight branch" GUID="fa2a57e1-36a2-41d4-84f6-a4783412ddb8" Username="admin" Password="0j1pfppZgRecS+YRdh3XRX/u55YKZu8GTVXHVF11KJ0if89r4QxkPUbQQzlUU6ka"> <Entry Type="OU" Name="Computers" CNType="CN" Comment="Default container for upgraded computer accounts" GUID="aec2b844-3ad7-4aa6-8307-7ae4f6476ed1"> <Entry Type="Machine" Name="W7-X86-SP-MKIII" DNSName="W7-X86-SP-MKIII.Dreamlight.local" CNType="CN" GUID="2f780f0f-6530-43e0-b7b0-e90e3a3689fc" IPAddress="192.168.5.85" Platform="x86" OSVersion="6.1" OSType="Workstation" ServicePack="1" OSLanguage="en-US" /> </Entry> <Entry Type="OU" Name="Domain Controllers" CNType="OU" Comment="Default container for domain controllers" GUID="6da86366-77ae-4d56-86c6-e77fc849697f"> <Entry Type="Machine" Name="DREAMLIGHT-PDC" DNSName="Dreamlight-PDC.Dreamlight.local" CNType="CN" GUID="3a9a9fb2-aa92-4768-b9f5-0883048ff999" IPAddress="192.168.5.74" Platform="x64" OSVersion="5.2" OSType="Server" ServicePack="2" OSLanguage="en-US" /> </Entry> <Entry Type="OU" Name="Floor 2" CNType="OU" Comment="Building 5A - Floor 2" GUID="23e9055e-4883-4c52-9702-8c34ba4c12cd"> <Entry Type="OU" Name="Office 203" CNType="OU" Comment="Accounts" GUID="cb63c680-249d-497a-b523-a6c3129a23ef"> <Entry Type="Machine" Name="W2003-X86-SP1" DNSName="W2003-x86-sp1.Dreamlight.local" CNType="CN" Comment="Windows Server 2003" GUID="07649a86-36d9-409d-8caa-b2bb0e46e832" IPAddress="192.168.5.94" Platform="x86" OSVersion="5.2" OSType="Server" ServicePack="1" OSLanguage="en-US" /> </Entry> <Entry Type="OU" Name="Office 204" CNType="OU" Comment="Project Management" GUID="ed8a44b0-0d8e-48fe-8891-6c93c2edadc0"> <Entry Type="Machine" Name="WXP-X86-SP1" DNSName="WXP-X86-SP1.Dreamlight.local" CNType="CN" Comment="Windows XP Professional x86 Edition" GUID="038badad-baf7-41a8-a199-cac381c48b60" IPAddress="192.168.5.93" Platform="x86" OSVersion="5.1" OSType="Workstation" ServicePack="1" OSLanguage="en-US" /> </Entry> </Entry> </Entry> </Entry> </Data> |
Now you are introduced to the formats used for storing the network objects data and can prepare files for manual import or for editing data exported earlier to be used for future imports.

