Uninstall Registry Filters Page
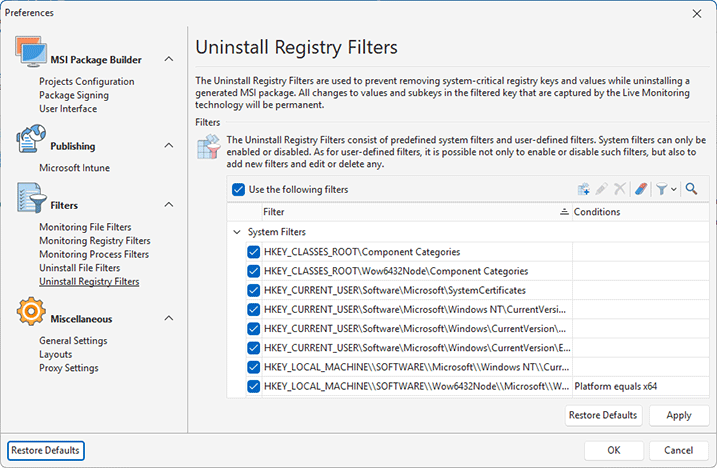
The Uninstall Registry Filters allow you to prevent removing system-critical registry keys and values while uninstalling a generated deployment package. All changes to values and sub-keys in the filtered key that are captured by the Live Monitoring technology are treated as permanent. To configure the Uninstall Registry Filters open the program preferences using the Preferences button from the Application Menu and click the Uninstall Registry Filters link on the navigation bar on the left of the Preferences dialog within the Filters group Pic 1.
The filters are divided into two categories; those are User Filters and System Filters. The system filters are predefined ones and cannot be deleted, but can be disabled, if required, using the Disable Selected item from the pop-up menu. You can then re-enable any filter using the Enable Selected menu item. To enable/disable a filter and to check if it is enabled, you can use the check boxes located on the left of each row representing the filter. It is also possible to refuse filtering registry keys from uninstall by disabling the Use the following filters option.
Toolbar Overview
|
Add Filter The Add Filter button should be used to add a new user-defined Uninstall Registry Filter. |
|
Edit The Edit button allows you to change the selected user-defined Uninstall Registry Filter. |
|
Delete The Delete button allows you to delete the selected user-defined Uninstall Registry Filter items. |
|
Clear User Filters The Clear User Filters button should be used to delete all user-defined Uninstall Registry Filter items. |
|
View Mode The View Mode button is intended to show only the filters that meet specific criteria. You may show all the filters, the filters applicable for the current OS only, or specify a custom criterion for filters. |
As for the user filters, those are the user-defined ones. To add a new filter, use the Add Filter item from the pop-up menu or press the Add Filter button on the toolbar.
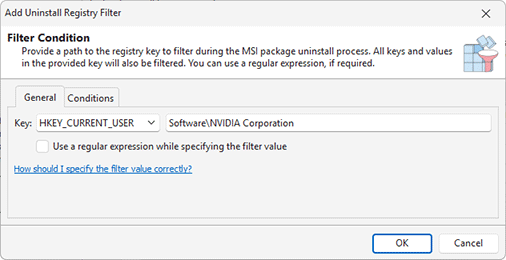
When configuring an Uninstall Registry Filter Pic 2, you should define a registry key to be treated as persistent. No keys and values from the specified key, including the key itself, will be deleted while uninstalling a generated deployment package. To define a registry key, you should first choose the root key from the drop down list and then type in the path to the key in the text edit. If you enable the Use a regular expression while specifying the filter value option, you can define a filter that will treat as permanent all keys matching the expression. See the How should I correctly specify the filter value? section of this document for a detailed description of possible values.
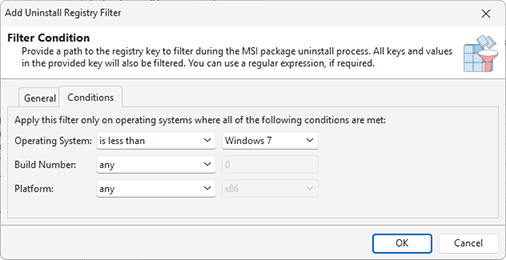
A filter can be used in specific environments if you configure conditions for it. On the Conditions tab Pic 3 you can specify the Operating System, the Build Number (of the OS) and the Platform where the filter should be applied. You can use one or multiple criteria together with the comparison operators to specify environments for the filter. If you specify a condition, you can see its value in the filters list. Using conditions can be helpful if you plan to perform monitoring on different OSs so that you can configure OS/platform-specific filters, if required.
To edit a user-defined Uninstall Registry Filter select it in the filters table and choose the Edit menu item from the pop-up menu or press the Edit button on the toolbar. The filter editing process is similar to the above-stated creation process. To delete the user-defined filters that are no longer needed, you can select those items in the filters table and choose the Delete menu item from the pop-up menu or press the Delete button on the toolbar. It is also possible to delete all user-defined filters using the Clear User Filters menu item and the corresponding button on the toolbar.


