Custom Scan Criteria
Along with the simple File Scan and Registry Scan you can provide a custom scan criteria to be used along with other Detailed Scan options. This criteria allows you to fetch additional file system, registry and services info that can't be fetched with simple scan. To use custom scan criteria first of all you should enable the Execute Custom Scan option on the Settings tab under the Software Information Scan Options.
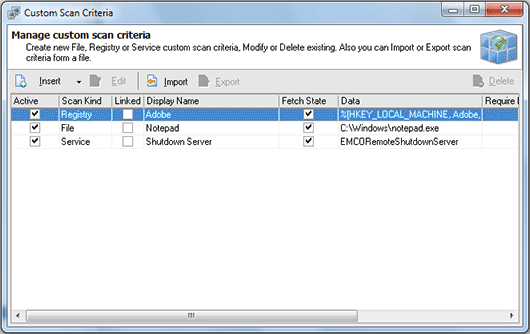
The next step is specifying a criteria itself – select Management Tools > Custom Scan Criteria menu item from the main application menu or select Custom Scan Criteria node under the Management Tools one in the Machine Tree. The Custom Scan Criteria dialog will appear on the screen. Pic 1
The Custom Scan Criteria dialog contains the list of all custom scan criteria defined. You can add a criteria, edit one and delete. Also you can export this list to a file for a future use or import existing from file. It is possible to define file, registry or service scan criteria.
File scan criteria
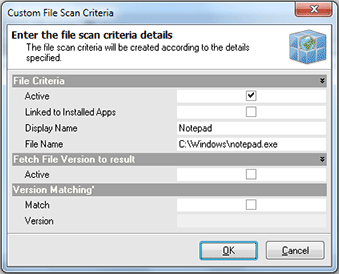
File custom scan criteria allows you to find specific files on the remote Machines and link them to the applications list. To add a file scan criteria choose File item from the Insert button drop-down on the tool bar over the criteria list. The Custom File Scan Criteria dialog will appear on the screen. Pic 2
In the Custom File Scan Criteria dialog you are proposed to specify a Display Name of the application this file belongs to by entering a name or choosing from the applications list if the linkage is enabled and the file to search itself. Optionally you can choose if the version should also match. After all the required information is specified press OK button to proceed. The custom file scan criteria is now added to the criteria list.
Registry scan criteria
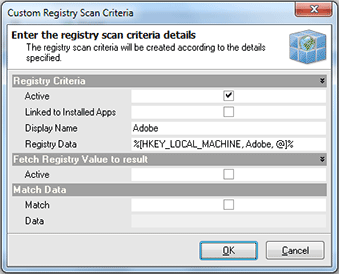
Registry custom scan criteria allows you to find a specific registry data on the remote Machines and link in to the applications list. To add a registry scan criteria choose Registry item from the Insert button drop-down on the tool bar over the criteria list. The Custom Registry Scan Criteria dialog will appear on the screen. Pic 3
In the Custom Registry Scan Criteria dialog you are proposed to specify a Display Name of the application this registry data belongs to by entering a name or choosing from the applications list if the linkage is enabled and registry value-key pare itself. Optionally you can choose if the data of the key should match with the data provided. After all the required information is specified press OK button to proceed. The custom registry scan criteria is now added to the criteria list.
Service scan criteria
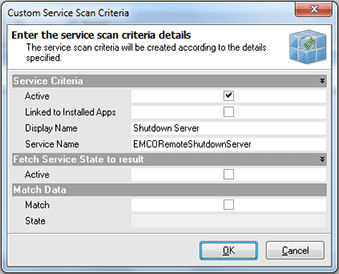
Service custom scan criteria allows you to find specific services on the remote Machines and link them to the applications list. To add a service scan criteria choose Service item from the Insert button drop-down on the tool bar over the criteria list. The Custom Service Scan Criteria dialog will appear on the screen. Pic 4
In the Custom Service Scan Criteria dialog you are proposed to specify a Display Name of the application this service belongs to by entering a name or choosing from the applications list if the linkage is enabled and the service name to search itself. Optionally you can choose if the service state should match with the state provided. After all the required information is specified press OK button to proceed. The custom service scan criteria is now added to the criteria list.
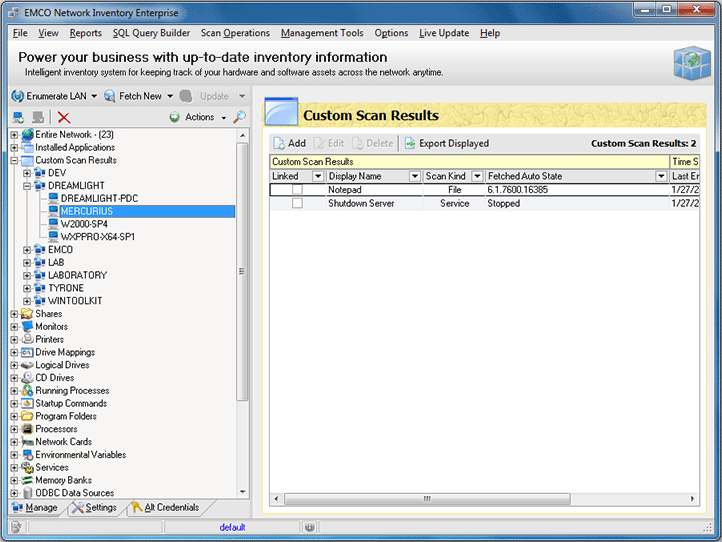
When all the criteria required are specified select the Machines you want to run custom scan for and choose Update Selected option from the drop-down of the Update button located on the tool bar above the Machine Tree. As soon as the update process completes you are about to see the custom scan results for the Machine by selecting its Custom Scan Results child node in the Machine Tree. Pic 5
Now you are familiar with the Custom Scan Criteria functionality and can use this feature of Network Inventory without any difficulties.
