Access Control
Remote Shutdown server supports concurrent access by multiple users. Each user is authenticated by its Windows credentials, but for an enterprise solution it is not enough to authorize access since each action should also be authorized for specific users only so that a simple user cannot perform administrative tasks. In Remote Shutdown the server access is controlled by means of roles.
The roles management is available only when running the Enterprise edition of Remote Shutdown, with the Free and Professional editions all users that are allowed to access the Remote Shutdown service is running on are granted administrative access to the program.
Each role defines a set of enabled privileges. There are three predefined user roles, which are Administrator, Read-Only and No Access. The Administrator role is used to grant users an unlimited access to the server. The Read-Only role allows the users in that role to access the server but does not allow performing any modifications to the server data and configuration. The No Access role should be used to disallow access for specific users that belong to the groups for which access is granted. In addition to these predefined roles, you can create custom roles enabling required privileges for those roles.
The roles may be assigned to users and groups thus granting or disabling access to Remote Shutdown features for specific users. By default, users that are members of the built-in administrator groups on the PC hosting the server are assigned the Administrator role. Other users are not allowed to connect to the server.
It is possible to grant users administrative access without applying the Administrator role to them by adding those users to the Remote Shutdown Administrators Windows group. This option can be used by the server administrator to get protected from losing the administrative role due to mistakes in roles configuration or manipulations performed by other administrators.
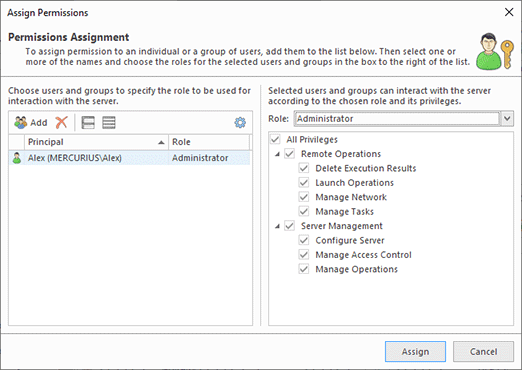
The roles are managed and assigned within the Access Control view. To assign roles to users and/or groups, use the Assign Permissions button in the Permissions part of the Access Control view. A dialog will be opened where you can add a set of principals and choose a role for each one Pic 1.
The assignment process is fast and easy. All you need is adding a list of principals for which you would like to assign roles in the table then selecting a role for each one on the right of the table. You may select multiple principals and assign them the same role. For each role, you can review the set of enabled privileges. To proceed with assignment, press the Assign button.
To assign another role to any principal, select it in the Access Control view and click the Edit button. Alternatively, you can use the corresponding item in the pop-up menu. A dialog will be opened where you can choose a new role for the selected user or group. To delete role assignments, use the Delete buttons and menu item.
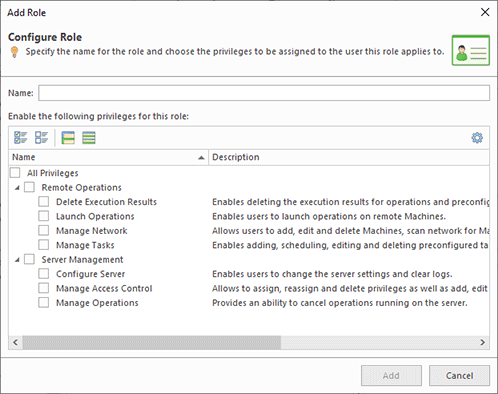
To create a custom role, use the Add button in the Roles part of the Access Control view. A dialog will be opened where you can specify a name for the role to be created and a set of privileges to be granted to users in this role Pic 2.
You can use the Edit button and menu item to change the role in the future. As during creation, it is possible to specify the role name and a set of privileges. To delete specific user-defined roles - if they are no longer required - use the Delete button and menu item. If the role is assigned to principals, you are prompted to decide during the deletion process whether you would like to delete the assignment altogether or reassign another role to those principals.

