Inventory Snapshots
In Remote Installer, software inventory is grouped by snapshots, and a new snapshot is created for each software scan. You can review the available snapshots pertaining to the selection in the Network view or the All Machines view, as well as all the snapshots ever created, within the Inventory Snapshots view.
|
Inventory Snapshots The Inventory Snapshots button from the Inventory Ribbon group on the Software page should be used to review the available snapshots for the selected Machines. |
This section assumes that the Link with Selection mode is enabled for the Inventory Snapshots view and the Specific Snapshots view mode is active; otherwise, the Inventory Snapshots view is not updated after the selection changes and scans completes, and you have to use the Inventory Snapshots button to update the view.
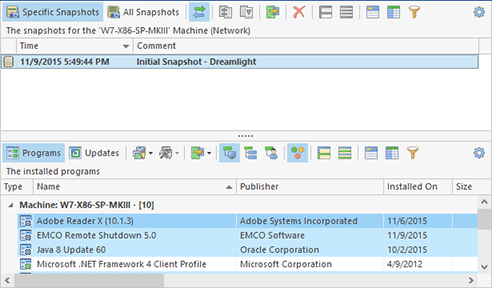
For each snapshot in the Inventory Snapshots view, it is possible to review the list of installed programs and updates retrieved during the scan this snapshot stands for Pic 1.
You can switch between the lists of installed programs and updates using the Programs and Updates buttons on the toolbar. By default, the table with programs displays the same columns as the operating system in the Programs and Features section of the Control Panel, but you can choose more columns from those available using the Choose Columns button on the toolbar. In addition to choosing columns, you can filter the displayed data using the Filter Editor button. Feel free to configure the view any way you need – you can then always roll back to the default view layout using the Reset Layout item from the view configuration menu.
Remote Installer comes with a built-in snapshots comparison engine, which helps you to review changes made between the scans to the installed programs and updates on each remote Machine. Let us take a closer look at this feature.
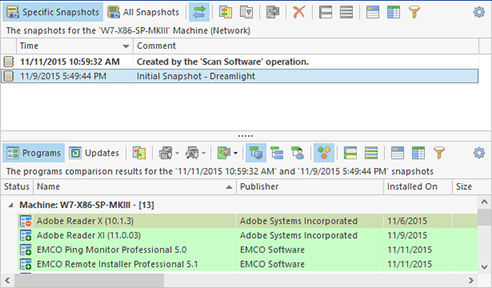
Let's assume we have installed new programs to the same Machines we scanned in the previous section and have scanned them again. The Inventory Snapshots view now displays two snapshots. To compare these snapshots, we simply select both of them in the Inventory Snapshots view and choose the Compare with Each Other item from the pop-up menu. Now, the table in the bottom part of the view displays the snapshots comparison result Pic 2.
The programs we have installed are highlighted in green and are marked with a special icon that means the program was installed between the scans. The programs and updates that have been changed or removed are represented in a similar manner.
To compare programs from the selected snapshot with those from the previous snapshot, there is no need to select both snapshots – you can just select the newer snapshot and choose the Compare with Previous item from the pop-up menu.
For detailed information on the snapshots review and comparison features, address the Inventory Snapshots View section of the document.


