Inventory Snapshots View
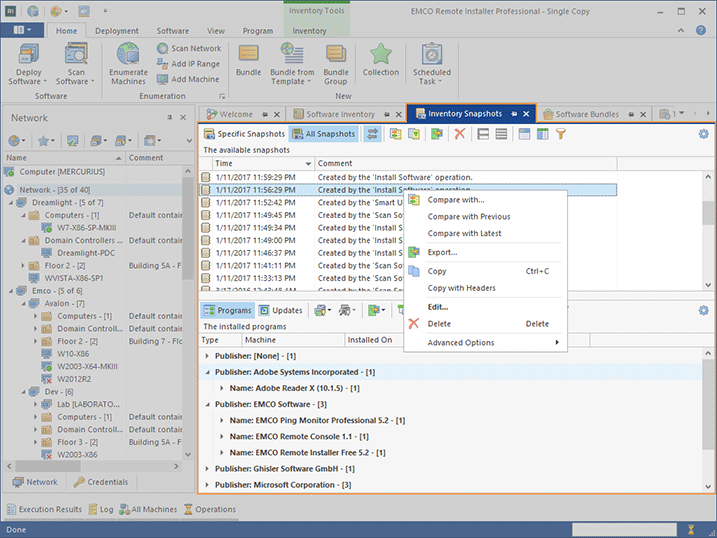
The purpose of the Inventory Snapshots view is to display the snapshots for all scans ever performed and the list of programs and updates for each scan allowing you to compare snapshots. It can be used in two view modes, those are Specific Snapshots and All Snapshots. In the Specific Snapshots mode the view displays only the snapshots for specific Machines – for the view to be automatically refreshed pertaining to the selected Machines the Link with Selection mode should be enabled.
|
Inventory Snapshots The Inventory Snapshots button from the Inventory Ribbon group on the Software page should be used to review available snapshots for the selected Machines. |
The view is automatically switched to the Specific Snapshots mode any time you are requesting the program to display inventory snapshots for the selected Machines or for the Machines from any Collection; and when the entire snapshot review is requested it is automatically switched to the All Snapshots mode.
The Inventory Snapshots view can also be used for the snapshots comparison. Using the comparison feature, you can review which products were installed, uninstalled and updated between specific scans.
In the Inventory Snapshots view, the latest snapshot is displayed in bold font; if the scan is still incomplete (i.e. it is not complete for all of the reviewed Machines), it is displayed in italic.
To review the snapshots and the lists of programs and updates, select the Machines that were scanned in the Network or the All Machines view and switch to the Specific Snapshots view mode. If the Link with Selection mode is enabled, the snapshots list will be automatically refreshed, otherwise you should also choose the Inventory > Inventory Snapshots item from the pop-up menu or press the Inventory Snapshots button from the Inventory Ribbon group on the Software page.
Each snapshot along with the programs and updates lists can be easily deleted when it is no longer needed by using the Delete button on the toolbar. You are offered to choose if you would like to delete the results only for certain Machines or for all the Machines that were processed during the scan the snapshot stands for. You can also delete all snapshots for a certain scope of Machines by selecting them in the Network or the All Machines view and choosing the Inventory > Delete All Snapshots pop-up menu item.
Toolbar Overview
|
Specific Snapshots The Specific Snapshots button should be used to switch the Inventory Snapshots view to the mode, where the software scan results are displayed only for a specific set of Machines. |
|
All Snapshots The All Snapshots button is used to switch the Inventory Snapshots view to the mode, where the snapshots for all scans ever performed on any Machine are displayed. |
|
Link with Selection The Link with Selection button is available in the Specific Snapshots view mode and turns on and off the option of linking the Inventory Snapshots view to the selection within the Network and the All Machines views. When linkage is enabled, the view content is automatically refreshed to display the most relevant snapshots for the selected Machines. |
|
Compare with The Compare with button should be used to compare the selected snapshot with another one from those available. |
|
Compare with Previous The Compare with Previous button should be used to compare the selected snapshot with the previous one. |
|
Export The Export button allows you to export the programs or updates from the selected snapshot to a CSV file. |
|
Delete The Delete button should be used to delete the selected snapshot. It is possible to delete the results for a certain Machines or for all the Machines that were processed during the scan. |
|
Full Expand The Full Expand button should be used to expand all the grouping rows in the table. |
|
Full Collapse The Full Collapse button should be used to collapse all the grouping rows in the table. |
|
Group By Box The Group By Box button should be used to configure the data grouping for the table. |
|
Choose Columns The Choose Columns button should be used to choose the columns to be displayed in the table. |
|
Filter Editor The Filter Editor button should be used to define the custom filter criteria to be applied to the data displayed within the table. |
|
Configuration The Configuration button should be used to change or reset the view layout. |
All the described features of the snapshots part can be reached from the toolbar and the pop-up menu at the top of the Inventory Snapshots view.
The layout of the Inventory Snapshots view is really flexible. You can use both horizontal and vertical orientation of the view parts and switch their places. These features are available from the Configuration menu within the Group Layout section. The Rotate item changes the orientation and the Flip button can be used for the view parts to switch places.
Displaying scan results
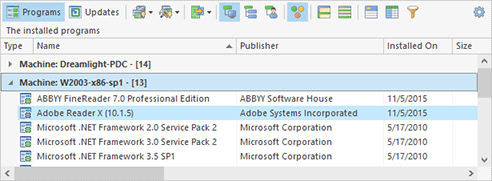
Choosing a specific snapshot leads to displaying the list of programs or updates retrieved during the scan the snapshot stands for Pic 2.
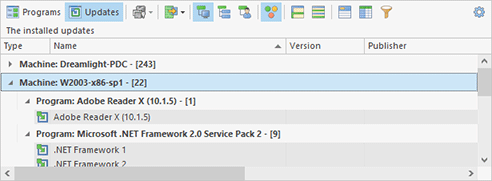
By default, the list of installed programs is displayed. To review the list of installed updates, press the Updates button on the bottom part toolbar Pic 3. You can then switch back to the list of programs using the Programs button.
The type of each item available in the scan results is represented with one of the following icons:
|
- |
a program that can be both repaired and uninstalled with Remote Installer; |
|
- |
a program that can be either repaired or uninstalled with Remote Installer; |
|
- |
a program that can be neither repaired nor uninstalled with Remote Installer; |
|
- |
an update that can be uninstalled with Remote Installer; |
|
- |
an update that cannot be uninstalled with Remote Installer. |
By default, the programs and updates part of the Inventory Snapshots view is organized by Machine name, whereas the updates are also grouped by the program each update is meant for. Such grouping is one of the predefined groupings available. You can also regroup this view by publisher and program name or use custom grouping.
By default, the programs and updates tables initially display the same columns as the operating system in the Programs and Features section of the Control Panel, except for the columns displaying the Machine and Snapshot properties. You can use the Choose Columns button from the table toolbar to review the entire list of available columns and choose the ones you would like to see in the table.
You can then always roll back to the default view layout using the Reset Layout item from the view configuration menu.
Toolbar Overview
|
Programs The Programs button should be used to switch to the list of installed programs. |
|
Updates The Updates button should be used to switch to the list of installed updates. |
|
Smart Uninstall With the help of the Smart Uninstall button, you can perform immediate uninstall of the selected products from the selected remote Machines, execute a smart deployment operation to uninstall those products having provided additional uninstall options, create a scheduled smart deployment task to uninstall those products or add those products to an already existing smart deployment task for uninstall. |
|
Smart Repair With the help of the Smart Repair button, you can perform immediate repair of the selected products on the selected remote Machines using the repair options defined in the program preferences, execute a smart deployment operation to repair those products having provided additional repair options, create scheduled smart deployment task to repair those products or add those products to an already existing smart deployment task for repair. |
|
Export The Export button should be used to export the list of installed programs or updates to a CSV file. |
|
Group by Machine The Group by Machine button should be used to group programs or updates by Machine whereas the updates will also be grouped by the program each update is meant for. This grouping belongs to the predefined ones, and you can always roll back to it using this button. |
|
Group by Publisher and Name The Group by Publisher and Name button should be used to group programs or updates by program/update publisher and name; the updates will also be grouped by the program each update is meant for. This grouping belongs to the predefined ones, and you can always roll back to it using this button. |
|
Custom Grouping The Custom Grouping button should be used to reset the predefined grouping so that you can group programs or updates any way you want. |
|
Highlight Manageability The Highlight Manageability button should be used to enable or disable the view mode when the products that cannot be repaired and/or uninstalled are highlighted. |
|
Full Expand The Full Expand button should be used to expand all the grouping rows in the table. |
|
Full Collapse The Full Collapse button should be used to collapse all the grouping rows in the table. |
|
Group By Box The Group By Box button should be used to configure the data grouping for the table. |
|
Choose Columns The Choose Columns button should be used to choose the columns to be displayed in the table. |
|
Filter Editor The Filter Editor button should be used to define the custom filter criteria to be applied to the data displayed within the table. |
|
Configuration The Configuration button provides access to the option of configuring and resetting the view layout. |
The Inventory Snapshots view allows you to uninstall and repair software from any snapshot. The products that can be managed by Remote Installer are marked with the pinion decorator in the bottom right corner of the program icon. You can immediately uninstall or repair those products using the Smart Uninstall > Quick Uninstall and Smart Repair > Quick Repair menu items, execute or create new smart uninstall or repair tasks pertaining to those products or add them to an already existing smart task using the Uninstall/Repair, New Scheduled Task and Add to Task menu items.
You can easily export the lists of installed programs and updates using the Export button from the bottom part toolbar. It is also possible to copy any number of programs or updates, with or without the column headers, to the clipboard and then paste them to any editor. These features are available in the pop-up menu of the programs and updates table.
As you can see, the snapshots review is quite simple and intuitive: just select the snapshot you would like to review the results for and switch between the programs and updates tables.
Displaying the snapshots comparison
Another important feature of Remote Installer is an ability to compare snapshots. Using this mode, you can see which programs and updates were installed, uninstalled or updated between two different scans. Remote Installer gives you several options for comparing snapshots, namely, a comparison of a selected snapshot with the latest one, a comparison of a selected snapshot with the previous one, and a comparison of a selected snapshot with another one from those available. To perform a comparison of two snapshots, simply select two snapshots in the top part of the Inventory Snapshots view and choose the Compare with Each Other item from the pop-up menu. To compare a selected snapshot with the latest one, choose the Compare with Latest item from the pop-up menu in the top part of the Inventory Snapshots view. Finally, to compare a selected snapshot with the previous one, choose the Compare with Previous menu item. Using the Compare with menu item and the respective button on the toolbar of the Inventory Snapshots view, you can choose the snapshot to compare the selected one with. In such a case, a dialog is displayed on the screen to let you choose the snapshot to compare with.
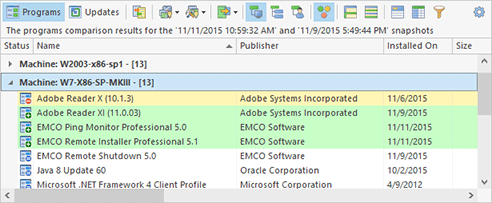
The comparison results are displayed in the bottom part of the Inventory Snapshots view for any type of comparison. Like when reviewing the actual scan results, you can choose between the programs and updates view using the Programs and Updates buttons respectively Pic 4.
The type of each item available in the comparison results is represented with one of the following icons:
|
- |
a program that was installed between the scans; |
|
- |
a program that was updated between the scans; |
|
- |
a program that was uninstalled between the scans; |
|
- |
a program that was not changed between the scans; |
|
- |
a program on a Machine that was not processed during one of the scans; |
|
- |
an update that was installed between the scans; |
|
- |
an update that was updated between the scans; |
|
- |
an update that was uninstalled between the scans; |
|
- |
an update that was not changed between the scans; |
|
- |
an update on a Machine that was not processed during one of the scans. |
When comparing both programs and updates, you can specify if you would like to review all items or only the changed ones and if the changed items should be highlighted within the comparison results table.
Toolbar Overview
|
Programs The Programs button should be used to switch to the installed programs comparison results. |
|
Updates The Updates button should be used to switch to the installed updates comparison results. |
|
Show Differences Only The Show Differences Only button should be used for configuring the view to display only the programs and updates that were installed, uninstalled or updated between the scans. |
|
Smart Uninstall With the help of the Smart Uninstall button, you can perform immediate uninstall of the selected products from the selected remote Machines, execute a smart deployment operation to uninstall those products having provided additional uninstall options, create a scheduled smart deployment task to uninstall those products or add those products to an already existing smart deployment task for uninstall. |
|
Smart Repair With the help of the Smart Repair button, you can perform immediate repair of the selected products on the selected remote Machines using the repair options defined in the program preferences, execute a smart deployment operation to repair those products having provided additional repair options, create scheduled smart deployment task to repair those products or add those products to an already existing smart deployment task for repair. |
|
Export The Export button should be used to export the comparison results to a CSV file. |
|
Group by Machine The Group by Machine button should be used to group programs or updates comparison by Machine, whereas the updates will also be grouped by the program each update is meant for. This grouping belongs to the predefined ones, and you can always roll back to it using this button. |
|
Group by Publisher and Name The Group by Publisher and Name button should be used to group programs or updates comparison by program/update publisher and name, the updates will also be grouped by a program each update stands for. This grouping belongs to the predefined ones, and you can always roll back to it using this button. |
|
Custom Grouping The Custom Grouping button should be used to reset the predefined grouping so that you can group programs and updates comparison any way you want. |
|
Highlight Differences The Highlight Differences button should be used for configuring the view to highlight the programs and updates that were installed, uninstalled or updated between the scans. |
|
Full Expand The Full Expand button should be used to expand all the grouping rows in the table. |
|
Full Collapse The Full Collapse button should be used to collapse all the grouping rows in the table. |
|
Group By Box The Group By Box button should be used to configure the data grouping for the table. |
|
Choose Columns The Choose Columns button should be used to choose the columns to be displayed in the table. |
|
Filter Editor The Filter Editor button should be used to define the custom filter criteria to be applied to the data displayed within the table. |
|
Configuration The Configuration button provides access to the option of configuring and resetting the view layout. |
Like when reviewing the scan results, you can choose the columns to be displayed within the programs and updates comparison tables using the Choose Columns button and apply a custom filter to the displayed data using the Filter Editor button. The Highlight Differences and Show Differences Only items, which are available on the toolbar and in the pop-up menu, should be used to configure the comparison results representation described above. You can export the comparison results to a CSV file using the Export button or copy certain entries to the clipboard, with or without the column headers, using the corresponding items from the pop-up menu.
With Remote Installer, you can get information on all software scans ever performed, review all Machines scanned on a specific date, find out which Machines were scanned and when, generate inventory reports for specific scan dates, etc. All these options are provided by the Inventory Snapshots view and should make your everyday work easier.


