Collections Management
A Collection is a component for building a Machine Queue that describes the scope of Machines to be processed by any operation in Remote Installer. It either groups a set of static Machines or defines a method and conditions for fetching Machines to be operated dynamically. In this section of the document, we will describe how to create and configure Collections within the program scope. Management of embedded Collections defined within the scope of a single Machine Queue is the same; the only difference is that they are stored locally within the Machine Queue.
|
Collection The Collection button from the New Ribbon group on the Home page should be used to create a new Collection to group static Machines and Queries to fetch Machines dynamically. |
|
New The New button from the Collections Ribbon group on the contextual Network page should be used to create a new Collection to group static Machines and Queries to fetch Machines dynamically. |
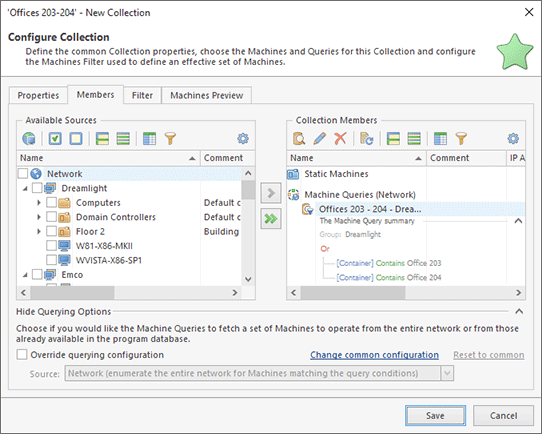
To create a new Collection, you can use the Collection button from the New Ribbon group on the Home page or the New button from the Collections group on the contextual Network page. Alternatively, you can use the New Collection menu item from the Network view pop-up menu and the Collections button drop-down from the toolbar. You can also use the New Collection option of the Add to Collection drop-down to create a Collection initializing it with the selected Machines and Queries. In any case, the New Collection dialog will appear on the screen to configure the Collection being created Pic 1.
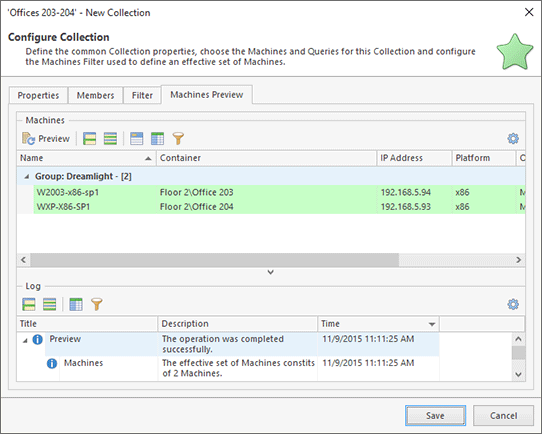
The Collection editor consists of four tabs. The Properties, Members and Filter tabs are used to configure the Collection being created. The Machines Preview tab allows previewing the set of Machines defined by the Collection.
On the Properties tab, you are supposed to specify the common Collection properties such as the Collection name, comment and description. It is recommended that the comment and description fields be filled in to easier distinguish this Collection from others in the future.
The Members tab is used to specify the set of Machines and Queries included into the Collection and to configure the querying options. It is divided in two parts: the tree of Machines and Queries available in the program and the tree of Machines and Queries from the Collection being edited. The available Machines are grouped, and you can choose from the Machines available in the Network view, the All Machines view and other Collections. In addition, if there are any Machines and/or Queries in the clipboard, they are displayed under the Clipboard group within the Additional Sources node. If you have expanded the available Machines scope to include imported Machines or those found during the enumeration, the Additional Sources node also contains the Enumerated node where you can find those Machines. The Machines that are already in the Collection being edited are automatically filtered out from those available and shown again when removed from the Collection. Within the Collection Members part, standalone Machines are grouped within the Static Machines node and Queries are grouped within the Machine Queries node.
To add Machines to the Collection, you should check them in the Available Sources part and press the button with a single right arrow. The checked Machines will appear in the Collection Members part and disappear from the Available Sources part. You can also add all available Machines to the Collection being edited by using the button with a double right arrow.
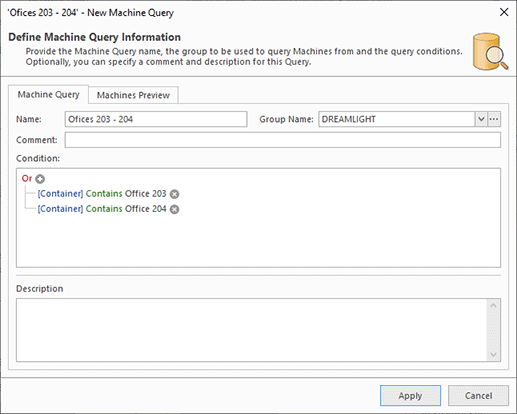
Queries can be copied from Available Sources to Collection Members the same way as Machines. It is also possible to create new Queries using the New Machine Query button and edit queries and query options using the Edit button on the Collection Members part toolbar. Each query retrieves Machines from a single Group depending on the specified query conditions. Those conditions should be defined within the Machine Query editor Pic 2.
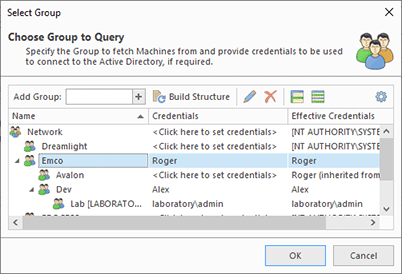
Within the Machine Query editor, you can provide the query name, the group to query Machines from and the query conditions. Optionally, you can also specify a comment and a description for the query. The group is chosen from the drop-down list of available groups. It is also possible to add a new group and configure the credentials to be used for connecting to Active Directory using the  button on the right of the groups list. After pressing this button, the Select Group dialog Pic 3 is displayed.
In the Select Group dialog, the tree of available groups is displayed along with the credentials to be used to connect to Active Directory. You can provide and reset the credentials the same way as for the Credentials view. It is also possible to add a new group by typing its name into the Add Group field and pressing the  button. You can check the provided credentials and build the network structure using the Build Structure button on the Credentials toolbar. After all the required groups have been added and the credentials have been specified, press the OK button to proceed.
After you provide the Machine Query name and the group to retrieve Machines from, you should define the query condition, if required. If the query condition is left empty, all Machines will be queried from this group. The query condition editor is similar to the filter editor used for data filtering. The condition can be applied to the Machine name, the Container and the Last Logon timestamp. The Container condition should contain the Active Directory container path, where '\' is used as a separation for path elements, e. g. Computers\Office 203. If the container unit name contains the '\' character, it should be replaced with '\\'.
On the Machines Preview tab page, you can execute a query by pressing the Preview button. The Machines fetched by the query will be displayed within the Machines part, and the Log part will show if there have been any problems while executing the query.
Machine Queries can fetch Machines either from the network or from the program database. The default querying source is defined on the Collections Settings preference page, but you can override the behavior for specific collections using the querying options group at the bottom of the Members tab and ticking the Override querying configuration checkbox.
To remove Machines or Machine Queries from the Collection being edited, select them in the Collection Members part and press the Delete button from the toolbar. The selected Machines will disappear from the Collection Members part and appear in the Available Sources part. The Machine Queries will simply be removed.
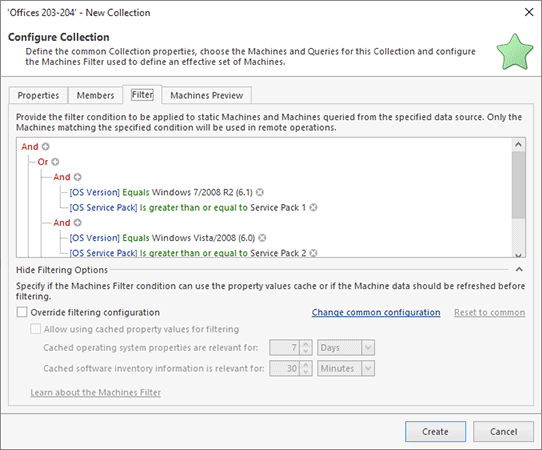
All the Machines grouped within a Collection, both static and those fetched via Machine Queries, can be filtered by their properties such as the operating system version and type, the platform, installed software, etc. The condition to be used for filtering is defined on the Filter tab Pic 4. Refer to the Machines Filters section of this document for details.
After a Collection has been configured, you can press the Preview button to execute all the queries and apply all the filters and review the effective set of Machines defined by this Collection on the Machines Preview page Pic 5.
During the Collection editing process, you can expand the scope of available Machines by using the Expand Scope button on the toolbar and from the pop-up menu. The Expand Scope wizard is similar to the Enumerate Machines wizard, the only difference being that Machines are added to the Available Sources part.
Press the Create button to proceed with creating the Collection. After the Collection has been created, it can be found in the Network view under the Collections node. It can be added to a Machine Queue of any operation.
To edit a Collection, if required, you can select it and choose the Edit button from the Organize Ribbon group on the Program page, the Edit menu item or the Edit button on the toolbar. Alternatively, you can just double-click the Collection. When a Collection is edited, the configuration process is the same as during the Collection creation. When a Collection is no longer needed, you can delete it. To delete a Collection, select it and choose the Delete button from the Organize Ribbon group on the Program page, the Delete menu item or the Delete button on the toolbar. It is also possible to delete any item from an existing Collection. After a Collection has been deleted, it is also removed from all Machine Queues it was used in.
With Remote Installer it is really easy to transfer and back-up Collections. You can use the well-known drag/drop and copy/paste techniques, simply duplicate Collections and export/import them. You can also copy a Collection from this or another EMCO program and paste it into the Collections node. Export and import can also be used to share and back up Collections; refer to the Importing and Exporting Network section for details.
|
Create Snapshot The Create Snapshot button from the Collections Ribbon group on the contextual Network page should be used to create a snapshot of a Collection containing the currently effective set of Machines defined with this Collection. |
|
Preview The Preview button from the Collections Ribbon group on the Network contextual page allows you to review the currently effective set of Machines defined with the selected Collection. |
A Collection defines a set of Machines to operate using Queries. Each Query defines a group to fetch Machines from and the conditions to be used. Filtering may also be applied to a Machines scope. However, it may sometimes be useful to work with standalone Machines currently defined with the Collection. To resolve this issue, the Collection Snapshots are introduced. For each Collection, there can be only one snapshot representing its most relevant result. Snapshots are displayed under the Collections' Snapshots node in the Network view. To create a snapshot from a Collection, you should select this Collection and either click the Create Snapshot button from the Collections Ribbon group on the contextual Network page or choose the corresponding item from the pop-up menu or the Collections button drop-down on the toolbar. All the queries defined in the Collection will be executed, all the filter conditions will be applied, and the snapshot containing the currently effective set of Machines will be added to the Collections' Snapshots node. The query log becomes available on the process completion in the Application Log view.
As it has already been mentioned, you can preview the effective set of Machines while editing a Collection, but it is not required to open the Collection for editing to review it again. You can simply select the Collection and either click the Preview button from the Collections Ribbon group on the contextual Network page, or choose the corresponding item from the pop-up menu or the Collections button drop-down on the toolbar. The effective machines set preview will be opened in a new window and displayed in the same manner as when editing a Collection.
|
Add to Collection The Add to Collection button from the Collections Ribbon group on the contextual Network page should be used to add the selected Machines and/or Machine Queries to a new or an already existing Collection. |
The Collection editing process is not the only way to add Machines and Machine Queries to any Collection. Remote Installer allows you to add the items you have selected within the Network or the All Machines view to any Collection. Simply select those items and choose the required Collection from the Add to Collection pop-up menu. The pop-up menu displays only the first ten Collections. If the required Collection is not displayed and you have more Collections to display, you can click the Choose Collection item under the Collections list and choose the required Collection through the dialog where all the Collections are displayed. To create a new Collection based on the selection, choose the New Collection item under the Collections list. It is also possible to copy Machines and Queries from any view and paste them into any Collection, as well as cut them from any Collection and paste them into another one. The drag-and-drop feature is fully supported, too. You can even import items into a Collection by selecting this Collection and either pressing the Import button from the Organize Ribbon group on the Home page or choosing the corresponding menu item from the pop-up menu.
We've done our best to make the Collections management both easy-to-use and flexible, and we hope you'll be able to solve your management tasks without any difficulties and with full understanding of the process.


