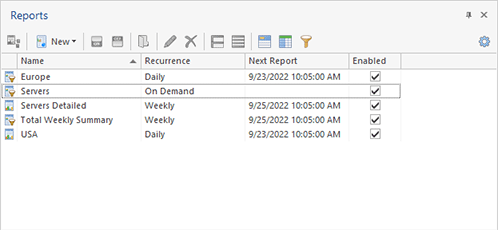
Reports View
The Reports view Pic 1 is by default located on the left of the program main window. It is designed to display and manage preconfigured monitors performance and availability reports to be generated either on demand or on a regular basis.
The icon next to every item represented in the Reports view is used to describe of the item's type and state. Below is the list of icons used:
|
- |
the detailed report that is enabled for generation; |
|
- |
the summary report that is enabled for generation; |
|
- |
the detailed report that is disabled for generation; |
|
- |
the summary report that is disabled for generation. |
As for the problematic situations, the following overlays are used:
|
- |
the report is incorrectly configured and won't be generated; |
|
- |
the report won't be generated, because there no enabled report outputs. |
For the detailed information on different report types and states, you can refer the Preconfigured Reports section of this document.
The Reports view initial state displays the report name, recurrence, next automatic generation time (for regular reports) and the sign if the report is enabled. You can customize the Reports view by choosing other columns to be displayed and filter data to make it feet your needs best – see the Grouping and Filtering Data topic for details. It is always possible to roll back to the default view layout using the Reset Layout item from the Advanced Options menu.
Toolbar Overview
|
Generate The Generate button from the Reports view toolbar should be used to immediately generate the output for the selected enabled reports. |
|
New The New button from the Reports view toolbar allows you to create a new preconfigured monitoring performance and availability report having provided the required properties. |
|
Enable The Enable button from the Reports view toolbar should be used to turn on an ability of generating the selected reports both manually and on a regular basis. |
|
Disable The Disable button from the Reports view toolbar should be used to turn off an ability of generating the selected reports both manually and on a regular basis. |
|
Open Storage The Open Storage button from the Reports view toolbar allows you to open the local reports storage for the selected preconfigured report. |
|
Edit The Edit button from the Reports view toolbar should be used to edit the selected preconfigred report. |
|
Delete The Delete button from the Reports view toolbar is used to permanentrly deleted the selected reports. |
|
Full Expand The Full Expand button from the Reports view toolbar should be used to expand all the grouping rows in the view. |
|
Full Collapse The Full Collapse button from the Reports view toolbar should be used to collapse all the grouping rows in the view. |
|
Group By Box The Group By Box button should be used to configure the data grouping for the Reports view. |
|
Choose Columns The Choose Columns button should be used to choose the columns to be displayed in the Reports view. |
|
Filter Editor The Filter Editor button should be used to define the custom filter criteria to be applied to the data displayed in the Reports view. |
|
Advanced Options The Advanced Options button from the Reports view toolbar opens the view configuration menu where you can reset the layout of the view. |
From the Reports view, it is possible to create new preconfigured reports to be generated either on demand or on a regular basis, control reports enablement, generate, edit and delete reports, etc. All these actions are available on the Reports view toolbar and in view popup menu. The Reporting contextual Ribbon page from the Reporting Tools category is displayed when the Reports view is active and also contains the actions for reports generation and management.
The Reports view fully supports the drag/drop and copy/paste techniques. Via those techniques you can add groups and hosts to the reports members set and duplicate reports. From this view it is also possible to export preconfigured reports, and import them to the program. The corresponding actions are available in the pop-up menu, Organize Ribbon group and Clipboard Ribbon group on the Program page.


