Managing VM Profiles
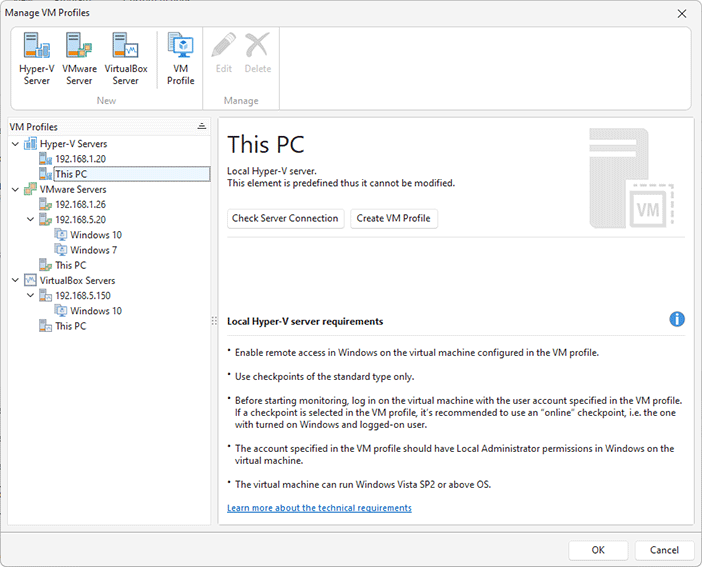
The program stores configurations of virtual machines used for monitoring in VM profiles. To configure VMs, you need to click the Manage VM Profiles button located in the Capture group of the Home tab on Ribbon. VM Profiles Manager is used to configure Hyper-V, VMware and VirtualBox servers and virtual machines hosted on those servers that can be used by the program for repackaging. The profiles manager dialog consists of the toolbar with the main actions located at the top, the list of VM servers and VM profiles located on the left, and the information area located on the right Pic 1.
The profiles manager has the following actions displayed on the toolbar.
|
Hyper-V Server This button allows adding a new Hyper-V server that hosts virtual machines. |
|
VMware Server This button allows adding a new VMware server that hosts virtual machines. |
|
VirtualBox Server This button allows adding a new VirtualBox server that hosts virtual machines. |
|
VM Profile This button allows adding a new profile with the virtual machine configuration. |
|
Edit This button allows changing properties of the selected item. |
|
Delete This button allows deleting the selected items. |
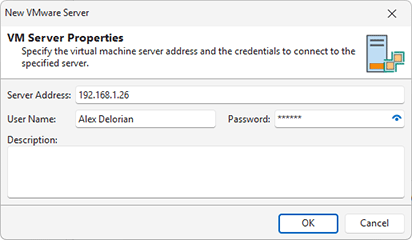
In VM Profiles Manager, you can add Hyper-V, VMware and VirtualBox servers that host virtual machines that you plan to use in the program for repackaging. Note that the program has predefined configurations for local servers displayed in the VM Profiles tree, so that you can create new VM profiles on any of them if you plan to work with virtual machines hosted on the local PC. To add a new remote server, you need to click the Hyper-V Server, VMware Server or VirtualBox Server buttons on the toolbar or select the corresponding options in the context menu of the VM Profiles tree. In the displayed configuration dialog, you need to specify settings for connecting to a VM server Pic 2.
Server configurations for all types of servers are identical. You need to specify the Server Address, Username and Password. After being added, a server appears in the VM Profiles tree, and you can select it there. Press the Check Server Connection button to make sure the server is accessible.
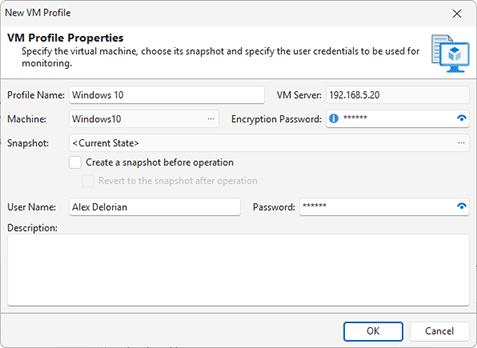
After configuring a server, you can configure a virtual machine by creating its VM profile. On the server, select the option of creating a new VM profile by choosing the corresponding option in the context menu or on the toolbar. As a result, the VM configuration dialog appears Pic 3. It is identical for all types of virtual machines and includes the same options.
In the displayed dialog, you need to specify the Profile Name. This name will be displayed in the VM Profiles tree, and you can see it in the Repackage Installation wizard when you select a VM profile for repackaging. The server can host multiple virtual machines, so you need to press  to choose the required one. After selecting a Machine, you need to configure the Snapshot that will be used for monitoring. Press
  to select the required snapshot. If you would like to use the current actual state of the VM, you can select the <Current State> option.
Depending on the selected snapshot, you can configure the additional options. If <Current State> is selected, you can enable the Create a snapshot before operation option, so the program will automatically create a new snapshot before monitoring. You can also select the Revert to the snapshot after operation option, and the program will automatically revert the VM to the created snapshot at the end of monitoring so that you always use a clean VM for monitoring. If you have selected an existing snapshot, the program allows you to revert the VM to this snapshot automatically at the end of monitoring by selecting the Revert to the snapshot after operation option.
When a new VM profile is created, you can select it in the VM Profiles tree and press the Check Profile button to test the VM. If the VM settings are configured properly, you can see a dialog that displays the discovered environment issues for the VM. Make sure that the VM is configured properly to follow the repackaging best practices. If for some reasons there is no connection to the VM, you will see an error message and you need to troubleshoot the problem.
The program has specific requirements for VM servers and virtual machines depending on the used virtualization provider, the location of the server (a local PC or a remote server), and the virtual machine and OS configuration. It’s recommended to review the Requirements for Virtual Machines chapter to make sure that your VM configuration satisfies those requirements.
Once a VM is properly configured and tested, you can use it for repackaging. Select the VM profile in the Repackage Installation wizard and follow the repackaging process described in the How Monitoring on a Virtual Machine Works chapter.


