Packages Testing and Troubleshooting
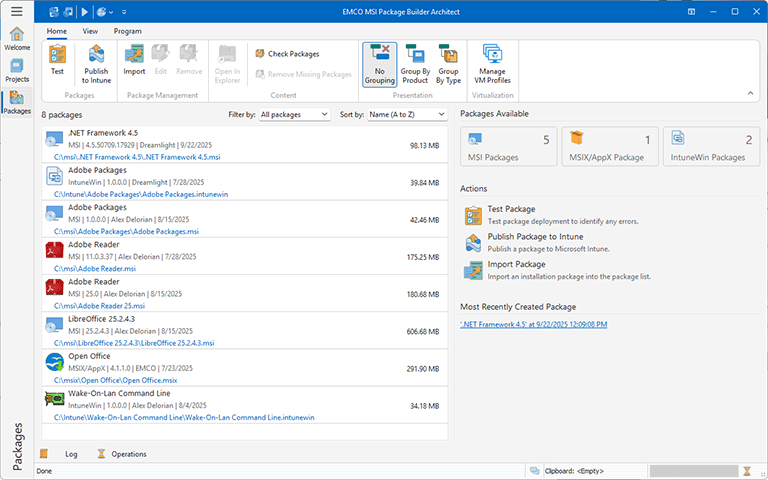
Once an installation package is generated, it needs to be thoroughly tested before being deployed remotely across a network. You can test the package manually by deploying it on a virtual machine with a fresh OS installation, or you can utilize the package testing features provided by the program. The generated packages appear in the Packages view. You can access this view by clicking the corresponding button on the vertical navigator located on the left side of the main screen. This view enables you to test packages and log the installation results. To test a generated package, follow the steps outlined below.
Step 1. Open the Packages view and initiate the test deployment
Click the Packages button on the navigator, located on the left side of the main screen, to open the corresponding view. From the list of displayed packages, select the one you wish to test and click the Test Deployment button found in the Actions group on the right side of the screen Pic 1.
Step 2. Choose the testing environment
In the dialog that appears, select the environment where you wish to test the package. Options include deploying the package on the same computer the program is running, deploying in Windows Sandbox, or deploying to a virtual machine. For accuracy, it’s recommended to test in a clean environment consistent with the best practices. Therefore, choose the Deploy on an Existing Virtual Machine option and select an existing VM profile or create a new one.
Step 3. Choose the deployment test mode
During package testing, the program can verify the installation only, both installation and execution of the installed program, or conduct a full test that includes installation, execution, and uninstallation. For the purposes of this tutorial, a comprehensive assessment is required. Therefore, select the Full option to thoroughly test all aspects of the package.
Step 4. Run the test
Click Finish to initiate the test. The program will then establish a connection to the selected test environment, transfer the package, and perform deployment.
In the first testing phase, the package is deployed to the test environment. Deployment is automated, and the program automatically detects and logs any errors that occur during this process.
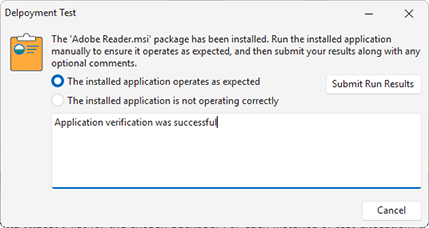
After deploying the package, MSI Package Builder will display a dialog box. In this box, you need to confirm whether the deployed application functions correctly. To do so you need to manually run the deployed application in the test environment to check its functionality. After testing, choose the appropriate option in the dialog box to indicate if the application worked as expected. Include any necessary comments. Finally, click Submit Run Results to proceed to uninstallation testing Pic 2.
The program automatically performs the package uninstallation and detects and logs any errors that occur during this process.
Step 5. Check test results
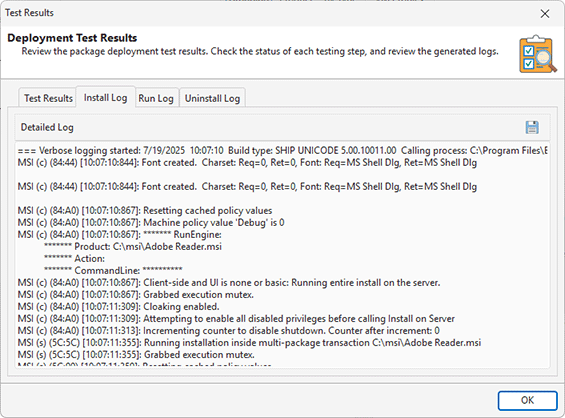
Once the test has finished, locate the new entry that displays the test results in the package's Actions History. To examine the test outcomes and logs, click View Details. For each testing phase, the results will be displayed. Any detected issues will be noted here. For detailed installation and uninstallation logs created during the test, click the View Log link. For instance, you can access the Install Log to review the detailed log generated by the MSI installation Pic 3.
If you encounter any issues during package testing, you can either edit the corresponding project to address them or redo the repacking process.
Troubleshooting
Many problems can be resolved simply by using a clean environment for repackaging and following the best practices explained in the Overview of the Repackaging Best Practices chapter. Below, you can find a list of the most common MSI problems and recommendations on how to resolve them.
A file is locked during MSI install
This problem usually happens when you don't use a clean environment for repackaging, and an unrelated process, such as an antivirus running in the background during the repackaging, generated a file change that is captured and included into the MSI. When you deploy the MSI, it tries to modify the file, but the file is in use by the running antivirus, therefore the MSI deployment cannot be finished. To resolve this problem, you need to repeat the repackaging using a clean environment as suggested in the repackaging best practices.
A file is locked during MSI uninstall
This problem is similar to the one described above. An MSI includes a change initiated by an unrelated application, which may be an antivirus, for example. When you deployed the MSI, the file change is accepted, but when you try to uninstall the MSI, the file is locked by the antivirus. To resolve this problem and uninstall the MSI, you need to close the program that locks the file and then uninstall the MSI. In any case, the generated MSI is incorrect and you need to create a new MSI using a clean environment for repackaging.
An MSI was installed successfully, but the installation does not appear in Windows Programs and Features
By default, EMCO MSI Package Builder creates MSI packages that are deployed per user, so if you didn't use any special options during the MSI deployment, the installation is visible for the current user only, and if you switch to another user, you won't be able find it in the Windows Start menu or in Programs and Features. To resolve this problem, you may provide special deployment options for the msiexec utility to be deployed to all user accounts during the MSI deployment. Alternatively, you may change the MSI project settings to use the All Users option instead of the Current User option and generate a new MSI package.
An MSI upgrade doesn't remove the old version of the same application
Windows Installer uninstalls the previous version of MSI automatically if a new version is being installed. Note that this only works for MSI packages, so you cannot rely on this feature if the previous version of the application was installed by an EXE installer. Besides, to use this feature, you need to properly configure the MSI version, Upgrade GUID and the installation scope as explained in the How should I configure the repackaged installations to support an upgrade? chapter.
An MSI doesn't replace some files
When you deploy an MSI package, Windows Installer checks the file properties for every file to be replaced. For files that contain version information in their properties, like DLL or EXE files, Windows Installer compares the versions of the new file and the existing one and replaces the existing file only if the new file version is greater than that of the existing one. This behavior is configured in the Install Options section of the MSI properties, so you can change it to replace all files unconditionally.
If you face a problem, first make sure that you follow all the repackaging best practices and repeat the repackaging in a clean environment. If you still have questions after that, you can contact support and provide information on the problem and the installation you try to repackage.


