Selecting the Monitoring Environment
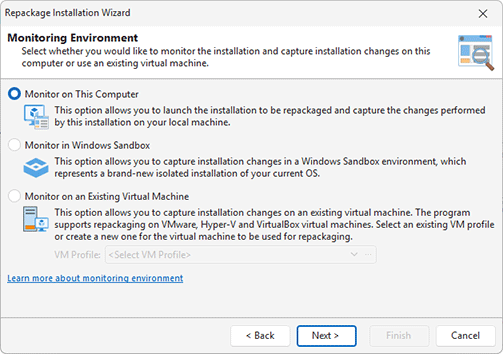
When you follow the Repackage Installation wizard, you need to select where you would like to monitor an installation and capture the installation changes: on the local computer, in Windows Sandbox, or on an existing virtual machine Pic 1.
Monitoring on a virtual machine is a preferred option, so if you have virtual machines hosted on a Hyper-V, VMware or VirtualBox server, you can select the option of monitoring an installation on an existing virtual machine, which should be specified in the wizard. If a VM isn’t available, you can monitor in Windows Sandbox or on the local computer.
Monitoring on the Local Computer
This is the default option that allows monitoring an installation on the same computer where EMCO MSI Package Builder is running. To use it, ensure that the local computer is selected as your monitoring environment and proceed to monitoring. Before starting monitoring, make sure you follow the repackaging best practices and use a clean environment as explained in the Overview of Repackaging Best Practices chapter.
For successful repackaging, you need to use a clean environment and restore the clean state every time you perform monitoring. When you monitor on the local computer, it is required that you perform manual actions before or after repackaging to restore the clean state of the monitoring environment. You can avoid this manual extra work if you use the Monitor in Windows Sandbox or Monitor on an Existing Virtual Machine options.
It’s recommended to use existing virtual machines for repackaging, if possible. The advantages of this approach are explained in the corresponding section below.
Monitoring in Windows Sandbox
Windows Sandbox is a feature available on the latest Windows versions starting from Windows 10 and above. Windows Sandbox allows you to run applications safely in isolated environment. Sandbox runs a clean, brand-new Windows installation that is sandboxed and runs separately from the host machine. All changes in sandbox are temporarily and are lost when sandbox is closed. These features of Sandbox meet requirements of a clean repackaging environment explained in the Overview of Repackaging Best Practices chapter, so you can use Windows Sandbox for monitoring.
Windows Sandbox doesn’t require any setup or configuration. It is available out of the box on modern Windows versions. To use it you just need to enable virtualization features on your hardware and enable Sandbox it in Windows Features list. You can learn more about enabling Sandbox in the Repackaging in Windows Sandbox chapter.
Using Sandbox is easier than using a virtual machine for repackaging because you don’t need to configure environment. Sandbox provides you with a clean environment each time when you run Sandbox. Note that Sandbox environment isn’t equal to the regular OS environment, so some installations cannot be installed in Sandbox. If you need to repackage an installation that fails to deploy in sandbox, it’s recommended to use a virtual machine to repackage this installation.
Monitoring on an Existing Virtual Machine
This option allows you to connect to a Hyper-V, VMware or VirtualBox virtual machine remotely and use it for monitoring. In this case, virtual machines are used for monitoring only, but all other operations, such as creation of installation projects, projects management and packages generation, are performed on the local computer.
This approach is preferable to the traditional repackaging on the local computer for the following reasons.
- You can switch among repackaging environments quickly and easily. You can install a single copy of the program that can connect to different VMs hosted on Hyper-V, VMware and VirtualBox servers to use them for monitoring. It allows you to have one local copy of EMCO MSI Package Builder, and you don’t need to install the program on every VM used for monitoring.
- Installation projects are stored on the computer where EMCO MSI Package Builder is installed. If you revert a VM, your projects stay intact since they are stored on another machine. You don’t need to care about manual copying of projects from the VMs because the program automatically copies projects into a central projects storage at the end of every repackaging.
- You can configure the program to restore a VM automatically to a snapshot with a clean state at the end of repackaging. You don’t need to restore VMs manually. If a VM has multiple snapshots, you can configure the program to use a specific snapshot for repackaging.
These features help to automate the repackaging process, so it is recommended to use monitoring on an existing virtual machine if possible.
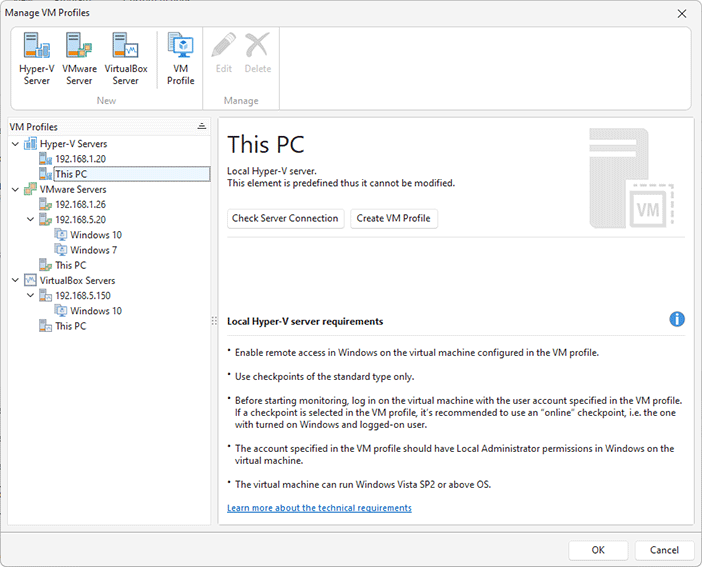
When the Monitor on an Existing Virtual Machine option is selected, you need to specify a VM to be used for monitoring. All VM configurations are stored as VM profiles, so you can select the required profile. If you don’t have profiles, you can click the  and open the VM Profiles Manager to configure a new VM Pic 2.
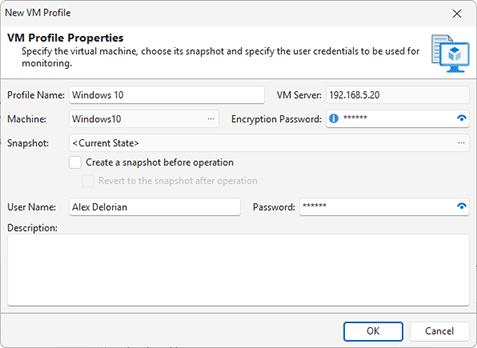
The program is able to work with Hyper-V, VMware and VirtualBox virtual machines hosted on the local PC or on remote servers. To create a VM profile, you need to configure where the VM is hosted. There are available default server configurations working on the local PC. If you need to work with a remote server, you can configure it by specifying its host name, username and password. Then you can create a VM profile by specifying the machine name, username, password and the optional snapshot of the virtual machine Pic 3.
After creating a VM profile, you can select it in the Repackage Installation wizard, so the program will use the specified VM for monitoring. You can learn more about VM configuring and other topics in the Repackaging on a Virtual Machine chapter. There you can find important information on the technical requirements for virtual machines and servers that can be used by the program.


