Installation Project Editing and Customizing
Regardless of the repackaging method you use to create a deployment package, you can see that the main screen of EMCO MSI Package Builder changes when the package generation is finished. EMCO MSI Package Builder automatically creates an installation project when you use installation monitoring and wrapping and opens such a project after the deployment package is generated, so you can review and edit it. The projects are created in the program's storage, and you can open and edit them anytime. You can apply custom changes through the visual editors and generate a modified deployment package.
In most cases, you don't need to review and edit installation projects because you get deployment packages at the end of the Repackage Installation wizard, but you can get access to the advanced features if you know how to edit and customize installation projects. Let's see how it works in practice.
Review and Modify Project Properties
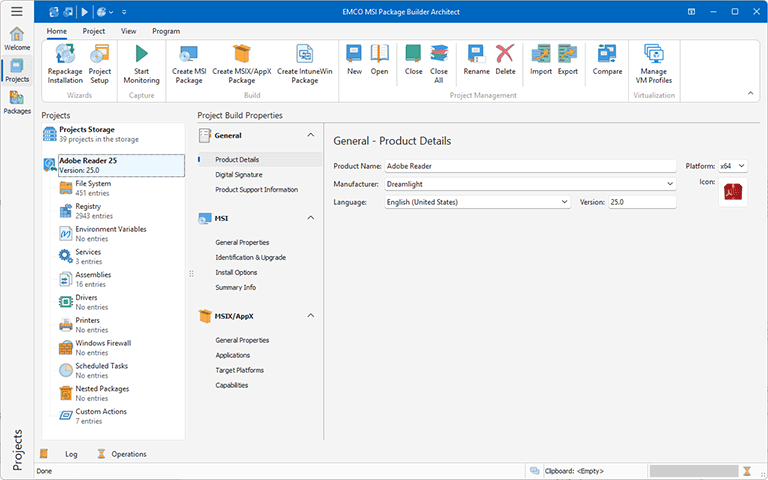
After the generation of a deployment package is complete, the program automatically opens the Projects view, and the newly created installation project is added to the Projects tree for editing. Upon addition, a project appears as a root node in the Projects tree, with its sub-elements representing the file system, registry, and other modifications included in the project. If you select the root node of a project in the Projects tree, you can see the project properties on the right of the screen. Those are the properties you specified in the Repackage Installation wizard Pic 1.
If you made a mistake when creating a deployment package and specified, for example, a wrong Product Name or Version, you can edit them in the project settings and press the Create MSI Package, Create MSIX/AppX Package or Create IntuneWin Package button on the Ribbon to generate a new package with the modified properties.
Configure an MSI to Update Another MSI
You can configure an MSI package to be installed as an update for an older version of the same product installed as another MSI package. Windows Installer supports updates automatically; so if it detects that you install an update, it uninstalls the old MSI package and then installs the new one.
To configure an MSI to be deployed as an update, you only need to modify the MSI package properties. First, you need to modify the properties displayed in the Identification and Upgrade section. Enable the Allow an installation upgrade option and specify the same Upgrade GUID as the one used in the MSI you wish to update. You also need to update the Version number to ensure that the new MSI has a higher version number than the old one. Learn more about the technical requirements for an upgrade in the How should I configure the repackaged installations to support an upgrade? chapter.
Digitally Sign Generated Packages
Output packages apply Windows changes on deployment, so Windows Installer requires that they should be run under an account with administrative permissions The Windows UAC automatically checks the validity of digital signatures when software is executed with administrative permissions. By default, packages generated by EMCO MSI Package Builder aren't digitally signed, so you can see the signature warning in the Windows UAC when you deploy such packages manually. If you need to deploy the generated packages remotely, note that such deployment tools as Microsoft SCCM don't deploy unsigned packages.
EMCO MSI Package Builder allows signing packages if you have a digital code-signing certificate and specify it in the program Preferences dialog. You can enable and disable digital signing of the generated packages by configuring the corresponding options in the Digital Signature section of the package properties. You can learn more about digital singing in the Signing Packages chapter.
Review and Edit Changes
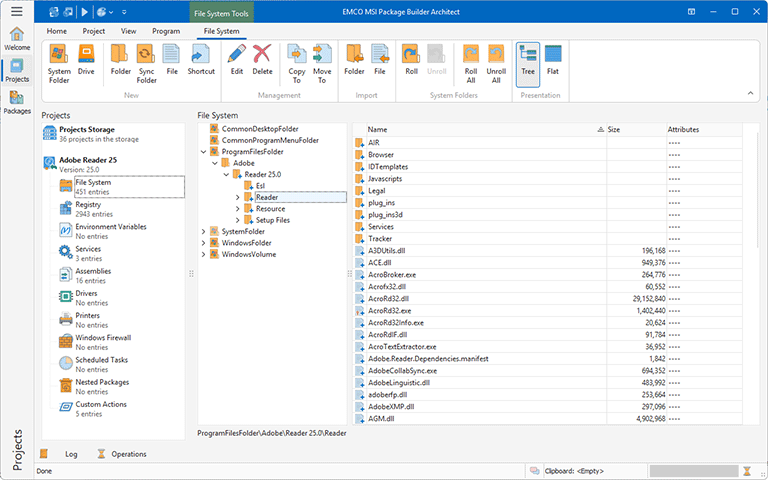
Under the project node in the Projects tree, you can find the list of changes applied by the installation. These changes are grouped by types and are displayed as separate nodes in a tree, so you can see File System, Registry, Assembles, etc. If you select a node, on the right you can see a specific editor for the corresponding type of resources and can use it to review and modify the changes Pic 2. You can learn how to use every available editor in the Installation Projects chapter, but here you can get a quick overview of the available features.
If you select the File System node, for example, you can see the structure of folders on the left and the modified files on the right. The resource icons shows the applied operation type, so you can see the files that were created, modified or deleted. If you created an installation project automatically using repackaging, you can notice that the file system paths are not absolute and include so-called System Folders. This is required to make installations portable from one PC to another, because different PCs may have different paths to standard Windows folders that store applications, their data and so on. EMCO MSI Package Builder can convert an absolute path to system folders automatically, so it's recommended that this conversion be performed if you edit a project manually. You can learn more about System Folders in the System Folder Definition Placeholders chapter.
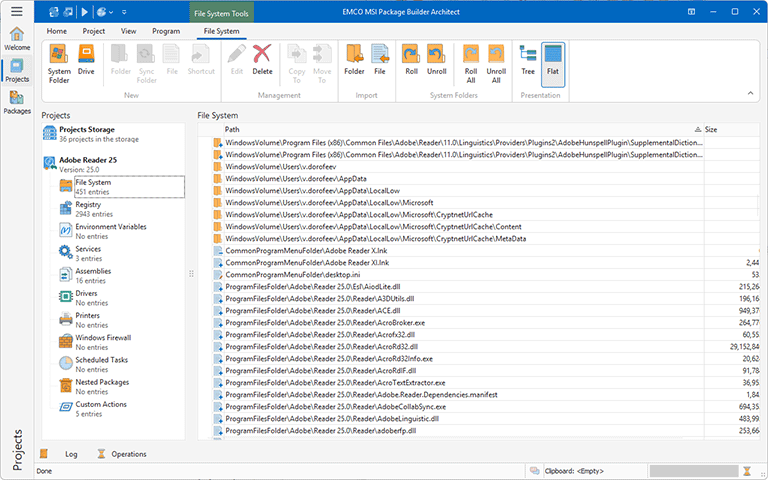
If you wish, you can switch the editor to the flat representation mode by clicking the Flat button on the contextual Ribbon page. In this case, the changes are displayed as a grid and this grid is grouped by default by the Creator values. This mode is helpful if the project was created using monitoring, because it allows seeing the captured processes and the files they changed Pic 3. If you need to troubleshoot a problematic package, you can use this mode to find and delete the changes performed by unrelated process monitored during the repackaging.
You can modify the set of file system and other resources using the actions available in the editor's context menu and in the contextual Ribbon pages. If you need to review and modify other types of changes, you can select the required node in the Projects tree and use the corresponding editors.
Define Custom Actions
EMCO MSI Package Builder allows you to configure a deployment package to execute custom actions before and/or after the installation or uninstallation and to perform system configuration actions. Such actions can be managed through a special editor displayed after selecting Custom Actions in an installation project. You can configure a package to run any executable commands, scripts or applications as pre and post actions. You can learn more about configuring custom actions in the Using Custom Actions chapter.
Using EMCO MSI Package Builder, you can customize installations according to your needs. For example, you can automatically create an installation project by monitoring the required actions and then review and modify the project contents by adding additional resources or a configuration of custom actions.


