Creating an MSIX/AppX Package
MSI Package Builder includes full support for generating MSIX and AppX packages. Since MSIX is an extension of AppX, the two formats share many similarities. These packages can only be generated on PCs running Windows 10 or later. MSI Package Builder automatically selects the output format based on the operating system version: on machines with the Windows 10 October 2018 Update or later, an MSIX package is generated; on earlier Windows builds, an AppX package is generated.
MSIX/AppX packages can be generated only on PCs running Windows 10 or later. If you run the program on earlier version on Windows, you cannot generate MSIX/AppX. In this case you need to install the program on a PC running Windows 10 or later, copy the installation project and generate MSIX/AppX there.
To create an MSIX or AppX package, you must have a regular installation project. MSIX/AppX generation is not supported for wrapping projects. During repackaging, the output MSIX or AppX package is created automatically, so no additional steps are required. If you don’t have an installation project yet, you can easily create one using one of the available repackaging methods, depending on your needs. For detailed instructions, see the Capture Installation and Capture System Changes chapters.
|
Create MSIX/AppX Package The Create MSIX/AppX Package button from the Build group on the Home Ribbon page should be used to generated an MSIX/AppX package based on the selected project. |
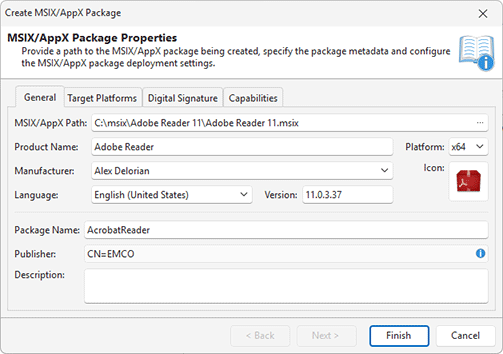
To create an MSIX/AppX package manually, you can use the Create MSIX/AppX Package item from the Projects view pop-up menu or from the Build group on the Home Ribbon page. When an MSIX/AppX package is created based on a project, the options for the package created are filled automatically using the values defined in the Project Details view, while during the repackaging process they are defined on-line, then saved to the created project. Let us take a look at the available options and describe each one starting with the general product information Pic 1.
The general information consists of the Product Name, Platform, Manufacturer, Icon, Language and Version. The product name, manufacturer and icon are used to display the product on the system. The platform is used to define if the installer is deploying an x86 or an x64 application. The Language field is responsible for defining the language and the encoding used by the installer package.
If you're using the evaluation version of the product, the Product Name field includes a predefined prefix (EMCO EVALUATION PACKAGE) to indicate that the package was created with a trial version. Such packages are intended for testing purposes only and cannot be used in production environments. After registering the program with a valid license key, you can regenerate the package using the same project, and the evaluation mark will be removed.
The version is the most important field of the general information because it is responsible for a correct package installation and upgrade. That means that every time you prepare an updated package using the same project you should change its version to a higher one. And it is also displayed on the system.
The Package Name and Publisher fields are responsible for the package identification. For packages signed with a certificate from store or from file, the Publisher field is automatically filled from the certificate. The Description field is used to provide a description for the package.
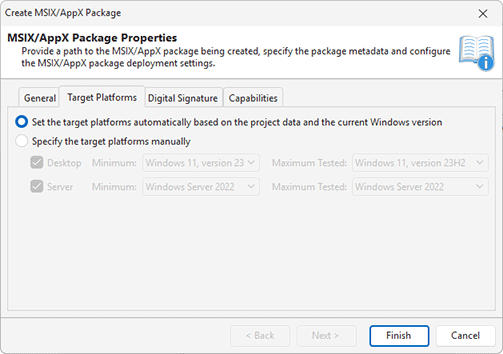
The next aspect of an MSIX/AppX package configuration is choosing the target platforms Pic 2. It's recommended to set target platforms automatically based on the project data and current Windows version. You can also specify the list of supported desktop and server operating system versions manually. When you create an MSIX/AppX package the output package format depends on the selected target platform. If you select a Windows platform that supports MSIX, the program will generate an MSIX package. For earlier versions of Windows that don't support MSIX, an AppX package will be generated.
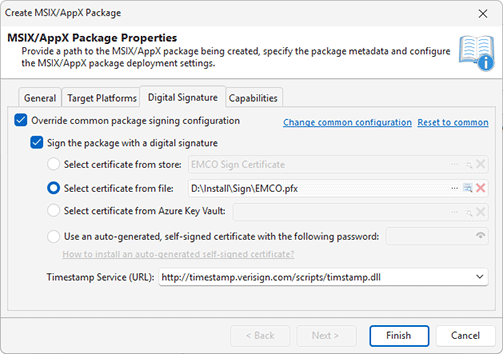
Another important thing to configure is a digital signature as MSIX/AppX packages cannot be installed until they are digitally signed. You can use the configuration defined in the program preferences or override it for this package Pic 3.
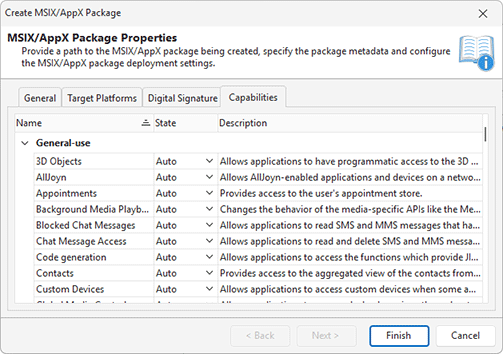
To create an MSIX package you need to declare its capabilities, i.e. access to APIs or resources, such as pictures, music, camera or microphone. Some capabilities provide applications with access to sensitive resources. These resources are considered sensitive because they can access the user's personal data. You can enable or disable required capabilities manually, if required. By default capabilities are set to auto. If a package contains resources that require specific capabilities, those capabilities are enabled by default Pic 4.
After all the required settings have been configured, either within the Project Details view or within the package creation wizard, all you need is to provide a path to the location to save the resulting MSIX/AppX package to and press Finish. As soon as the package is created, it is ready for deployment.


