Signing Packages
Digitally signing files helps protect against changes to a file by validating that a hash of the current file matches the hash stored in the digital signature. Digital signatures also help verify that a package came from a particular publisher by encrypting the hash with the publisher's private key. Verifying the signature using the publisher's public key or a trusted certificate authority that signed their public key validates the publisher.
You can sign Windows Installer packages to help guarantee that users know if your packages have been modified and that they came from you, the publisher. Windows Installer validates that a package hasn't been changed if it contains a digital signature when attempting to install it. Properly signed MSI packages can be installed via GPO even within the environments with strict security policies. As for an MSIX/AppX package, it is required to be digitally signed to be deployed.
About Digital Signatures
A digital signature is based on a signing certificate. A certificate is a set of data that completely identifies an entity, and is issued by a certification authority only after that authority has verified the entity's identity. The data set includes the entity's public cryptographic key. When the publisher of a package signs the package with its private key, the installer can use the publisher's public key to verify the publisher's identity.
In order to perform a package signing operation, both private key and signer identification information must be supplied. The digital certificate used in the signature usually supplies the signer identification information, however. Thus, the private key must be supplied through some other means. Additionally, the signature must include the certificate chain for the cryptographic service provider (CSP), up to a root certificate trusted by the user, in order for the signed file to be authenticated. So in all, there are several items that need to be provided in order to generate a digital signature.
Microsoft has developed a certificate store technology to reduce the above complexity. Using this technology, when a user enrolls to obtain a certificate, they specify the private key information, the CSP information, and the certificate store name for the certificate. The certificate will then be stored in the certificate store and be associated with the other items. When the user wants to sign a package, they only need to identify the certificate in the certificate store. The code-signing tool will retrieve the certificate, the private key, and the certificate chain for the CSP, all based on the specified certificate.
When signing a package, a trusted time server is used to generate a time stamp for a digital signature. This is performed, to guarantee that the package is signed with the certificate that is neither expired not revoked.
Requirements for a Digital Certificate
For a digital certificate to be used by MSI Package Builder for signing the generated packages, the following set of requirements must be met:
- The certificate must include the Code Signing (1.3.6.1.5.5.7.3.3) within its Intended Purpose.
- The certificate's Valid From date must be less and the Valid To date must be greater than the package signing date.
If you would like to use the certificate from certificates storage:
- The digital certificate must be placed in the Current User certificates storage.
- Both the private key and the signer identification information must be supplied.
- The private key must be available together with the signing certificate in the certificate storage. In case you have a private key in a separate file, please use the tool provided by Microsoft for preparing the a private & public key pair for importing into the certificates storage as described here: Pvk2Pfx, Combine PVK + SPC to PFX.
In case the digital certificate does not meet the above-stated requirements, MSI Package Builder will not suggest that you use it for signing packages.
Configuring Packages Signing
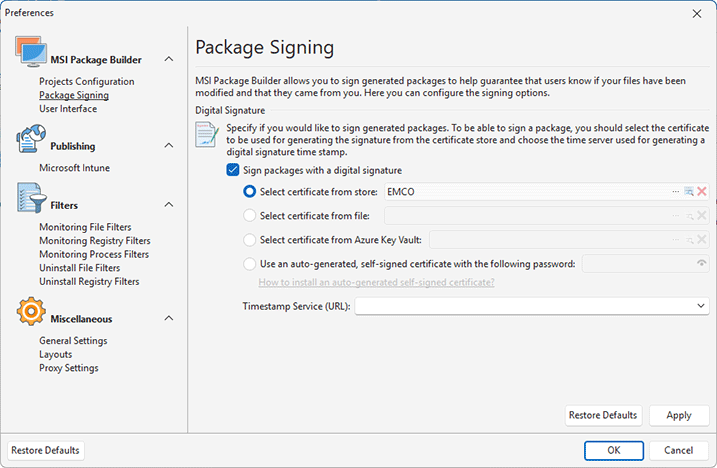
MSI Package Builder allows you both to define the common packages signing configuration to be used for adding digital signatures to generated packages and to override those settings for specific projects. The common digital signing options are specified on the Packages Signing preference page Pic 1, and the overriding feature can be used either when creating an MSI package, creating an MSIX/AppX package or in the Project Details view.
In any case, if you enable the packages signing, you are suggested to select the signing certificate to be used for creating a digital signature and choose the time server for generating a digital signature time stamp.
The required certificate can be selected from those installed to the above-mentioned certificate storage. To select the certificate from store, check the Select certificate from store radio button and press the  button within the following field. The dialog will be displayed to let you choose the certificate from those available. When choosing the certificate, you can press the View Certificate button on the toolbar to view detailed information on the selected certificate. This information dialog can also be reached via the
  button from the certificate choosing field when the certificate is already specified. To reset the certificate, you can use the
  button.
If you would like to use the certificate stored within the private information exchange (pfx) file, check the Select certificate from file radio button press the  button within the following field. The file browser dialog will appear on the screen to let you provide the path to the file. Normally, private keys in pfx files are password encrypted, so you're going to be prompted for the password to use the certificate from the specified file for signing packages. The same as for the certificates chosen from store, you can open the certificate information dialog via the
  button from the certificate choosing field and reset the certificate via the
  button.
You can also sign packages using a certificate stored in Azure Key Vault. To do this, select the Select certificate from Azure Key Vault radio button and click the  button next to the corresponding field. In the dialog that appears, configure the required options to access the certificate, such as Client ID, Tenant ID, and other parameters. Once all settings are provided, you can apply them to access the certificate. To view certificate details, click the
  button. To reset the selected certificate, use the
  reset button.
If you do not have a required certificate, as a workaround it is possible to generate a self-signed certificate for the package being generated. In such a case the pfx file containing the automatically generated certificate will be placed next to the generated package and must be installed on the client machines before deploying the package. Please refer to the How to install the auto-generated self-signed certificate? section for details. To use the described approach, check the Use auto-generated self-signed certificate radio button and provide the password to protect private key to the Certificate password field.
As for the time server, you can either choose the one from those predefined in the Time Server field or provide the address of another trusted server that can generate a time stamp for digital signatures. A time stamp should always be added when signing a package. Although it is strongly recommended that a digital signature time stamp be added immediately when signing packages with MSI Package Builder, you can leave the Time Server field empty, thus skipping the time stamping. In case a time stamp is not added, it is possible to time stamp a signed package in future with the help of the sign tool.
If the package signing is enabled, MSI Package Builder will add a digital signature using the specified signing certificate and chosen time server when a package is generated. If there are any problems occurred during the signing process, they are added to the Log view.
Project Files Signing
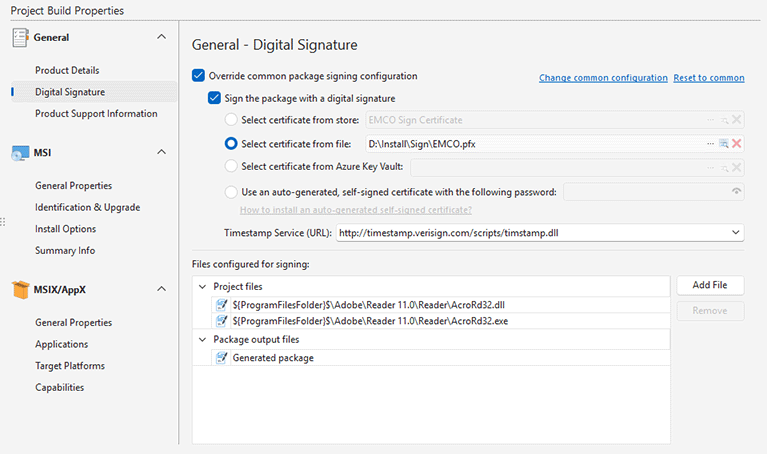
When the package signing is enabled, the program signs a generated package, but you can configure the program also to sign the files deployed by the package. You can configure files to be signed in Project Build Properties. Select a project in the Projects view and open the General tab of the build properties. In the Digital Signature section you can find the list of files configured for signing. By default, the program signs the generated package only, but you can add the project files for signing Pic 2.
Press the Add File button and select a file available in the project, to add it to the list of files to be signed during the package generation. You can select EXE, DLL or SYS files because these file types support digital signing. To delete a file from the list, select it and press the Remove button.
How to install the auto-generated self-signed certificate
When using auto-generated self-singed certificate, it should be installed on client Machines before deploying generated packages. The following steps should be followed to install the certificate:
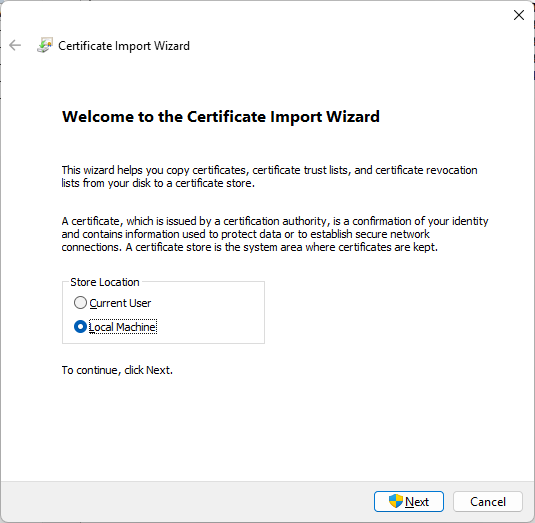
- Double click the auto-generated pfx file. The Certificate Import Wizard will appear on the screen.
- Select the Local Machine store and press Next.
|
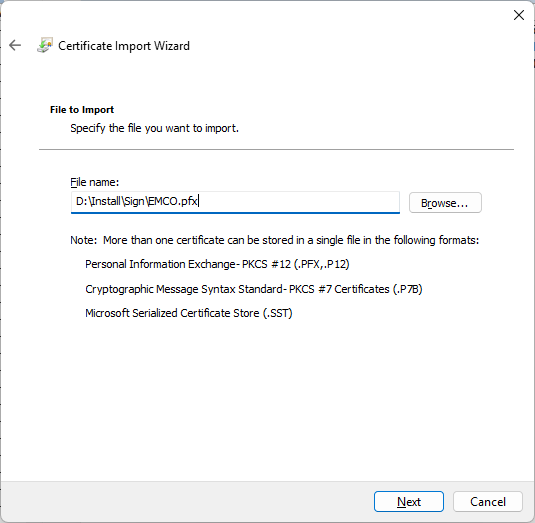
- Double check that you are importing the certificate from the appropriate pfx file and press Next.
|
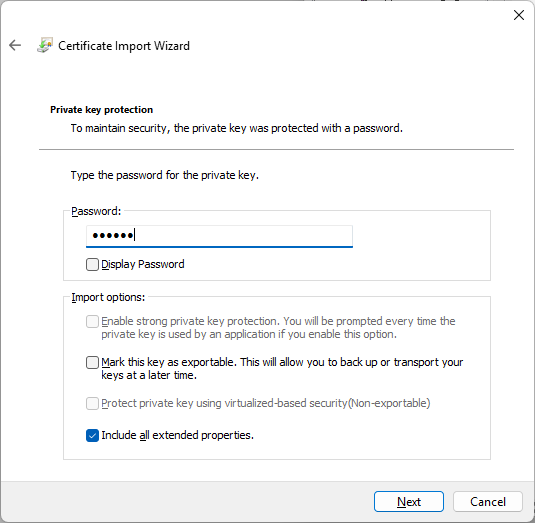
- Provide the password you have specified in the Certificate password field to the Password field and press Next.
|
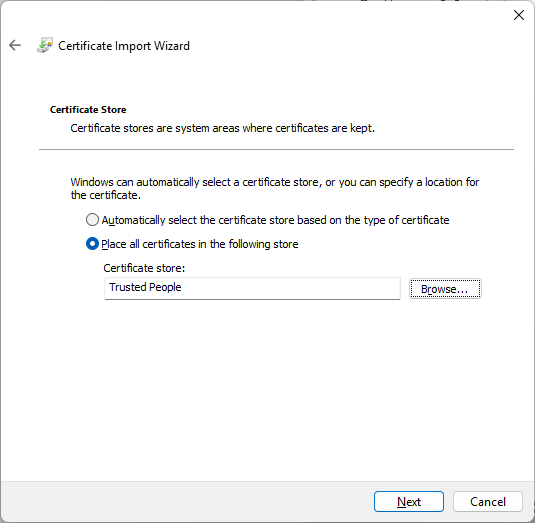
- Select the Place all certificates to the following store radio button, press the Browse button and choose the Trusted People store. Then press Next.
|
- After checking the import settings on the final wizard page, press Finish.
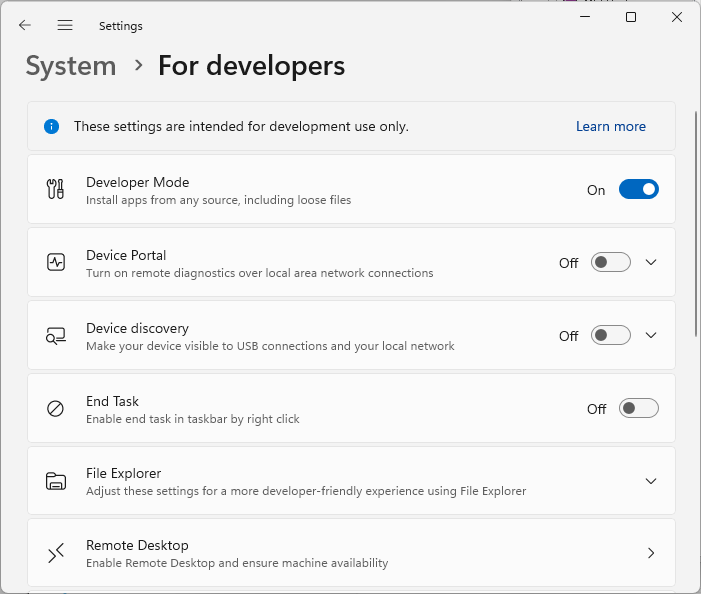
As soon as the certificate is imported to the Trusted People store, the packages signed with the certificate are considered trusted thus fully secure, so you can successfully install MSI packages signed with such certificate via GPO. To allow deploying MSIX/AppX packages signed with the auto-generated certificate, it is also required to enable the Developer mode in the Windows settings Pic 3.
As you can see, using a self-singed certificate as a workaround has a set of limitations, but allows you to get a signed packaged that can be trusted within your organization or by specific PCs only.
