Projects View
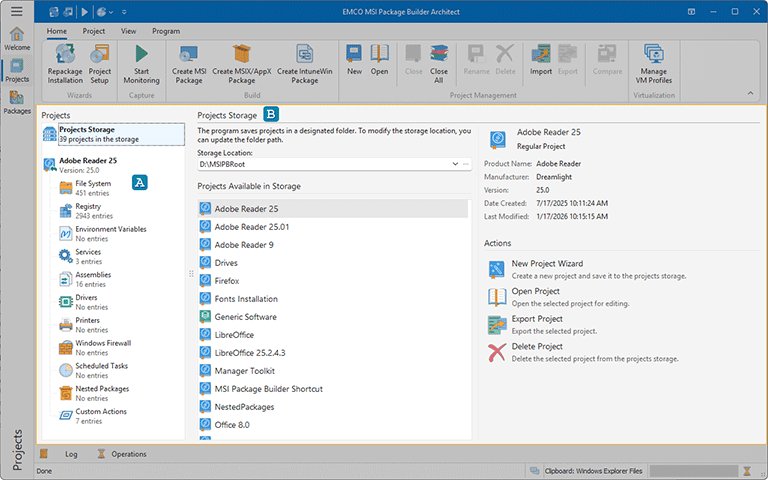
The Projects view is intended for the management of installation projects, allowing you to review, edit, import projects into the program, and create new projects Pic 1. Access this view by clicking the corresponding button on the vertical navigator on the left side of the main screen, or by selecting the Projects button on the View tab of the Ribbon.
On the left side of the view you can find the Projects tree A that allows you to navigate through the projects. When the program is started, no projects are open, and the only node visible in the Projects tree is Projects Storage. Select this node to open the Project Storage view B on the right side next to the tree to review all projects saved by the program. From here, you can choose a project to edit. Additionally, project management actions are available to import a project into storage, open an existing project for editing, or create a new project.
After creating a new project or opening one for editing, it will be displayed in the Projects tree. You can open a single project or you can open multiple projects, which is particularly useful when you need to transfer changes from one project to another. Each project encapsulates the changes that a generated package will implement. The project is presented as a tree structure: the root node represents the project properties which can be edited, and the child nodes represent various types of changes, including the file system, registry, services, drivers, and more. Selecting a specific node will open a dedicated editor on the right side of the screen, enabling you to review and modify the changes of the selected type.
The Projects tree shows a list of currently opened projects. Distinct icons next to each project denote its current status, providing at-a-glance information. These icons reveal if a project is in process or if there are any processing issues. The icons used include:
|
- |
an MSI Package Builder project; |
|
- |
an MSI Package Builder project is being operated; |
|
- |
an MSI Package Builder project containing errors that should be resolved before creating a deployment package; |
|
- |
an MSI Package Builder project based on monitoring results that is not prepared; |
|
- |
an MSI Package Builder project based on monitoring results that is prepared; |
|
- |
an MSI Package Builder project based on monitoring results that could not be fully prepared (not all of required files were available during the prepare operation). |
The Projects tree is the starting point for managing changes and creating a deployment package based on existing projects. The actions for adding, editing and deleting projects and other operations are available in the Projects tree pop-up menu and on Ribbon.
Functions Overview
Projects Management |
In the Projects view, you can create, rename, delete, open and close MSI Package Builder projects. To perform these actions, you can either use the pop-up menu of the Projects tree or the buttons from the Project Management group on the Home Ribbon page. The actions for creating a new project, opening existing projects and closing all projects are available in the pop-up menu displayed on an empty selection of the tree, and to edit, rename, delete and close specific projects, you should first select those projects. Detailed information about the projects management abilities is available in the Projects Management section of this document. |
Projects Preparation |
Within the Projects view, it is possible to prepare the projects created on a basis of the monitoring results. The preparation steps consist of copying the file system resources to the projects storage, repairing missing links and rolling system folders. These actions are available in the pop-up menu of the tree and on the Project Ribbon page. To learn more about preparing the projects, refer to the Projects Preparation section of this document. |
Capturing Changes |
From the Projects view, it is possible to capture changes to the underlying operating system and create a project, containing the performed changes. To start a new session of changes capturing use either the Start Monitoring item from the pop-up menu displayed on an empty selection of the tree, or the Start Monitoring button from the Capture group on the Home Ribbon page. To stop the changes capturing session, use the Stop Monitoring items. The capturing abilities can be used for low-level repackaging and for simple monitoring of the application activity. |
Deployment Package Generation |
You can easily create a deployment package containing the changes represented by any project displayed in the Projects tree. Just select that project and choose the Create MSI Package or the Create MSIX/AppX Package item in the pop-up menu – it is equivalent to using the corresponding buttons from the Builder group on the Home Ribbon page. Detailed information on the deployment package generation abilities is available in the Creating an MSI Package and Creating an MSIX/AppX Package sections of this document. |
Deployment Package Import |
It is possible to create a project by extracting any deployment package generated with MSI Package Builder in the Projects view. This feature is called a deployment package import. To perform import, use either the Import Project item from the pop-up menu displayed on an empty selection of the tree, or the Import button from the Project Management group on the Home Ribbon page. |
Search |
Within the Projects tree, you can execute a search for specific project using the Find item from the pop-up menu. |
From the Projects tree pop-up menu, depending on the selection, it is possible to perform projects management, import existing deployment packages, etc.
In the subsequent chapters, you'll learn more about the Projects Storage view and other views for reviewing and editing project content.
What's Inside


