Creating an MSI Package
MSI Package Builder was designed to repackage existing installations into MSI packages, so one of the main aspects of the program is a flexible configuration of the package being created. The package can be created during the installation repackaging process, or manually from an existing MSI Package Builder project. If you don’t have an installation project yet, you can easily create one using any of the available repackaging approaches, depending on your needs. Refer to the Capture Installation, Capture System Changes, or Repackaging via Wrapping chapters for detailed guidance.
|
Create MSI Package The Create MSI Package button from the Build group on the Home Ribbon page should be used to generate an MSI package based on the selected project. |
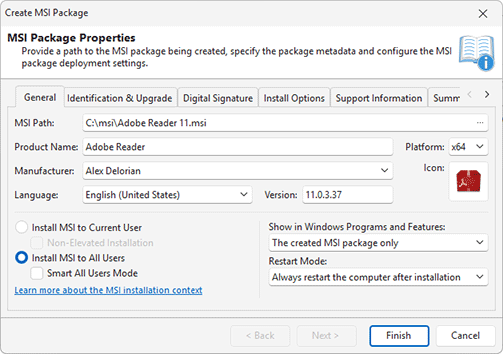
To create an MSI package manually, you can use the Create MSI Package item from the Projects view pop-up menu or from the Build group on the Home Ribbon page. While creating an MSI package based on a project the options for package created are filled automatically using the values defined in the Project Details view, and during the repackaging process they are defined on-line and then saved to the created project. Let us take a look at the available options and describe each one, starting with the general product information Pic 1.
The general information consists of the Product Name, Platform, Manufacturer, Icon, Language and Version. The product name, manufacturer and icon are used to display the product in the Programs and Features section of the Windows control panel. The platform is used to define if the installer is deploying an x86 or an x64 application. The Language field is responsible for defining a language and encoding used by an installer package.
If you're using the evaluation version of the product, the Product Name field includes a predefined prefix (EMCO EVALUATION PACKAGE) to indicate that the package was created with a trial version. Such packages are intended for testing purposes only and cannot be used in production environments. After registering the program with a valid license key, you can regenerate the package using the same project, and the evaluation mark will be removed.
The version is the most important field of the general information, because it is responsible for the correct package installation and upgrade. That means that when you are preparing an updated package, using the same project, you must change the version to a bigger. This is also displayed in the Programs and Features section of the Windows control panel.
The other aspect of the general product information is an installation context. You can choose if the package when launched without additional parameters should be installed only for a current user account, or for all users. This is defined by switching between the Install MSI to Current User and Install MSI to All Users radio buttons. Please note, that the administrative privileges are required to install the MSI package for all users. You can also choose if the generated MSI package should be displayed in the Programs and Features section of the Windows control panel, and if the repackaged installations, if any, should also be displayed. If the reboot is required to complete the package installation, an appropriate options should be selected in the Restart Mode drop-down list.
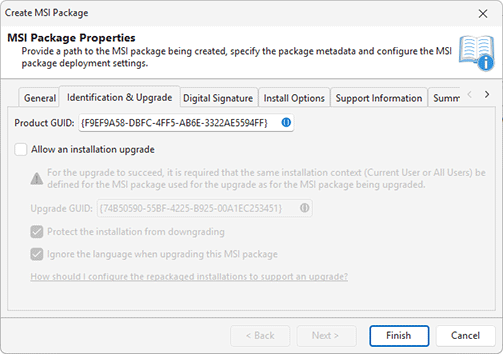
The next step is configuring the package identification and upgrade abilities Pic 2. For MSI packages to be deployed and upgraded correctly, they should be properly identified. For each MSI package there is a Product GUID, that uniquely identifies the product, and Upgrade GUID that is used for matching upgrades. Windows Installer maintains its database and handles its consistency, depending on these identifiers, so you must be very careful with them. You may not provide the upgrade identifier, but in this case, the upgrade will not be supported. If you are going to support upgrades, you can define if the upgrade is language specific and if downgrade is allowed. In case you choose that the upgrade process is language specific, then it will be allowed to install a new version of an MSI package only if its language is the same as the language of the previous version installed. If you disable the protection from downgrade it will be possible to install a previous version of the product even when the newer version is installed, replacing the newer version with the previous one.
For the successful upgrade it is also required that the installed MSI package should have the same installation context (Current User/All Users) defined as the MSI used for update. It is also required that at least one of the first three version figures of the MSI package used for update differs from the version of the installed MSI package.
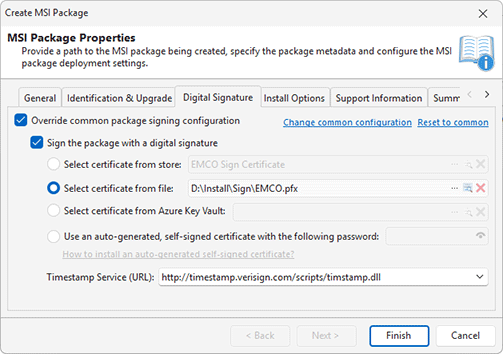
Before generating the MSI package, you can choose if the common package signing options should be used, or they should be overridden for this specific project Pic 3. As when defining the common settings, you can choose if the digital signature should be added to the package, select the signing certificate from the certificate storage and choose the time server used to generated a digital signature time stamp.
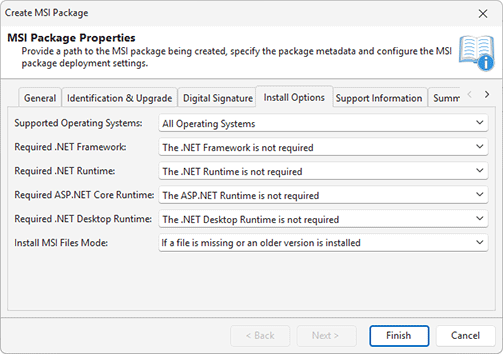
The next aspect of an MSI package configuration is install options Pic 4. You can specify the list of supported operating systems and choose the reinstall mode used if the files deployed by an MSI package already exist in the target location. You can also define the Microsoft .NET Framework versions required by deployed software packages – the Windows Installer will check for those versions and interrupt the deployment process if the required version is missing on a target PC. You can specify dependencies from different .NET Frameworks, including .NET Framework, .NET Runtime, ASP.NET Core Runtime and .NET Desktop Runtime.
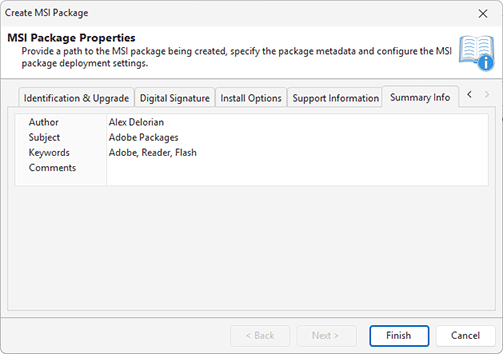
The last thing to define, that is also optional, is a set of support and summary properties Pic 5. Those are available in the package properties and are displayed in the Programs and Features section of the Windows control panel. As for the support information, you can use the properties defined in the program preferences, or override them for this package.
When all the required settings are configured, either within the Project Details view or within the package creation wizard, all you need is to provide a path to the location to save the resulting MSI package to and press Finish. As soon as the package is created, it is ready for deployment.

