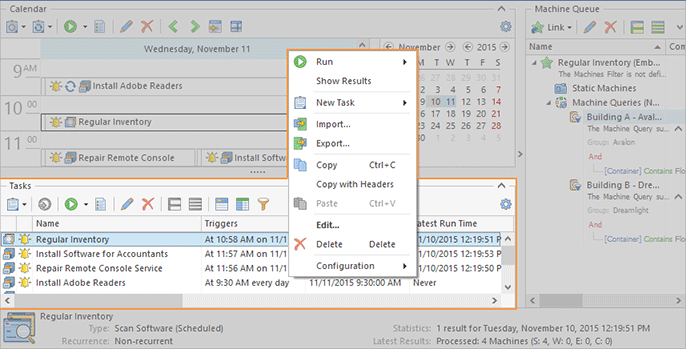
Tasks Area
The Tasks area Pic 1 displays all the tasks created and scheduled within Remote Installer in form of a table. Using this area, you can create new tasks, schedule already created tasks, run the selected tasks, review their execution results and delete them when they are no longer needed.
You can drag Collections from the Network view and drop them on the Tasks area. You are offered to create a new task if Collections are dropped on an empty space. Collections dropped on a task are added to its Machine Queue. The same result can be achieved by using the Copy/Paste technique. It is also possible to drag/drop and copy/paste standalone Machines and Queries, whereas the embedded Collections containing those Machines and Queries will be created automatically.
By default, the Tasks area shows you the name of every task, the comment specified for it, its scheduling properties, last execution time, and last results, as well as the task type and scheduling state, both represented by icons. You can also make it display the column that shows each task's description by using the column chooser. It is possible to sort this view both by the text fields and the fields that represent the task type and state. Thus, you can configure the view layout in the way that is most convenient for your everyday work with Remote Installer. Detailed information on every task is available in the tool tip shown when you are hovering the mouse pointer over the row representing this task. The tasks that require additional configuration before being executed are highlighted.
The state of every scheduled task can be seen in the Tasks area and is represented with a colored bell icon. This enables you to always see what is going to happen to each one of the scheduled tasks in future. Below you can see the meaning of each of the bell icons:
|
- |
The task has already been processed by the scheduling engine. It has either been executed or its execution has been skipped. |
|
- |
The task is waiting for its execution time to come and will be executed as soon as the scheduled time comes. |
|
- |
The task is either created in the past or moved to the past, and is processed according to the specified confirmations configuration. |
|
- |
The task is the Past Task. It should have been executed on the schedule but the program was not running, so it is processed according to the specified confirmations configuration. |
|
- |
The decision regarding the task execution was postponed by snooze when asked for the execution confirmation. |
Toolbar Overview
|
New Task The New Task button from the Tasks area toolbar can be used to create a new task to be executed in the future. |
|
Schedule Task The Schedule Task button from the Tasks area toolbar should be used to put the selected task on schedule. |
|
Run The Run button from the Tasks area toolbar can be used to execute the selected tasks immediately. You can execute the task either for all Machines from the Machine Queue or only for those not processed during the latest execution due to errors. |
|
Show Results The Show Results button from the Tasks area toolbar allows you to display the execution results for the selected tasks in the Execution Results view. |
|
Edit The Edit button from the Tasks area toolbar allows you to edit the selected task. |
|
Delete The Delete button from the Tasks area toolbar allows you to delete the selected tasks. |
|
Full Expand The Full Expand button should be used to expand all the grouping rows in the Tasks area. |
|
Full Collapse The Full Collapse button should be used to collapse all the grouping rows in the Tasks area. |
|
Group By Box The Group By Box button is used to display Group By Box for configuring data grouping within the Tasks area |
|
Choose Columns The Choose Columns button should be used to choose the columns to be displayed in the Tasks area. |
|
Filter Editor The Filter Editor button should be used to define the custom filter criteria to be applied to the data displayed within the Tasks area. |
|
Configuration By using the Configuration button, you can configure and reset the layout of the Tasks area. |
You can create, edit, delete and execute tasks directly from the Tasks area using the buttons from the view toolbar. In addition to the options of creating a new task, opening an already existing task for edit, running a selected task, copying or deleting it, pasting a task from the clipboard or pasting Collections from the clipboard into the Machine Queue of an existing task is available in the pop-up menu of the Tasks area.
If you prefer to work with scheduled tasks only, you can collapse this area using a glyph on the area caption. You can also change the orientation between the Tasks area and the Scheduling area and switch their places using the Rotate Layout and Flip Layout items from the Group Layout pop-up of the Configuration menu.


