Using Custom Actions
The custom actions are the actions that can be performed together with the MSI package install and/or uninstall process. They can be used, for example, to prepare the system for installation of the package, to check prerequisites, to start the application on installation completion, etc. These actions are defined on a project level and are displayed in the Custom Actions view when the Custom Actions node of a project is selected in the Projects view.
There are two kinds of custom actions, namely pre & post actions and system actions. The pre & post actions are generic commands to be performed, and the system actions are predefined commands.
|
Custom Actions The Custom Actions drop-down button from the New group on the Project Ribbon page allows creating a new action of a specific type and add it to the selected project. |
|
Pre & Post Action The Pre & Post Action button from the New group on the Custom Actions Ribbon page should be used to create a new generic action and add it to the selected project. |
Managing Pre & Post Actions
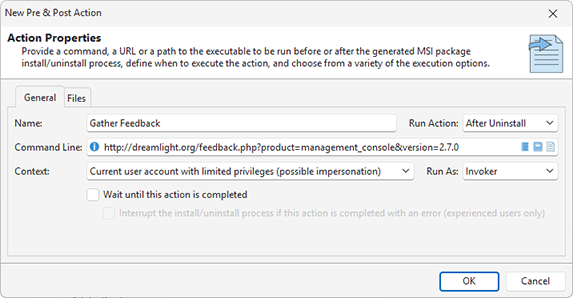
To create a new action, choose the New Pre & Post Action item in the Custom Actions view pop-up menu from the Pre & Post Actions part. Alternatively, you can use the Pre & Post Action option within the Custom Action button from the New group on the Project Ribbon page and the Pre & Post Action button on the contextual Custom Actions Ribbon page. In any case the New Pre & Post Action dialog will appear on the screen to let you configure the action to be created Pic 1.
Each pre & post action can be represented with a command (such as an executable or script file) or a simple action to open a file or an URL. The action to be executed should be specified in the Command Line field, where you can also configure optional command-line parameters to be passed to the executable/script.
A custom action can be executed before install of the package, after install, before uninstall or after uninstall. It’s important to understand when the action will be executed to configure a command properly. A custom action can run executable and script files that is a part of deployed package, but for actions executed before install or after uninstall these files are not available because the installation isn’t deployed them (in the case of before install action) or already deleted them (in the case of after uninstall action). Custom actions executed before install or after uninstall can run scripts/executables always available in a system, for example system commands. Or you can configure action files, as explained below, and use them to run an action.
To specify a command using an executable/script file use buttons available in the Command Line edit box.
|
- |
Choose the file from those available in the action files |
|
- |
Choose the file from those available in the project |
|
- |
Choose the file from those available on the system |
Using a File from Action Files
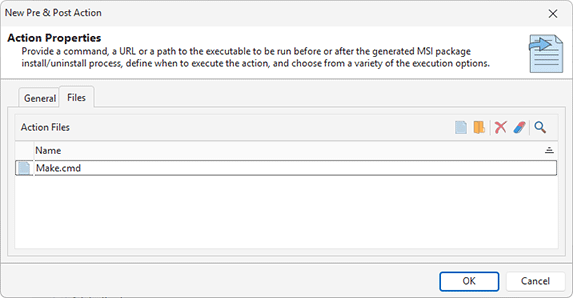
Custom actions can operate with own set of files that are deployed independently from the deployed package. You can configure those files on the Files tab of the custom action configuration dialog Pic 2.
If you have been added custom actions files, you can use the Select a File from the Actions Files button of the Command Line edit box to configure a file to be executed as a custom action. When you select a file, it is represented as ${ActionFiles}$\<file> in the commend line, where <file> is the file you selected and ${ActionFiles}$ is a property definition placeholder that specified a path to the storage of custom action files. You can add command-line parameters to the command, if required.
Using a File from Actions Files allows you to run executables/scripts independently from the type of the custom action (before/after install/uninstall) and environment. Custom actions operate with the own set of files always available in all the cases, so, for example, you can execute a custom script before package installation or after uninstallation, for example. Other options, represented below, have limitations and aren’t as flexible as this option.
Using a File from the Project
This option allows you to run an executable or a script deployed by the package. The executable/script file should be available in the File System section of the project. This option can be used, for example, to run a file that is a part of the captured installation, for example. This file is a part of deployed changes, so you can run it.
This option has some limitations. You cannot use it to run a command before installation, because the file to be executed isn’t deployed yet. You cannot use it to run a command after uninstallation, because the file is already deleted. Use it when you need to run a file that is a part of the deployed installation after install or before uninstall.
When you select a file from those available in the project, the path to the file may be represented using the property definition placeholders. They replace absolute paths to the files location with placeholders to represent special system folders to make the package independent from the deployment environment.
Using a File
This option allows you to select a location on the local file system and is applicable only to run standard Windows commands. The custom action will work only if the configured executable with the same file path is available on the system where the package will be deployed. If you need to run an executable that isn’t available on each system where the package will be deployed, use any of the options above.
The Command Line field supports the property definition placeholders, so you can use the standard MSI properties while configuring the action. See the Property Definition Placeholders section of this document for the list of available placeholders.
The Windows Installer does not allow installing, configuring and uninstalling packages in parallel, though it is impossible to execute installation, repair or uninstallation of another MSI package within the custom actions execution scope.
As for the start type, you can choose between Before Install, After Uninstall, Before Uninstall and After Uninstall. Thus, you can, for example check some prerequisites and perform preparation steps before the package installation and perform a kind of clean-up after uninstalling the package. For each action, you can choose the execution context, if to run it as administrator or as invoker in case of current user account context, if the installer should wait for the action to complete and if it should analyze the completion result.
The Administrator value from the Run As drop-down should be selected only for executing the actions that required administrative privileges to function. It is insecure to run all actions as administrator.
If the successful action completion is required for the installation to complete successfully, than you can check both the Wait until this action is completed and Interrupt the install/uninstall process if this action is completed with an error options. However, be aware of the fact, that if the action is implemented incorrectly, the whole installation will fail.
|
Move Up The Move Up button from the Order group on the contextual Custom Actions Ribbon page should be used to move the selected pre & post actions up the execution order. |
|
Move Down The Move Down button from the Order group on the contextual Custom Actions Ribbon page should be used to move the selected pre & post actions down the execution order. |
By default, the pre & post actions execution order is the same as the addition order, but you can reorder the actions using the Move Up and Move Down items from the pop-up menu or the Order group on the contextual Custom Actions Ribbon page.
Custom Action Templates
Some custom actions are used regularly in different projects. To simplify configuring those actions the program provides preconfigured templates. Use Run PowerShell Script, Run VB Script, Run Batch File or Run Installed Application actions available in the Action Templates group of the contextual Custom Actions tab on Ribbon to configure a corresponding action.
Action templates allow you to select a file to be executed. This file is automatically added to action files storage and the path to the file is specified in the command together with the standard command-line options. Other suitable configuration options are also set to the required values. You only need to set Run Action according with your needs.
Managing System Actions
To create a new action for installing Software Assets Management (SAM) licenses, choose the New SAM Licenses Installation item in the Custom Actions view pop-up menu from the System Actions part. Alternatively, you can use the SAM Licenses Installation option within the Custom Action button from the New group on the Project Ribbon page and the SAM Licenses Installation button on the Custom Actions contextual Ribbon page.
|
SAM Licenses Installation The SAM Licenses Installation button from the New group on the Custom Actions contextual Ribbon page should be used to create a new action for installing Software Assets Management (SAM) licenses to the Software Licensing Service (SLS) and add it to the selected project. |
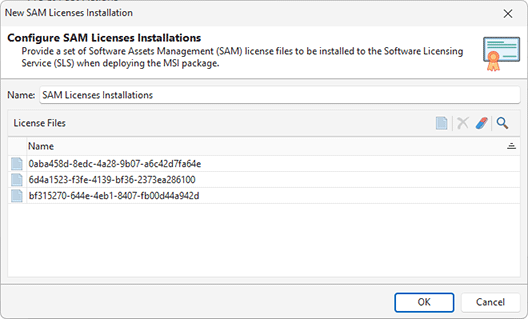
Configure the action to be created in the New SAM Licenses Installation dialog Pic 3.
For each SAM licenses installation action, you can define a name and a set of licenses to be installed to the Software Licensing Service (SLS) during the installation of the generated MSI package.
|
Pin Application Action The Pin Application Action button from the New group on the Custom Actions contextual Ribbon page allows you to create a new action to pin any application to or unpin it from the Start Menu and/or the Task Bar. |
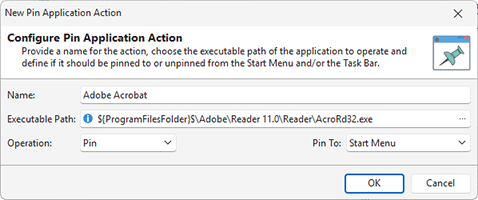
If you would like to pin any application to or unpin it from the Start Menu and/or the Task Bar, you can use the Pin Application action. To create such an action, choose the New Pin Application Action in the Custom Actions view pop-up menu from the System Actions part. Alternatively, you can use the Pin Application Action option within the Custom Action button from the New group on the Project Ribbon page and the Pin Application Action button on the Custom Actions contextual Ribbon page. The New Pin Application Action dialog will appear on the screen in any case Pic 4.
For each action, you should define its name, the application to operate, whether the application should be pinned or unpinned, and if the operation should be performed for the Start Menu, the Task Bar or both.
Editing, Deleting and Transferring Actions
The custom actions can be changed, deleted and transferred between projects. The corresponding actions are available in pop-up menu or on the contextual Custom Actions Ribbon page.
|
Edit The Edit button from the Management group on the contextual Custom Actions Ribbon page should be used to change the selected action configuration. |
|
Delete The Delete button from the Management group on the contextual Custom Actions Ribbon page allows you to delete the selected actions from the selected project. |
|
Copy To The Copy To button from the Management group on the contextual Custom Actions Ribbon page should be used to copy the selected actions to another project. |
|
Move To The Move To button from the Management group on the contextual Custom Actions Ribbon page allows you to move the selected actions to another project. |
To change the action, select it and either double-click, or choose the Edit item in pop-up menu or on the contextual Custom Actions contextual Ribbon page. While editing an action, you can define the same scope of properties as during its creation. To delete the action from the project, select it and choose the Delete item in the pop-up menu or on the contextual Custom Actions contextual Ribbon page.
If the project contains some custom actions that you don’t want to include into the generated package, you can use the context menu option Exclude from Build. Excluded resources are displayed in the project using the faded icons. Use the context menu option Include in Build for excluded resource to add them into the generated package. The Exclude from Build option allows you to make experiments with the set of resources included into the resulted package with no deleting resources from the project.
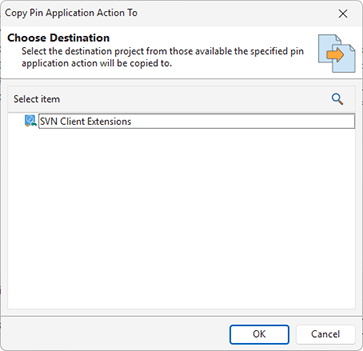
The well-known drag/drop and copy/paste techniques are fully supported for copying and moving custom actions between projects. You can also use the Copy To and Move To buttons from the Management group on the contextual Custom Actions contextual Ribbon page to transfer the selected actions to a different project. While using these buttons, you are suggested to select a project from those available in a dialog and confirm your selection Pic 5.
Now you are introduced to the custom actions concept and the abilities the custom actions provide you with, thus you should be able to use this feature of MSI Package Builder to resolve appropriate tasks.


