Printers Deployment
MSI Package Builder comes with an option of performing changes to the printing system configuration. It is possible to create, delete and modify printers; install and uninstall printer drivers; create and delete print processors and monitors; create, modify and delete printer ports, both local and TCP/IP. All those actions will be performed within the scope of the generated MSI package installation if defined in the project.
MSIX/AppX packages do not support configuring the printing system during deployment, so, when generated, those changes are included into MSI deployment packages only.
The set of changes to the printing system described in the project is displayed in the Printers view when the Printers node is selected in the Projects view. The changes performed during the monitoring process are automatically added to the printing system configuration actions. Let us take a closer look at the possible types of actions.
|
Printer Entries The Printer Entries drop-down button from the New group on the Project Ribbon page can be used to create modifications to the printing system to be performed by the resulting MSI package |
|
Printer The Printer button from the New group on the Printers contextual Ribbon page should be used to add a new deployment action for creating, modifying or deleting a printer during the package deployment. |
|
Printer Driver The Printer Driver button from the New group on the Printers contextual Ribbon page should be used to add a new deployment action for installing or removing a printer driver during the package deployment. |
|
Print Processor The Print Processor button from the New group on the Printers contextual Ribbon page should be used to add a new deployment action for adding or removing a print processor during the package deployment. |
|
Print Monitor The Print Monitor button from the New group on the Printers contextual Ribbon page should be used to add a new deployment action for adding or removing a print monitor (either a language monitor or a port monitor) during the package deployment. |
|
Printer Port The Printer Port button from the New group on the Printers contextual Ribbon page should be used to add a new deployment action for creating, modifying or deleting a printer port during the package deployment. |
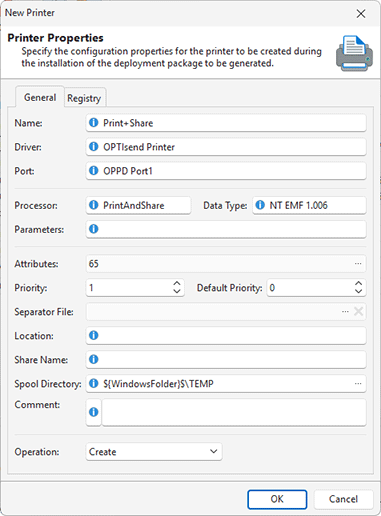
Let us start with adding a printer deployment action. As it has already been mentioned, it is possible to create, modify and delete printers during a package deployment. To add a printer deployment action, you should use the Printer item either from the Printers view pop-up menu or from the New group on the Printers contextual Ribbon page. Alternatively you can use the Printer Entries drop-down button located on the Project Ribbon page in the New group. The New Printer dialog will appear on the screen to let you configure the required deployment action Pic 1.
The common printer deployment action configuration is represented on the General tab of the dialog. If you would like the resulting MSI package to delete one of the existing printers, you should choose the Delete value in the Operation drop-down list and provide the name of the printer to be deleted to the Name field. For creation and modification of printers, there is a set of other fields to be specified beside the name. Along with the name, it is required to choose a driver to be used by the printer device and a port for the printer to reside on in the Driver and Port fields respectively. Two more required fields are Processor and Data Type. The Processor field should contain the processor to be used by the printer. The processor modifies the job as required for it to be printed properly. We will take a closer look at print processors later in this section of the documentation. The processor parameters can be provided to the Parameters field. The bitwise attributes mask can be specified by means of an easy-to-use editor using the ellipses button of the Attributes field. The current and default priorities of printers are specified in the Priority and Default Priority fields respectively. The page separator file is chosen from those already available in the project using the ellipses button of the Separator field. You can also specify the printer location, the share name, the custom spooler directory and a comment for the printer in the corresponding fields of this dialog.
On the Registry tab of the configuration dialog it is possible to configure the changes applied to printer-specific sections of Windows registry while creating or modifying the printer during the MSI package deployment process.
If you want to make a specific printer as default after installing it, you can select it in the modifications list and choose the Set as Default Printer item from the Printers view pop-up menu.
The next printer system layer available for configuration is the printer drivers. Printer drivers contain information specific to the printer begin used. Printer drivers reside on user's computers and are used by the GDI to render print jobs. A printer driver is a software program that understands how to communicate with printers and plotters. Printer drivers translate information a user sends from his/her computer into commands that a printer understands. A printer driver sends printer-setting data, including the specifications needed to produce each character of the document, to the GDI. It also transmits helper services or utilities required to make the output print correctly. Each printer driver consists of the driver binary, data type and configuration files, an optional help file and dependent files. MSI Package Builder allows you to install and/or uninstall printer drivers during the resulting package deployment.
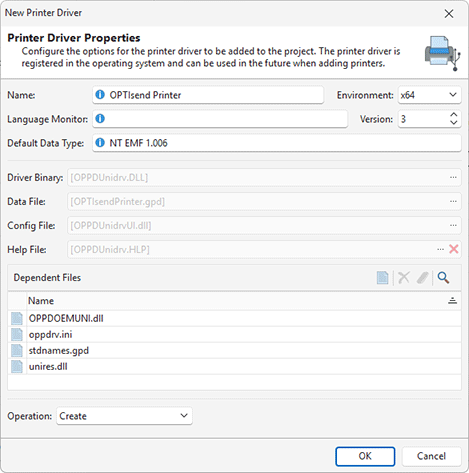
To add a deployment action to be performed for a printer driver, you should use the Printer Driver item either from the Printers view pop-up menu or from the New group on the Printers contextual Ribbon page. Alternatively you can use the Printer Entries drop-down button located on the Project Ribbon page in the New group. The New Printer Driver dialog will appear on the screen to let you configure the required deployment action Pic 2.
The Name and Environment fields are used to provide a driver name and specify the target environment. These fields must be filled for both Create and Delete operations. As for the Create operation, you should also define the print monitor for the driver, the driver version, the default data type and driver files as described above.
MSI Package Builder allows you to manage print processors when deploying the resulting package. Print processors are user-mode DLLs that are responsible for converting a print job's spooled data into a format that can be sent to a print monitor. They are also responsible for handling application requests to pause, resume and cancel print jobs. You can add and delete print processors during a package deployment.
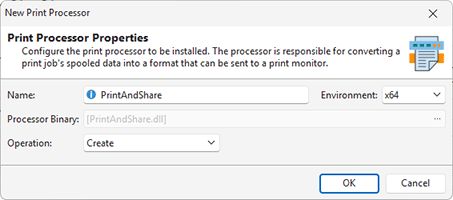
To add a print processor to be managed during a package deployment, you should use the Print Processor item either from the Printers view pop-up menu or from the New group on the Printers contextual Ribbon page. Alternatively you can use the Printer Entries drop-down button located on the Project Ribbon page in the New group. The New Print Processor dialog will appear on the screen to let you configure the required deployment action Pic 3.
Within the dialog, you can define a name for the print processor to be managed and the target environment. If you are going to create a processor, it is also required to provide a path to the processing library in the Processor Binary field.
With MSI Package Builder, it is also possible to manage print monitors. Print monitors are responsible for directing a print data stream from the print spooler to an appropriate port driver. Two types of print monitors are defined: language monitors and port monitors. Both can be created or deleted with a package generated with MSI Package Builder.
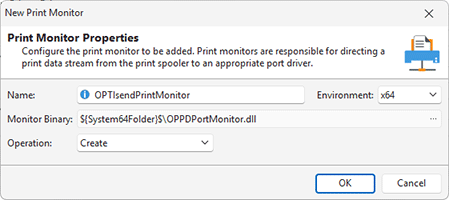
To add a print monitor entry, you should use the Print Monitor item either from the Printers view pop-up menu or from the New group on the Printers contextual Ribbon page. Alternatively you can use the Printer Entries drop-down button located on the Project Ribbon page in the New group. The New Print Monitor dialog will appear on the screen to let you configure the required deployment action Pic 4.
When adding a print monitor, you should define its name, the environment to be affected and the operation to perform over this monitor. For the monitors being installed, you should also choose the monitor binary from the file available in the configured project.
The last layer available for management with a package generated via MSI Package Builder is the printer ports. There are two types of ports, namely local and TCP/IP. Packages generated with MSI Package Builder can create and delete both local and TCP/IP printer ports as well as modify TCP/IP ports.
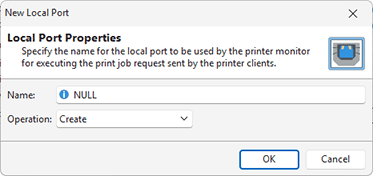
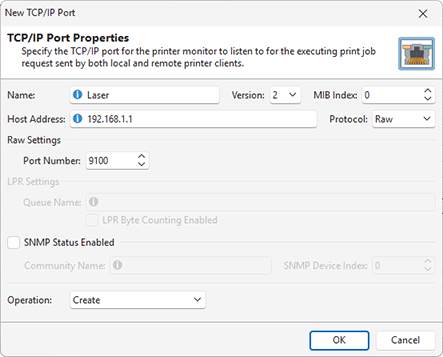
To add a printer port operation, you should use the Printer Port item either from the Printers view pop-up menu or from the New group on the Printers contextual Ribbon page. Alternatively you can use the Printer Entries drop-down button located on the Project Ribbon page in the New group. A dialog will be displayed for choosing the port type, and as soon as it is chosen, you will get to either the New Local Port dialog Pic 5 or the New TCP/IP Port dialog Pic 6.
When adding a modification to local ports, you should simply provide the local port name to the Name field and specify the operation to be performed with this port (either Create or Delete) in the Operation drop-down.
The TCP/IP ports configuration process is a bit more complex. You can choose if you would like to create, modify or delete the port being added using the Operation drop-down. For deleting a port, it is only required to provide its name. For both adding and modifying a port, you should also provide the port properties. Beside the name, the port is identified with its version, the MIB index and the host address. The values should be provided to the Version, MIB Index and Host Address fields respecrively. If the port is meant for raw bytes communication, then the Raw value should be selected in the Protocol drop-down list, and the port number should be specified in the Port Number field. In case the LPR protocol is used, the corresponding value should be selected in the Protocol drop-down, and the LPR queue name should be specified in the Queue Name field. In case the LPR byte counting is enabled for communication, the corresponding check box should be ticked. If the printer device residing on the port can report the SNMP status, the SNMP Status Enabled check should be ticked, and the required values should be provided to the Community Name and SNMP Device Index fields.
|
Edit The Edit button from the Management group on the Printers contextual Ribbon page should be used to change the selected printing system configuration action. |
|
Delete The Delete button from the Management group on the Printers contextual Ribbon page allows you to delete the selected printing system configuration actions from the selected project. |
|
Copy To The Copy To button from the Management group on the Printers contextual Ribbon page should be used to copy the selected printing system configuration actions to another location. |
|
Move To The Move To button from the Management group on the Printers contextual Ribbon page allows you to move the selected printing system configuration actions to another location. |
The printing system configuration actions can be changed, deleted and transferred to different location. To change the printing system configuration action, select it in the Printers view and double-click it. Alternatively you can either choose the Edit item in the pop-up menu or click the Edit button on the Printers contextual Ribbon page. While editing a printing system configuration action, it is possible to configure the same options as during its creation. To delete specific actions from the project, select them and choose the Delete item from the pop-up menu or click the Delete button on the Printers contextual Ribbon page.
If the project contains some printers that you don’t want to include into the generated package, you can use the context menu option Exclude from Build. Excluded resources are displayed in the project using the faded icons. Use the context menu option Include in Build for excluded resource to add them into the generated package. The Exclude from Build option allows you to make experiments with the set of resources included into the resulted package with no deleting resources from the project.
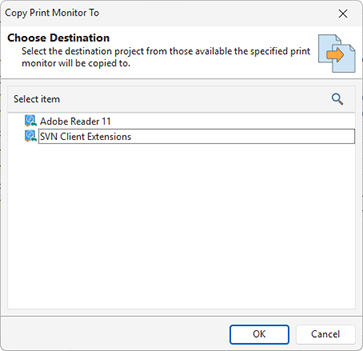
The well-known drag/drop and copy/paste techniques are fully supported for copying and moving printing system management actions between projects. Also you can use the Copy To and Move To buttons from the Management group on the Printers contextual Ribbon page to transfer the selected printing system configuration actions to a different location. While using these buttons, you are suggested to select a target location in a dialog and confirm your selection Pic 7.
Now that you have been introduced to the features used for managing the printing system configuration actions with MSI Package Builder, you should be able to set up a printing system with the help of a generated MSI package without any difficulties.


