Registry Modifications
The registry modifications are the changes to be performed by a generated package during its deployment to the registry on a target PC. Those changes can include keys and values creation or deletion and values modification. The registry modifications are displayed in the Registry view when the Registry node of a project is selected in the Projects view. The changes performed during the monitoring process are added to the registry modifications automatically. Let us take a close look at configuring registry modifications.
|
Root Key The Root Key button from the New group on the Project Ribbon page and on the contextual Registry Ribbon page should be used to add a new root key to the currently configured project. |
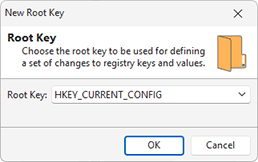
Each registry modification is defined with a full path of the resource, so to add a value you should also define the complete key path. Each path is routed with a root registry key, also known as a registry hive. To add a new root key, you should either choose the New Root Key item from the pop-up menu, or click the Root Key button from the New group on the regular Project and contextual Registry Ribbon pages. Within the New Root Key dialog, you are suggested to choose a registry hive Pic 1.
As soon as the root key is added, you can define modifications to keys and values in this key.
|
Key The Key button from the New group on the contextual Registry Ribbon page should be used to create a new registry key modification within the selected registry key. |
|
Value The Value drop-down button from the New group on the contextual Registry Ribbon page should be used to create a new registry value modification within the selected registry key. |
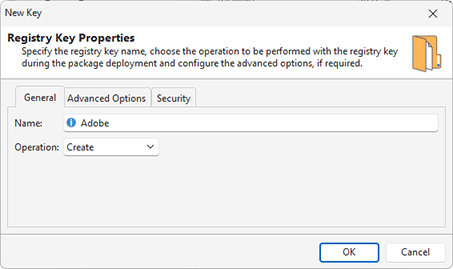
MSI Package Builder allows you to define which registry keys and values should be created, modified or deleted during a deployment package installation. To add a new registry key modification, select the root key or key to add modification to, and either choose the New > Key item from the pop-up menu, or press the Key button from the New group on the contextual Registry Ribbon page. The New Key dialog will appear on the screen to configure the registry key modification Pic 2.
While configuring a registry key modification, you should specify a key name and an operation to be performed over this key during a deployment package installation. You can choose between the Create, Modify and Delete operations.
While specifying registry modifications you can provide a path to the Name field, and the missing path elements will be created in the registry modifications automatically.
The Name field supports the property definition placeholders, so you can use the standard MSI properties while specifying the arguments. See the Property Definition Placeholders section of this document for the list of available placeholders.
It is also possible to specify if the registry key should be treated as persistent, thus not removed during a deployment package uninstall process, on the Advanced Options tab. On the Security tab, you can specify the permissions to be explicitly assigned to this key.
The advanced options are provided for the experienced users. Please do not modify these options until you are positively sure that this modification is required for the correct package deployment.
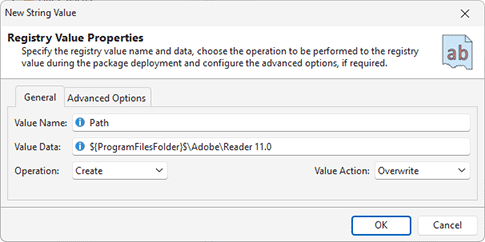
To add a new registry value modification, select the key you want to add modification to and choose the appropriate value type from the New item in the pop-up menu or from the drop-down of the Value button from the New group on the contextual Registry Ribbon page. The New Value dialog will appear on the screen Pic 3. This dialog is almost the same for all value types; it differs only with a value data editor.
While configuring a registry value modification, you should specify a value name and an operation to be performed over this value during a package deployment. You can choose between Create, Modify and Delete operations. For the value creation and modification, you can define a data to be written to this value. For the string, expandable string and multi-string values, in case if the value already exists, you can choose if it should be overridden by the specified data or the specified data should be appended/prepended to the existing.
To define a modification to a default registry value, you can select it and choose the Edit item from the pop-up menu. If you want to edit it as a type, different from REG_SZ, you should use the Change Type item from the pop-up menu.
It is also possible to specify if the registry value should be treated as persistent, thus not removed during a deployment package uninstall process, within the Advanced Options group.
The advanced options are provided for experienced users. Please do not modify these options until you are positively sure that this modification is required for the correct package deployment.
The Value Name and Value Data fields support the property definition placeholders, so you can use the standard MSI properties while specifying the arguments. See the Property Definition Placeholders section of this document for the list of available placeholders.
|
Edit The Edit button from the Management group on the contextual Registry Ribbon page should be used to change the selected registry modification. |
|
Delete The Delete button from the Management group on the contextual Registry Ribbon page allows you to delete the selected registry modification from the selected project. |
|
Copy To The Copy To button from the Management group on the contextual Registry Ribbon page should be used to copy the selected registry modifications to another location. |
|
Move To The Move To button from the Management group on the contextual Registry Ribbon page allows you to move the selected registry modifications to another location. |
The registry modifications can be changed, deleted and transferred to different location. To change the modification, select it in the Registry view and either choose the Edit item in the pop-up menu or click the Edit button on the contextual Registry Ribbon page. While editing a registry modification, it is possible to configure the same options as during its creation. To delete specific modifications from the project, select them and choose the Delete item from the pop-up menu or click the Delete button on the contextual Registry Ribbon page.
If the project contains some registry entries that you don’t want to include into the generated package, you can use the context menu option Exclude from Build. Excluded resources are displayed in the project using the faded icons. Use the context menu option Include in Build for excluded resource to add them into the generated package. The Exclude from Build option allows you to make experiments with the set of resources included into the resulted package with no deleting resources from the project.
The well-known drag/drop and copy/paste techniques are fully supported for copying and moving registry modifications within a single project and between projects. You can also use the Copy To and Move To buttons from the Management group on the contextual Registry Ribbon page to transfer the selected registry modifications to a different location. While using these buttons, you are suggested to select a target location in a dialog and confirm your selection Pic 4.
When a registry key is transferred to another location, all keys and values within the key are transferred as well. Also all keys and values within a registry key are deleted irreparably when a registry key is deleted, so be careful while transferring and deleting registry keys.
Importing Changes from Registration Entries (.reg) File
MSI Package Builder allows you to ease the registry modifications definition by using an ability of importing changes from a registration entries (.reg) file. To perform import, you can choose the Import item from the pop-up menu. Alternatively, you can use the Registry button from the Import groups on the regular Project and contextual Registry Ribbon pages.
|
Registry The Registry button from the Import group on the regular Project and contextual Registry Ribbon pages allows you to add the changes defined in the specific registration entries (.reg) file to the selected project. |
While importing changes, you are suggested to provide the path to the file to use as a definition for the changes to be included into a project.
Now you are introduced to the features used to manage the registry modifications with MSI Package Builder and should be able to define the modifications to be included into a deployment package without any misunderstanding.


