Projects Management
MSI Package Builder is a project based program, so a project is a main structure unit. Manage your projects from the Projects view, accessible by clicking the Projects button on the navigation bar on the left side of the main screen or by selecting the Projects button on the View tab of the Ribbon. While repackaging installations the required projects are created automatically, but it is also possible to create projects manually to be used for generating deployment packages. The projects that are not currently in use are closed, thus are not available in the Projects tree. On each program start up, all projects are closed, and then you can open any project from those available to start working with it. Let us take a closer look on the projects management process, including creating, renaming, closing, opening and deleting projects.
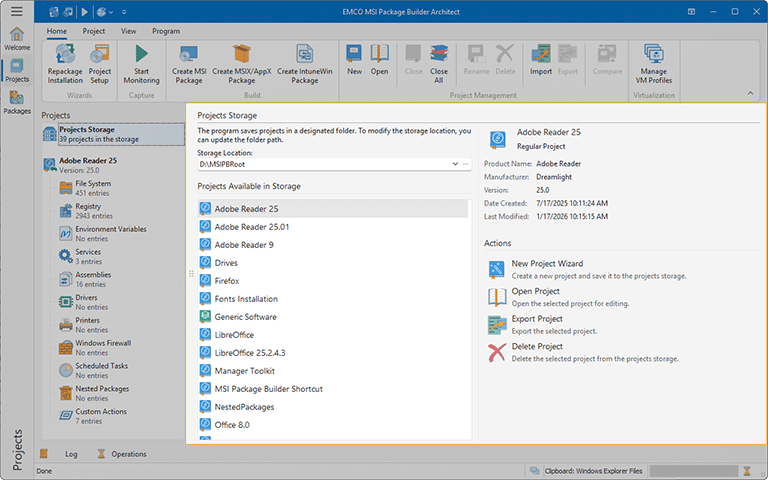
MSI Package Builder saves all projects within a designated projects storage folder on the file system. Each project is contained within its own sub-folder, which includes all the necessary components, such as file system changes, registry changes, drivers, and other contents required to generate an output package. You can administer the contents of the project storage from the Projects view. This view features the Projects tree and contains the Projects Storage node - select this node to manage the storage Pic 1.
Selecting the Projects Storage node in the Projects tree displays the contents of the project storage on the right side of the screen. Here, the path to the project storage folder is shown, with the default folder pre-selected. You have the flexibility to manage multiple storage folders and switch between them as needed. To introduce a new storage folder, click the  button and define the new storage path. To alternate between existing folders, click the
  button.
Please be aware that extensive installations may encompass thousands of files and consequently necessitate adequate disk space for storing installation changes. A chart on the right side of the screen visualizes the free and used space on your disk, enabling you to ascertain the available free space for your projects.
Projects Storage displays a list of projects within the selected storage folder, allowing you to locate and either open a project for editing or delete it if necessary. Double-clicking a project will open it for editing in the Projects tree. Upon selection, a project's key details are shown, including product name, manufacturer, version, and the dates of creation and last modification. The available actions enable you to open or delete the selected project, export it as a file or to initiate the creation of a new project.
Main Project Actions
To manage projects in storage, use the actions available when the Projects Storage node is selected in the Projects tree. These actions include creating, opening, or deleting a project. While these options are accessible in the Projects view, you can also manage projects from any screen using the Home tab on the Ribbon. Actions such as the Project Setup button and those in the Project Management group offer additional project management capabilities, detailed below.
|
Project Setup The Project Setup button from the Wizards group on the Home Ribbon page opens the project setup wizard, that can be used as an entry point both for managing MSI Package Builder projects and creating deployment packages on the basis of those projects. |
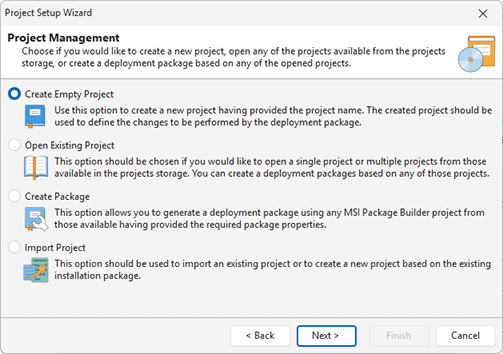
To make it easier to create new projects (both empty and bases on an existing deployment packages), open existing projects, and create a deployment package based on an opened project we have designed a Project Setup Wizard Pic 2. To open this wizard, just press the Project Setup button from the Wizards group on the Home Ribbon page.
The first page of the wizard is used to introduce its abilities to you, and on the next page you are able to choose the action you would like to perform. It is possible to choose between the following options: Create Empty Project, Open Existing Projects, Create Package and Import Package.
The Create Empty Project option allows you to create a new project with empty content. When you select this option, you must choose whether you want to create a project for a regular installation or a wrapped package. This selection will result in the creation of a project with corresponding sections and empty content. You can use this option if you intend to configure a project manually.
The Open Existing Projects option allows you to open a project for editing. After selecting this option, you should choose one or multiple projects from the project storage to add them to the Projects tree.
The Create Package option allows you to generate a deployment package using any project from those currently opened. For detailed information on the MSI package creation, refer to the Creating an MSI Package section of this document, for the MSIX/AppX packages creation process, refer the Creating an MSIX/AppX Package section.
The Import Package option should be used if you would like to create a new project, containing all the changes to be performed by an existing deployment package created with MSI Package Builder. This can be useful, if you need to change the package you have generated earlier but the original project is no longer available. Detailed information on the package import is available in the Importing Package section of this document.
Instead of using the wizard, you can use one of the actions available in the Project Management group on the Home tab of the Ribbon. These actions allow you to perform operations by selecting the required action on the Ribbon.
|
New The New button from the Project Management group on the Home Ribbon page should be used to create a new project. |
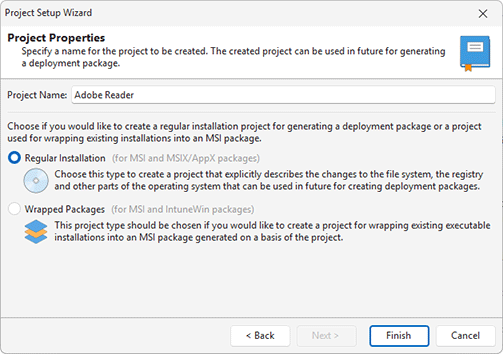
The New Project dialog will appear on the screen Pic 3. The same pane is also displayed if you choose the Create Empty Project option in the Project Setup Wizard or choosing the corresponding option on the Welcome view.
You are suggested to specify a name for the project to be created and the project type. You should pay enough attention to a project name; it will help you to identify the project in future. As for the project type, you are suggested to choose between the regular repackaging project and the project for wrapping existing installations into a single MSI package.
|
Open The Open button from the Project Management group on the Home Ribbon page allows you to open projects available in the projects storage. |
When you close MSI Package Builder all the projects you were working with are automatically closed too. It is also possible to close projects manually – this will be described further. If you want to continue working with those projects that were closed, you should open them again.
The links to the projects you have used recently are available in the Application Menu and in the Recent Projects group of the Welcome View. To open any of those projects, simply click on a link.
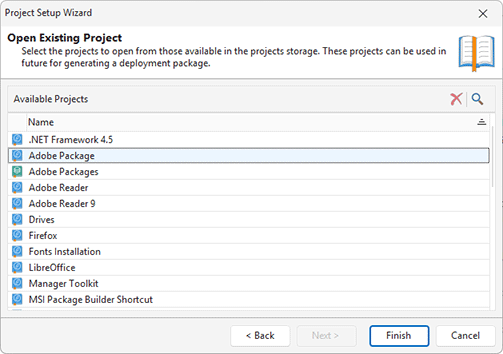
To open projects, choose the Open Project item from the Projects view pop-up menu or press the Open button from the Project Management group on the Home Ribbon page. Alternatively, you can click the Open Project link in the Recent Projects group on the Welcome View. The Open Project dialog will appear on the screen Pic 4. The same pane is also displayed if you choose the Open Existing Projects option in the Project Setup wizard.
You can select both single and multiple projects in the Available Projects table to be opened at the same time. It is also possible to delete a project from the projects storage, if it is no longer needed by using the Delete Projects button from the toolbar.
|
Close The Close button from the Project Management group on the Home Ribbon page should be used to close the selected projects, thus remove them from the Projects view. |
|
Close All The Close All button from the Project Management group on the Home ribbon page allows you to close all currently opened projects, thus remove them from the Projects view. |
MSI Package Builder provides you with an ability of always keeping the Projects view in an actual state. You can always close the projects you are not going to work with right now and they will be removed from the view, but they still exist so you can reopen any of them to continue working with them anytime you want. To close the project select it in the Projects view and choose the Close item from the pop-up menu, or press the Close button from the Project Management group on the Home ribbon page. It is also possible to close all the currently opened projects at once using the Close All button.
|
Rename The Rename button from the Project Management group on the Home Ribbon page should be used to provide a new name for the selected project. |
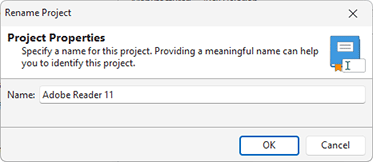
You can face a situation when the name you have given to a project is no longer actual or you have mistakenly provided a wrong name during the project creation. It is not a problem – with MSI Package Builder you can rename the project easily any time you want. Just double click the project, or select it and press the Rename button from the Project Management group on the Home Ribbon page. The Rename Project dialog will appear on the screen, where you can provide a new name for the project Pic 5.
The important limitation for a project name is that it must be unique. Thus, it is not possible to rename the project, if the project with the same name as specified already exists (even if it is now closed).
|
Delete The Delete button from the Project Management group on the Home Ribbon page allows you to delete the selected projects from the projects storage. |
The projects created in MSI Package Builder can require much space on the hard drive, but it is always possible to delete the project from the storage if it is no longer needed. To delete the project select it in the Projects view and choose the Delete item from the pop-up menu or press the Delete button from the Project Management group on the Home Ribbon page.
After you have deleted a project it is not possible to restore it any more. Make sure that the project is no longer needed before deleting it.
Now you are introduced to the project management features and should be able to organize your MSI Package Builder projects the way that will fit your needs best.
