Wrapping Existing Installations
One of the methods of installations repackaging supported by MSI Package Builder is wrapping existing installations into a generated MSI or IntuneWin packages.
Installation wrapping is available in the Enterprise and Architect editions of the program. The Architect edition supports creating both MSI and IntuneWin wrap packages, while the Enterprise edition supports MSI packages only.
To create a wrap package you need to specify wrapped installations and configure them for silent deployment, so they will be installed automatically when you install the generated package. You can also configure uninstall and repair options for wrapped installations if you want to uninstall and repair them when you uninstall and repair the wrap package.
To use wrapping you need to create a project with wrapped packages and configure those packages. Each wrapped package in the project corresponds to an installation you need to wrap. The wrapped packages are defined on a project level and displayed in the Wrapped Packages view when the Wrapped Packages node of a project is selected in the Projects view.
|
Wrapped Package The Wrapped Package button from the New group on the Project Ribbon page and on the contextual Wrapped Packages Ribbon page should be used to create a new wrapped package and add it to the selected project. |
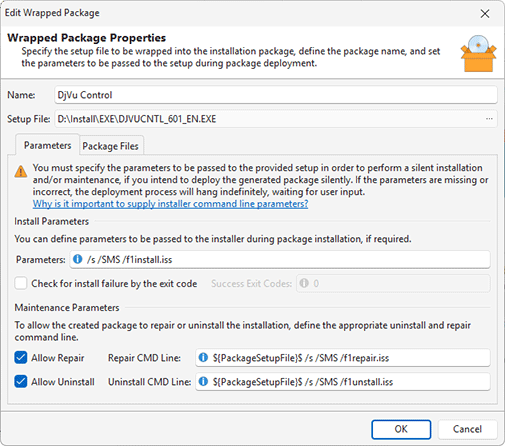
If the project was created in a scope of the Repackage Installation wizard, the packages defined during repackaging are automatically added to the project. You can also add any number of wrapped packages to any project manually. To add a new wrapped package, choose the New Wrapped Package item from the Wrapped Package view pop-up menu. Alternatively, you can choose the Wrapped Package button from the New group on the Project Ribbon page and on the contextual Wrapped Packages Ribbon page. The browse dialog will be displayed to let you choose the installation package to be wrapped. As soon as the installation is chosen, you are suggested to configure the package Pic 1.
While configuring a package, you should provide a package name – this name is also used as the installation package name while deploying a generated package. If additional files are required to install a wrapped package, they should be added to the Additional Files table, using the Add File and Add Folder buttons on the toolbar. You can add only files and folders that are located in the same folder as the setup file. In case the additional parameters are required to be passed to the installer during a generated package installation, they should be provided to the Parameters field within the Install Parameters group. A wrapped installation has to be deployed silently. Usually an installation deploys silently when running with parameters activating silent deployment, so you have to specify these parameters in the Parameters field.
It is possible to use the property definition placeholders when configuring both the installer parameters and maintenance parameters. See the Property Definition Placeholders section of this document for the list of available placeholders. Together with the common properties, you can also use the ${PackageSetupFile}$ and the ${PackageSetupDir}$ placeholders. The ${PackageSetupFile}$ placeholder stands for the path to the setup file during the package deployment and the ${PackageSetupDir}$ is replaced with the path to the setup file location.
In some cases you need to check the results of wrapped package deployment to revert wrap package deployment if a wrapped installation fails to install. You can use the Check for install failure by the exit code option to check results of the wrapped packages deployment. You can enable this option and specify exit codes for a wrapped package. If during the wrap package installation this wrapped installation exits with different exit codes than specified, an installation failure is detected for the wrap package. In this case already deployed wrapped packages are uninstalled, if their uninstallation settings are specified, and the wrap package entry isn’t created.
To be able to repair and uninstall this wrapped package, you should enable the Allow Repair and Allow Uninstall options within the Maintenance Parameters group. In case if the wrapped package is an MSI, you can define the Windows installer parameters used for uninstall and repair, if required. Otherwise, if the wrapped package is an executable installer, you should define a command line to be executed to uninstall and/or repair the package.
|
Move Up The Move Up button from the Order group on the contextual Wrapped Packages ribbon page should be used to move the selected packages up the deployment order. |
|
Move Down The Move Down button from the Order group on the contextual Wrapped Packages ribbon page should be used to move the selected packages down the deployment order. |
By default, the wrapped packages deployment order is the same as the addition order, but you can reorder the packages using the Move Up and Move Down items from the pop-up menu or the Order group on the contextual Wrapped Packages Ribbon page. Please take into account, that the install, repair and uninstall order for the wrapped packages is the same.
|
Edit The Edit button from the Management group on the contextual Wrapped Packages Ribbon page should be used to change the selected wrapped package configuration. |
|
Delete The Delete button from the Management group on the contextual Wrapped Packages Ribbon page allows you to delete the selected wrapped packages from the selected project. |
|
Copy To The Copy To button from the Management group on the contextual Wrapped Packages Ribbon page should be used to copy the selected wrapped packages to another project. |
|
Move To The Move To button from the Management group on the contextual Wrapped Packages Ribbon page allows you to move the selected wrapped packages to another project. |
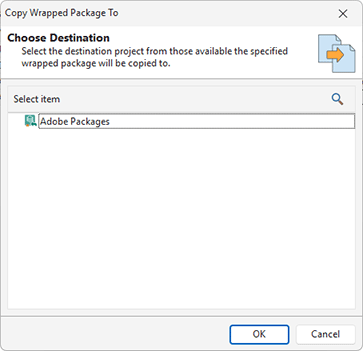
The wrapped packages can be changed, deleted and transferred between projects. To change the wrapped package, select it and either double-click, or choose the Edit item in pop-up menu or on the contextual Wrapped Packages Ribbon page. While editing a wrapped package, you can define the same scope of properties as during its creation. To delete the wrapped from the project, select it and choose the Delete item in the pop-up menu or on the contextual Wrapped Packages Ribbon page. The well-known drag/drop and copy/paste techniques are fully supported for copying and moving wrapped packages between projects. You can also use the Copy To and Move To buttons from the Management group on the contextual Wrapped Packages Ribbon page to transfer the selected wrapped packages to a different project. While using these buttons, you are suggested to select a project from those available in a dialog and confirm your selection Pic 2.
As you can see, the process of wrapping existing installations is fast and easy, but if you are going to deploy the generated package in a silent mode, you should pay a special attention to the parameters passed to the wrapped package installer.
Why is it important to supply installer command line parameters?
By default, most of the installation setup programs guide the end user through the setup wizard, thus the interaction with the user is required to complete the setup. So if you are going to deploy a generated package in a silent mode, it is required the wrapped installation is performed without any interaction with the user. If the package is configured incorrectly, the deployment process may pause to wait for user input, and if there is no user during the remote deployment process, it will hang indefinitely. Installation setup programs mostly support silent execution, but the execution parameters may vary depending on the installation vendor.
Now let us take a look at the importance of an answer file. In some cases, the installer simply does not provide a default installation sequence without any user input, so a silent deployment without any additional configuration is impossible. Such installers commonly provide a technique for recoding an answer file to perform the deployment saving the user answers to that file. Another example is setups that use the same command for uninstall and repair and simply ask you what you would like to do on the first step of the installation wizard. If you launch an uninstall using this command with a default scenario, the installation setup may simply perform a repair, and that is not what you are expecting. Therefore, the required answer files, if any, must be added to the wrapped package and used while specifying the installer command line parameters Pic 1.
As a conclusion, we should emphasize that providing the parameters to be passed to the installer setup and the answer file, if required, is always a must. You should contact the installation package vendor or should do Internet search to get the proper parameters to be passed to each executable installer setup.


