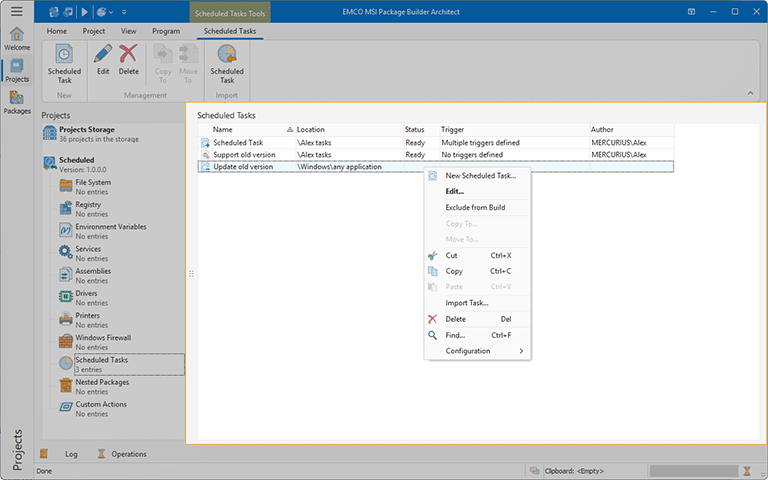
Scheduled Tasks View
The Scheduled Tasks view is displayed within the main program area when the Scheduled Tasks node of any project is selected in the Projects view. In the Scheduled Tasks view you can configure Windows scheduled tasks to be created or deleted on package installation or uninstallation Pic 1.
MSI Package Builder allows you to create and delete Windows scheduled tasks. When monitoring existing installations, the required changes are created automatically and added to the corresponding project representing the installation process. It is also possible to create the changes manually.
Configuring scheduled tasks during deployment is not supported by MSIX/AppX packages, so, when generated, those changes are included into the MSI deployment packages only.
The icon next to every item represented in the Scheduled Tasks view is used to describe of the item's type and state. The state icons are provided to help you understand what is currently happening in the program. You can always see if the item is being processed now by some operation or not, and if there are any processing problems.
Below is the list of type icons used:
|
- |
a scheduled task; |
|
- |
a scheduled task containing errors that should be resolved before creating a deployment package. |
The following overlays are used to represent the operation to be performed with each scheduled task:
|
- |
a scheduled task should be created; |
|
- |
a scheduled task should be modified; |
|
- |
a scheduled task should be deleted; |
|
- |
a scheduled task is excluded from the build. |
The actions for adding, editing and deleting the changes to Windows scheduled tasks as well as copying and moving those changes between projects are available in the Scheduled Tasks view pop-up menu and on the contextual Scheduled Tasks Ribbon page.
Functions Overview
Changes Management |
From the Scheduled Tasks view, you can create, edit and delete the modifications to be performed by a deployment package to the Windows scheduled tasks configuration. The New Scheduled Task item from the Scheduled Tasks view pop-up menu and the Scheduled Task button from the New group on the contextual Scheduled Tasks Ribbon page can be used to create a new modification to Windows scheduled tasks. It is possible to create a scheduled task together with the package deployment process or control any scheduled task when installing and/or uninstalling the deployment package. To change any scheduled task modification, you can use the Edit item from the pop-up menu or the Edit button from the Management group on the contextual Scheduled Tasks Ribbon page, and to delete the modification, use the Delete items. |
Copy/Move |
You can easily copy and/or move the modifications to be performed by a deployment package to the Windows scheduled tasks configuration from the Scheduled Tasks view. You can use the drag/drop and copy/paste techniques as well as the Cut, Copy and Paste menu items to reach the goal. It is also possible to use the Copy To and Move To items available both in the pop-up menu and on the contextual Scheduled Tasks Ribbon page to perform copy/move immediately choosing a target project in a dialog. |
Import |
If you have a Windows schedule task configuration as an XML file, you can import this configuration into the project. The import action is available in the Scheduled Tasks view. To import a task select the Import Task option in the context menu or use the Scheduled Task button from the Import group on the contextual Scheduled Tasks Ribbon page. |
Search |
Within the Scheduled Tasks view, you can execute a search for specific changes to the Windows scheduled tasks configuration performed by a deployment package using the Find item from the pop-up menu. |
For detailed information on the changes to Windows scheduled tasks that can be defined in a project, refer to the Scheduled Tasks Deployment section of this document.


