Managing and Configuring Hosts
At the first start of the program, you have an option to specify hosts that will be monitored by the program. After you have entered hosts, you can find them in the Hosts view located on the left of the main screen of the program. Using this view, you can see all the hosts added to the program and check if they are currently being monitored. In the Hosts view, you can add/delete hosts and manage their settings, so you need to open this view to add all the hosts that you plan to monitor.
Adding New Hosts
There are multiple ways for adding hosts to the program. You can use one of the following approaches depending on your needs:
- Add a single host. To add a single host you need to select New > Host in the context menu or on the toolbar of the Hosts view. In the dialog that appears, you can add a host by name or IP address. The program supports hosts with dynamic IP addresses: in this case, you need to enter the host name and turn on the option This host uses a dynamic IP address, so the program will resolve the host name to an IP address at every ping.
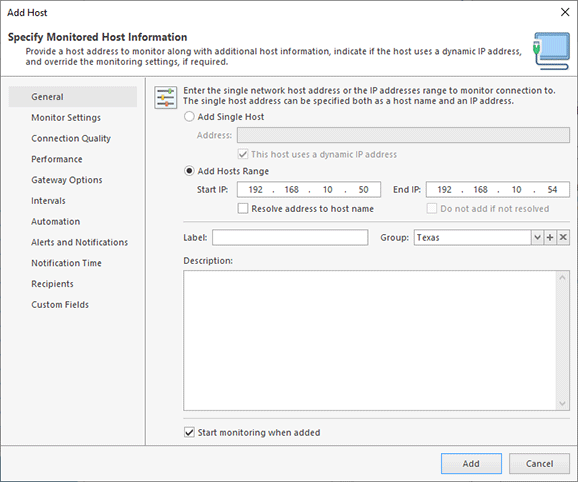
- Add multiple hosts by an IP range. This option can be used when you need to add multiple hosts at once and all of them are within the same IP range. To use this option, select New > Host in the context menu or on the toolbar of the Hosts view. You should add the start and end addresses of the IP range, and all IPs from this range will be added into the program Pic 1. By default, these hosts are added as IP addresses, but suppose you need to add them as host names. The program can resolve IPs and add them as host names if the option Resolve address to host name is turned on. There is also another useful option: Do not add if not resolved. When this option is enabled, the program skips the IPs of which cannot be resolved to host names.
- Import hosts from a file. This option is helpful when you have a list of hosts to be added into the program, and it isn't convenient to add them one-by-one or as an IP range. To use this option, select Import in the context menu of the Hosts view and follow the instructions available in the Importing and Exporting Hosts chapter.
Note that the program automatically starts monitoring the added hosts because the Start monitoring when added option is enabled by default in the Add Host dialog. Disable this option if you don't need to monitor the added hosts immediately.
If you need to add a list of hosts into the program, the easiest way to do so is to import them. Create a text file with the .csv extension and specify the host names or IPs in this file, where every line contains one host. Then select the Import option in the context menu of the Hosts view and follow the steps of the wizard that appears to import the created file.
Starting and Stopping Monitoring of the Hosts
When you add a host, the program starts monitoring it automatically. If you need to start or stop the hosts monitoring manually, you can do it in the Hosts view. To start or stop the monitoring, select the required host and choose the Start Monitoring or Stop Monitoring options in the context menu. The program also allows you to start/stop the monitoring of multiple hosts with a single click, for which you can select multiple hosts or groups and choose the corresponding context menu options.
The monitoring state is preserved even if you restart the computer running Ping Monitor server. The server works as a Windows service, so it runs on when you start the computer and can continue monitoring automatically. By default, the program preserves the same monitoring state of the hosts, so monitoring continues for the hosts that were monitored before the restart. If required, you can change that and configure the program to start or stop monitoring hosts regardless of their previous state, and set the hosts that should be monitored after the program restart. You can find these advanced options on the Automation page of the program preferences.
Deleting Hosts
To delete a host, you need to select it in the Hosts view and choose the Delete option in the context menu. It is possible to delete one or multiple hosts at once. Note that when you delete a host, all its collected statistics is deleted as well, and it isn't possible to restore it.
If the host deletion option is disabled, it means that it isn't possible to delete the host because it is currently being monitored. You need to stop monitoring the host to be able to delete it.
Configuring Host Settings
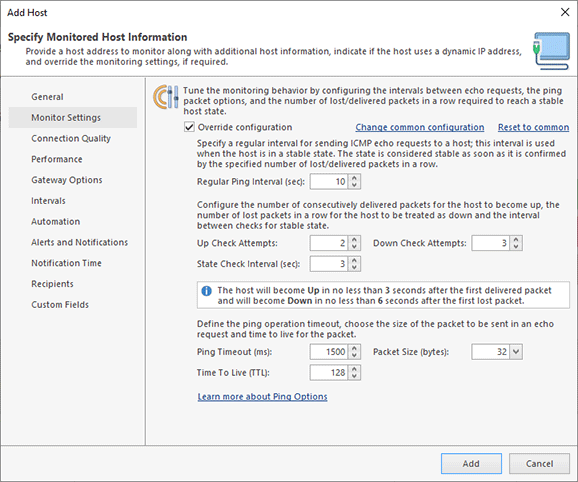
An addition to the name or IP address, every host can have various settings that allow customizing its monitoring options, notifications, performance estimation and other aspects. You can configure these settings when you add a host, or change them later by editing the host. On the left of the host configuring dialog, you can find the navigator, and on the right, you can apply the required changes Pic 2.
The Professional and Enterprise editions of the program allow overriding the common settings used for all hosts and specifying individual settings for a selected host. For example, by default, all hosts use the monitoring settings specified on the Monitor Settings page of the program preferences, but you can override them for some hosts, and use custom ping intervals and check attempts.
By specifying individual settings for hosts and groups, you can specify different e-mail notification recipients for different hosts and groups, so the program will send e-mails to the relevant recipients only.
Organizing Hosts in Groups
To organize hosts in the program, you can create groups and add the hosts into these groups. Why do you need to add hosts into groups? There are a few examples to consider:
- Using a group, you can start and stop monitoring all hosts in a group with a single click. If you have several different types of hosts that should be monitored differently, you can create several groups and add your hosts to those groups, so you can start and stop monitoring those groups independently.
- You can override the default monitoring and notification settings for multiple hosts at once by specifying custom settings for a group.
- When creating a report, you can configure it to include statistics for all the hosts in a group. Then you can update the hosts in the group, and the report will be updated automatically to provide statistics for the actual list of hosts in the group.
- For a group, you can see the total number of hosts with different state and quality characteristics.
To add hosts into a group, you need to create the group in the Hosts view and specify the hosts to be added into it.
Avoiding False Positive Outages Detection Using the Gateway Option
Let's analyze a typical situation: suppose you monitor a remote host located in the Internet, and pings to that host start failing, so the program reports an outage. An outage means that there is no connection between the computer where the Ping Monitor server is installed and the monitored host. Usually, there are two possible reasons for this problem. The first reason: the monitored host is down, so it isn't available for you and for other users. The second reason: you have lost the Internet connection, so the host isn't available only to you, but it is available to other users. By using a gateway in the program, you can distinguish between these cases.
In the program preferences, you can specify the gateway IP address to check and confirm the ping results. So, how does a gateway work in monitoring? If a ping to the host passes, the gateway check is skipped; but if the ping fails, the program pings the specified gateway. If the gateway ping passes, it means the problem lies with the monitored host, and the host ping is considered as failed. After the configured number of Down check attempts, the host state changes to Down if all the pings have failed. However, if the gateway ping fails together with the host ping, it means this isn't a host failure and a host outage isn't reported.
You can configure a common gateway to be used for all the hosts on the Gateway Options page of the program preferences. If required, you can override the common settings and specify an individual gateway in the host settings.
What host can be used as a gateway? From the technical point of view, you can use any host with a static IP address, because the program allows using an IP address only as the gateway. It makes sense to specify an always-on host located on the route between the monitoring server and the monitored host. Note that you can specify multiple IPs as gateways, if required.

